Table of Contents
Advertisement
Quick Links
Advertisement
Table of Contents

Summary of Contents for Neotone Mutant
- Page 1 Owners manual version 3.0...
-
Page 2: Table Of Contents
TABLE OF CONTENTS What is NEOTONE?..................3 Turning On and Off and the Charging of the Instrument......5 Quick and Useful Tips..................9 Tonefields and the Body of the Instrument..........10 Select a scale....................12 Connecting to a WiFi hotspot...............15 Login to Interface..................19 Using the Interface.................. -
Page 3: What Is Neotone
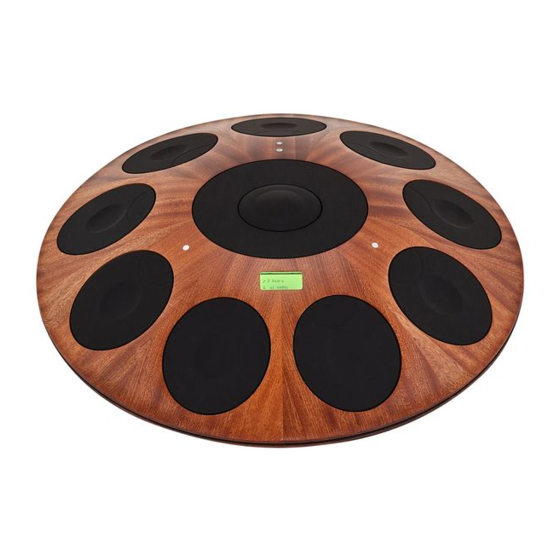
Instrument body The instrument’s body is made out of wood which thanks to NEOTONE’s unique touch-sensitive technology makes it possible to imitate the experience and the sounds of playing an acoustic handpan. Not only the tonefields but the instrument body itself is touch sensitive and can make a sound. - Page 4 Interface configure settings using online interface (https://digitalhandpan.com/setup/) of the instrument, using WiFi connection. The interface has many settings, for example adjusting the sensitivity / curve of the tonefields and the body, noise thresholds, configuring midi maps, assigning panel knobs / pedal jacks to any instrument setting. As well, the creation and editing of custom scales is only possible on the interface.
-
Page 5: Turning On And Off And The Charging Of The Instrument
POWER button for 2 seconds (the LED above the button lights up). In 10 seconds the NEOTONE¹ title, the serial number of the instrument and the version of the software will appear on the LCD screen. - Page 6 Turn off the digital handpan by holding down the POWER button for 2 seconds (The RED/GREEN light next to the POWER button will start blinking). The “SHUTTING DOWN” title will appear on the LCD screen. All together, the turning off procedure will approximately take 25 seconds.
- Page 7 Status information Music note icon: ● Normal note -> Normal scale ● Double note -> Mutant scale ● Circle -> Recording Selected scale: ● Name of the selected scale (and the optional pitch between -12 ... +12 tones) Battery level: ●...
- Page 8 Midi Set: ● Displays the chosen MIDI set in the MIDI menu point ● The number shows the MIDI SET’s selected number Tuner: ● Displays the frequency set in the SOUND menu point ● The number shows the set Hertz level of the frequency WiFi frequency: ●...
-
Page 9: Quick And Useful Tips
Quick and Useful Tips Hotkeys Select scale Hold DOME and a side tonefield simultaneously for 2 seconds Select midi set Hold DING and a side tonefield simultaneously for 2 seconds Upside down in its case The instrument is placed upside down on its case, grasping at the marked area. There is a soft ring inside the case to protect the upper side of the instrument. -
Page 10: Tonefields And The Body Of The Instrument
This is only the default configuration which can be changed on the interface. On NEOTONE¹ mutant models, each tonefield along the edge (from 1 to 9) of the instrument has an extra field on the upper half where extra sounds and notes can be added. - Page 11 Each scale that NEOTONE includes has more than 1300 unique recorded audio samples that gives you the closest experience to an acoustic instrument. Furthermore each hit mixes multiple samples, depending on its position and velocity, so practically every hit will sound slightly different.
- Page 12 Select a scale The instrument has a maximum of 9 scales to choose from. By pressing a side tonefield and the dome simultaneously the LCD screen will display the name of the scale assigned to that tonefield, and by holding down the pressure for an additional 2 seconds will start loading that scale.
- Page 13 Now the instrument is ready to play the selected scale. The double music note icon indicates that the loaded and used scale is a mutant scale. Every scale which has 11 notes or above counts as a mutant scale.
- Page 14 Status Icon LED light on the front of the instrument The Status Icon LED light shows the current status of the instrument. NO LIGHT The Instrument is switched off ORANGE Switching on / loading scale GREEN Ready to play GREEN FLASHING RED Ready to play, battery below 20% (~1.5 hours left) Recording...
-
Page 15: Connecting To A Wifi Hotspot
Connecting to a WiFi hotspot Connect the instrument to a WiFi hotspot You need to connect the instrument to a WiFi hotspot if you like to use the interface. You can do it by several ways: Connect to WiFi by WPS push button 1, Switch on the instrument by pressing the power button. - Page 16 Navigate to Settings > Wireless & networks >Tethering & portable hotspot > Portable Wi-Fi hotspot. Choose Configure Wi-Fi hotspot to set the name “Neotone”, and password “digitalhandpan”, then tap Save. iPhone ● Navigate General > About > Name, enter the name “Neotone” then tap Done.
- Page 17 ● Navigate Settings > Cellular > Personal Hotspot or Settings > Personal Hotspot, enable “Allow Others to Join”, Then set the Wi-Fi password to “digitalhandpan” ● older iOS versions: Navigate Settings > Personal Hotspot, and make sure the Personal Hotspot is on. Then set the Wi-Fi password to “digitalhandpan”...
- Page 18 WiFi. ● Make sure that “Maximize Compatibility” grid is turned on because this enables the mobile hotspot to share a 2,4GHz frequency connection. NEOTONE digital handpans prefer 2,4GHz frequency instead of the 5GHz.
-
Page 19: Login To Interface
Login to Interface The very first time to login 1, Just click on the link (digitalhandpan.com/setup) you receive in the registration email to log in the interface. 2, Select the HOTSPOT menu point. - Page 20 3, Set up a WiFi hotspot on your mobile phone and configure it using the default hotspot username and password. 4, Turn off the instrument then turn it back on, and wait for about 30 seconds. A GREEN indicator icon will appear which means the instrument is connected to the interface.
-
Page 21: Using The Interface
Using the Interface Status icon The interface always shows what status the instrument is in. When the circular icon is GREEN, it means the instrument is switched on and connected to the interface. When the circular icon is ORANGE, it means that the instrument is in power save mode (hit the dome to wake it up!). - Page 22 WiFi and Battery indicator The WiFi indicator shows the network’s strength. The Battery indicator shows the charge level of the battery when the instrument is turned on and connected to the WiFi. The battery bar is green if it is above 20%, and red if below 20% (~ 1.5 hours left).
-
Page 23: Hotspot Menu Point
HOTSPOT menu point This menu point has all the hotspot login information. The default hotspot helps you to connect to the interface for the very first time by using WiFi. You can also add another 2 hotspots. If there are more hotspots available at the same time, the instrument will automatically connect to a hotspot by the following order: >... -
Page 24: Scales Menu Point
SCALES menu point This menu point lists all the available scales you can select from. To select a scale, hold down the DOME and a tonefield simultaneously for 2 seconds. - Page 25 “add custom scale” link on the top of the SCALES menu point. The first step in assembling the notes of your custom scale. From the above note selection simply drag and drop the notes on the blueprint of the instrument, on the desired tonefields or mutant fields.
- Page 26 Once you are done with that, set the harmony of the scale! For the best results, try to find the source samples that fit together the most harmoniously! You can choose multiple source samples for each individual note. Each source sample brings different harmony to the final result, depending on its original scale characteristic (Minor/major, etc).
- Page 27 For example, on the following image you can see the source sample options for the G4 note of the Onoleo scale: In many cases, the harmony of the custom scale will not be perfect by choosing source samples at the current frequency. In such cases, feel free to choose a lower or a higher sample, the software automatically pitches the frequency to the connected note (in this case, G4).
- Page 28 HOTKEY editing When you are editing the hotkeys of the instrument you can set yourself an easy, offline way to swap between the scales of the instrument. When you are in the SCALES menu point simply select the HOTKEYS submenu on the top of the page to begin the editing of the hotkeys of the instrument.
-
Page 29: Record Menu Point
RECORD menu point At this menu point the management of the instrument’s recordings is possible. Hold down the DOME for 3 seconds to start or stop a recording. Once you have finished a recording, its track will appear on the list. (WiFi connection required). RECORDINGS Here you can manage your recordings. - Page 30 SETTINGS Start recording by dome Auto stop The recording stops after 10 seconds of inactivity or not hitting the instrument. MP3 compression Recording is automatically compressed to MP3 Recording is stored as WAV MP3 quality The bitrate can be set between 128 to 320 kbps...
-
Page 31: Sound Menu Point
SOUND menu point At this menu point the NEOTONE instrument’s sound qualities and preferences can be adjusted and customized. With each slider different sound qualities and details can be set and saved. Volume Adjust the master volume (0 - 200%) It may cause sound distortion if going above 100%.. - Page 32 Stereo environment Adjust the stereo width. 70% is ideal for headphones, 100% for loudspeakers. Sustain Adjust the sustain. Closed Sound Sensitivity Setting the closed sound sensitivity. 100% being the most sensitive, and closest to sounding like its acoustic instrument version. If setting the value lower, it will need stronger pressure on the tonefields to close a sound.
- Page 33 SENSORS menu point At this menu point the NEOTONE instrument’s sensitivity can be adjusted and customized. With each slider the sensitivity of the instrument sensors can be set and saved individually. HANDPAN You can adjust the sensitivity curves (dynamic characteristic) of tonefields and the body tones.
- Page 34 The foot pedal connectors work as an expression pedal mode by default. When the trigger pedal is turned on, the pedal connectors work as a kick trigger. THRESHOLD The default Noise threshold for the tonefields is 50%. It is recommended to increase this value if you use a handpan stand, or if you play strongly or hard on the body.
-
Page 35: Control Menu Point
CONTROL menu point At this menu point the NEOTONE instrument’s main technical features can be controlled. The main audio and MIDI inputs and outputs can be controlled here and as well, the instrument’s power saving through setting the shutdown time. - Page 36 Midi input enabled Enable midi input messages when it is switched on. Midi output enabled Enable midi output messages when it is switched on. Midi thru enabled Send input messages to the output when it is switched on. Midi thru filtered Filter midi output messages by channels (set instrument channels at MIDI menu) when it is switched on.
-
Page 37: Midi Menu Point
MIDI menu point This section has midi maps for configuring midi messages. In order to define midi maps you can click on SET 1 - 9. You can choose a midi set on the instrument by holding down the DING and tonefield #1 simultaneously for 2 seconds. For example, hold down the DING and tonefield #3 to select midi set 3. -
Page 38: Bottom Panel And Controls
Bottom panel and controls 1.) POWER Press the button to turn on the instrument Hold down for 3 seconds to turn off the instrument 2.) CHARGE Connect the DC 12V adapter to charge the battery 3.) PHONES Connect headphones (1/4“ TRS) 4.) VOLUME Adjust the headphones volume 5.) LINE OUT... -
Page 39: Included Accessories
Included Accessories ● Owner’s Manual ● DC 12V 24W adapter for charging ● Semi-hard case for carry Technical specifications ● Operational temperature: 0 - 40`C ● Weight: 3.7 kg if black walnut, 4.2kg if natural ash ● Dimensions: 47 cm diamater, 16 cm height ●... -
Page 40: Troubleshooting
Troubleshooting No sound at all Are headphones or a loudspeaker connected to the instrument? When the status icon light is ORANGE, the instrument loading or updating a scale. During this time sound is muted. When there is no light, the instrument is switched off. The instrument does not turn on The battery is exhausted, connect the charger.
Need help?
Do you have a question about the Mutant and is the answer not in the manual?
Questions and answers