Table of Contents
Advertisement
Quick Links
42580
SAWPK46
2 PACK 46" / 500 LB INDIVIDUAL CAPACITY
LIGHTWEIGHT ALUMINUM SAWHORSE KIT
WITH MULTI-POSITION MOUNTING BRACKETS
PRODUCT MANUAL
SCAN TO WATCH PRODUCT
ASSEMBLY VIDEO
CAUTION:
To reduce the risk of injury, user must read and understand
this product manual. Save these instructions for future reference.
P R O T OC OLE QU IPM EN T.CO M
Advertisement
Table of Contents

Subscribe to Our Youtube Channel
Summary of Contents for Protocol SAWPK46
- Page 1 42580 SAWPK46 2 PACK 46" / 500 LB INDIVIDUAL CAPACITY LIGHTWEIGHT ALUMINUM SAWHORSE KIT WITH MULTI-POSITION MOUNTING BRACKETS PRODUCT MANUAL SCAN TO WATCH PRODUCT ASSEMBLY VIDEO CAUTION: To reduce the risk of injury, user must read and understand this product manual. Save these instructions for future reference.
-
Page 3: Table Of Contents
TABLE OF CONTENTS Features and Specifcations ........................4 Preparing the Workstation........................5-6 Installing the Tool Holders / Handles ....................7-8 Attaching Slim Profle Tool Mounts to Your Miter Saw .............. 9-13 Mounting Miter Saw Assembly to the Stand................14-15 Removing Miter Saw Assembly from the Stand ................16 Transporting and Storing the Workstation.................. -
Page 4: Features And Specifcations
FEATURES AND SPECIFICATIONS 46" 46" 29" 24" SPECIFICATIONS INCLUDED FEATURES HEIGHT 29" 46" SAWHORSE WIDTH 46" Aluminum chassis DEPTH 24" High impact plastic top MAX WEIGHT CAPACITY 500 lb. EACH UNIT Tool holder / handle MATERIAL Aluminum, Steel, Nylon Folding legs with non-marring feet 46"... -
Page 5: Preparing The Workstation
PREPARING THE WORKSTATION Place workstation on a flat and level surface with folded legs facing up. Turn leg lock handle counterclockwise and unfold first set of legs from chassis. CROSS BRACE Deploy first set of legs. Make sure cross brace is secured in place to ensure legs are fully opened. - Page 6 PREPARING THE WORKSTATION After both sets of legs are deployed, lift workstation in an upright position. Ensure workstation is stable and both sets of legs are fully opened. FIND OUT MORE AT PROTOCOLEQUIPMENT.COM...
-
Page 7: Installing The Tool Holders / Handles
INSTALLING THE TOOL HOLDERS / HANDLES Tools Required: 4 mm hex key (not included) Tool Holder / Handle x 3 Counter Sunk Screw x 6 Locate holes at the bottom of the tool holder. Place one nylon nut underneath holder and align nut to hole. FIND OUT MORE AT PROTOCOLEQUIPMENT.COM... - Page 8 INSTALLING THE TOOL HOLDERS / HANDLES Find corresponding hole on chassis. Insert screw from interior side of chassis. Use a 4 mm hex key to attach tool holder to chassis. Repeat steps #2 through #5 to secure other end of tool holder. Repeat steps #1 through #6 to attach the remaining tool holders.
-
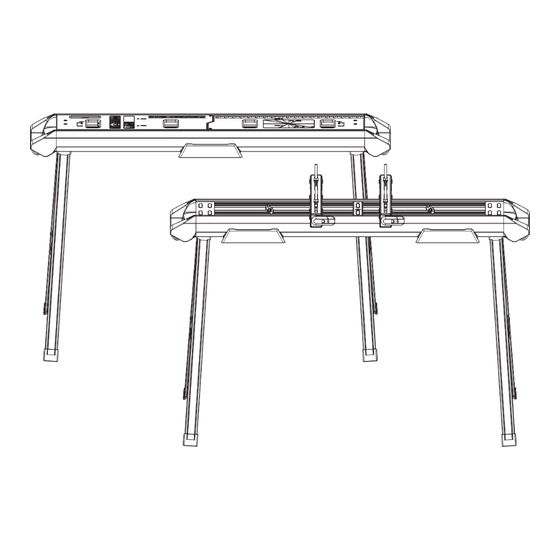
Page 9: Attaching Slim Profle Tool Mounts To Your Miter Saw
ATTACHING SLIM PROFILE TOOL MOUNTS TO YOUR MITER SAW Tools Required: 4 mm hex key (not included) Make sure your miter saw is unplugged and saw arm is locked in the down position. Place miter saw on a flat, stable surface. FIND OUT MORE AT PROTOCOLEQUIPMENT.COM... - Page 10 ATTACHING SLIM PROFILE TOOL MOUNTS TO YOUR MITER SAW 3RD HOLE 1ST HOLE FOR OVERHANG MOUNTING: Tool mounts are pre-installed for overhang mounting. Stair steps should already be installed in first and third holes starting from tool mount handle side. 4TH HOLE 2ND HOLE FOR CENTER MOUNTING: Use 4 mm hex key to loosen screws and remove stair steps...
- Page 11 ATTACHING SLIM PROFILE TOOL MOUNTS TO YOUR MITER SAW Place tool mount under one side of your miter saw. Maneuver miter saw over tool mount and feed pre-installed carriage bolts into mounting holes. M8 NUT SPRING WASHER FLAT WASHER CARRIAGE BOLT Place a flat washer, spring washer, and M8 nut onto carriage bolts.
- Page 12 ATTACHING SLIM PROFILE TOOL MOUNTS TO YOUR MITER SAW Repeat steps #5 through #8 to attach second tool mount to your miter saw. Ensure both tool mounts are parallel to one another, and finger-tighten all four M8 nuts to hold in position. FIND OUT MORE AT PROTOCOLEQUIPMENT.COM...
- Page 13 ATTACHING SLIM PROFILE TOOL MOUNTS TO YOUR MITER SAW NOTE: If your miter saw mounting holes DO NOT line up with tool mount slots and tool mounts are not parallel to each other when mounted: Make sure your miter saw is unplugged and saw arm is locked in the down position. Mount miter saw to a mounting surface at least 3/4”...
-
Page 14: Mounting Miter Saw Assembly To The Stand
MOUNTING MITER SAW ASSEMBLY TO THE STAND Tools Required: 13 mm socket or wrench (not included) Turn tool mount handles counterclockwise until stair steps are fully retracted. LOWER THE BACK FIRST Carefully lift miter saw assembly and tilt it slightly away from your body. Lower the back of miter saw assembly first, placing stair steps inside back rail. - Page 15 MOUNTING MITER SAW ASSEMBLY TO THE STAND Lower front of your miter saw assembly to sit flat into chassis. Slide miter saw assembly left or right to desired position. Turn both tool mount handles clockwise until stair steps are engaged and miter saw assembly is secured in place.
-
Page 16: Removing Miter Saw Assembly From The Stand
REMOVING MITER SAW ASSEMBLY FROM THE STAND Turn tool mount handles counterclockwise until stair steps are fully retracted. LIFT THE FRONT FIRST Lift front side of miter saw assembly until it is above the front rail. Pull and lift miter saw assembly to disengage from back rail. Place miter saw assembly on a flat, stable surface. -
Page 17: Transporting And Storing The Workstation
TRANSPORTING AND STORING THE WORKSTATION CROSS BRACE Refer to instructions for REMOVING MITER SAW ASSEMBLY FROM THE STAND. Carefully flip the stand over so that legs are facing up. Fold first set of legs by pressing on cross brace to bring legs together. Push legs down until fully nested into chassis frame. -
Page 18: Safety And Warnings
TRANSPORTING AND STORING THE WORKSTATION HANDLE WHEELS Use handles with built-in wheels on either side of chassis to transport workstation to desired location. SAFETY AND WARNINGS SAFETY INSTRUCTIONS FOR WORKSTATIONS Use caution when folding or unfolding legs to limit any finger pinch points. Place workstations on flat and level surface to keep from rocking or tipping. -
Page 19: General Maintenance
SAFETY AND WARNINGS GENERAL SAFETY INSTRUCTIONS FOR POWER TOOLS Using power tools of any kind can be dangerous if safe operating procedures are not followed. Recognizing the hazards of each tool and using them with respect and caution will considerably limit the possibility of personal injury. - Page 20 02.17.2023 JS PRODUCTS • 6445 MONTESSOURI STREET • LAS VEGAS, NV 89113 CUSTOMER SERVICE: 1-877-707-6449 • PROTOCOLEQUIPMENT.COM...
Need help?
Do you have a question about the SAWPK46 and is the answer not in the manual?
Questions and answers