Advertisement
Quick Links
Utility Trailer
Operator's Manual
WARNING:
Carefully review and understand all INSTRUCTIONS prior to operating this device. Failure to
follow the safety rules and other basic safety precautions may result in serious personal injury.
Keep these instructions in a safe place and accessible so that they can be reviewed as required.
Keep these instructions to assist in future servicing needs.
REV 1.0
Advertisement

Summary of Contents for Super Handy GUO099
- Page 1 Utility Trailer Operator's Manual WARNING: Carefully review and understand all INSTRUCTIONS prior to operating this device. Failure to follow the safety rules and other basic safety precautions may result in serious personal injury. Keep these instructions in a safe place and accessible so that they can be reviewed as required. Keep these instructions to assist in future servicing needs.
-
Page 2: Table Of Contents
INDEX 1. WARNING -------------------------------------------------------------------------------- 1 2. TECHNICAL SPECIFICATIONS ---------------------------------------------------- 1 3. CONTROLS AND FEATURES --------------------------------------------------- 1~2 4. ASSEMBLY ------------------------------------------------------------------------- 3~6 5. OPERATION -------------------------------------------------------------------------- 6~8 6. MAINTENANCE AND STORAGE -------------------------------------------------- 8 7. WARRANTY ----------------------------------------------------------------------------- 8... -
Page 3: Warning
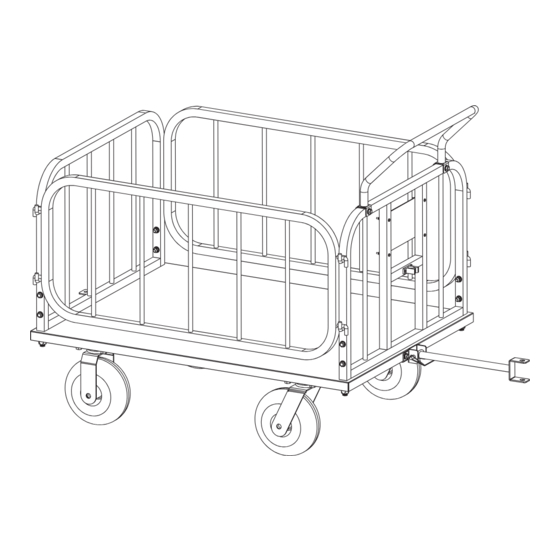
7. Keep your work area clean and well-lit. Cluttered workbenches and dark areas increase the risk of accidents. The floor must not be slippery due to wax or dust. 2. TECHNICAL SPECIFICATIONS SKU# GUO099 Load Capacity 1200Lbs (550kgs) 41″x30″x20″ (1050x760x500mm) Dimensions 8″... - Page 4 PARTS LIST (See Fig.2) Cargo Bed Front Hitch Connector Rear Hitch Connector Front Railing Rear Railing Left/Right Railing Handle Railing Base 8″ Swivel Wheel 8″ Directional Wheel D-pin M8x40 Bolt M8x65 Bolt M10x25 Bolt M8 Nut M10 Nut M14 Nut Fig.2 NOTE: To differentiate between the front hitch connector and the rear hitch connector, please refer to the figure above.
-
Page 5: Assembly
4. ASSEMBLY WARNING: Please wear work gloves to prevent fingers from being pinched or scratched. STEP 1 Installing Wheels (See Fig.3) Turn the cargo bed upside down, Install the swivel wheels (B) and directional wheels (C) on the cargo bed (A) with M10x25 bolts (D) and M10 nuts (E). After installing the swivel casters, make sure that they can rotate smoothly and avoid interference from bolts. - Page 6 STEP 3 Installing Railing Bases (See Fig.5) Now place the cargo bed upwards. Insert the four railing bases (B) into the frame (A), and use M14 nuts (C) to secure each of them. NOTE: The holes on the base should be oriented towards the left and right sides. Fig.5 STEP 4 Installing Front and Rear Railings (See Fig.6)
- Page 7 STEP 5 Installing The Handle (See Fig.7) Place the handle (B) onto the front railing (A) with the direction facing forward, and fix it using M8x40 bolts (C) and M8 nuts (D). Fig.7 STEP 6 Installing the Left and Right Railing (See Fig.8) Hang the left and right railings (C) on the hooks at the sides of the front and rear railings (B).
-
Page 8: Operation
STEP 7 Installing the Tow Bar (See Fig.9) Attach the tow bar (A) to the front hitch connector (C) using the D-pin (B), and you can store it on the clip (D) when not in use. Fig.9 5. OPERATION This device can be used in three different ways depending on the task. Please refer to the following description for details. - Page 9 3. Tugger Trailer (See Fig.12) Connecting with the tugger through the tow bar, it becomes the combination form of "tugger train" . Fig.12 WARNING: It is recommended that no more than two devices be connected when the trailer is fully loaded. Note: The tugger mentioned here is not included in the product package, it need to be purchased separately.
-
Page 10: Maintenance And Storage
WARNING: Risk of being trapped and crushed! • Do not reach into the open coupling. • Check the coupling pin (A) of the tow coupling for damage. • Ensure that the R pin (C) engages in the locating hole . WARNING: When this trailer is used with other tow tractors, please first understand the use requirements of the tow tractor for the trailer connection and ensure that it is used in accordance with the corresponding safety requirements. - Page 12 Great Circle USA Support Line: 1-866-493-0524 help@greatcircleus.com www.greatcircleus.com Size: 145x210mm 157克双铜 REV 03/02/23...
Need help?
Do you have a question about the GUO099 and is the answer not in the manual?
Questions and answers