
Subscribe to Our Youtube Channel
Related Manuals for NSR Marine NSI-1000 MKD

Summary of Contents for NSR Marine NSI-1000 MKD
- Page 1 USER MANUAL AIS/GNSS PLOTTER NSI-1000 MKD NAB-1000 MKD NES-3010/ NES-3010G NES-3010(G) UM.E 20220308-01...
- Page 2 SAFETY NOTICE Thank you for using our NES-3010(G) AIS/GNSS Plotter. Before installation and use, please read this Manual carefully in order to use properly and keep it fully functioned. This Manual is supplied with the equipment, so please keep it properly for future operation and maintenance reference.
- Page 3 MODIFY RECORD Modify by Date Paragraph Version Reason 2022/03/08 First edition NES-3010(G) UM.E 20220308-01...
-
Page 4: Table Of Contents
4.3 MENU OPERATION ......................30 4.3.1 AIS LIST ........................31 4.3.2 FAVORITES......................... 36 4.3.3 VIEW OWN SHIP INFORMATION ................39 4.3.4 VOYAGE DATA (NSI-1000 MKD) ................40 4.3.5 VOYAGE SETTING ....................45 4.3.6 LONGRANGE SETTING (NSI-1000 MKD) ............48 NES-3010(G) UM.E 20220308-01... - Page 5 4.3.7 DESTINATION LIST (NSI-1000 MKD) ..............50 4.3.8 AIS MESSAGE ......................52 4.3.9 AIS DIAGNOTICS....................... 58 5. SETTING ..............62 5.1 SYSTEM SETTING ....................... 62 5.2 SOFTWARE UPGRADE ....................... 65 5.3 VERSION ..........................67 6. ADVANCED ..............68 6.1 COM MONITOR ........................68 6.2 I/O BAUDRATE (NSI-1000 MKD) ..................
-
Page 6: General
AIS searching function is helpful to locate a target vessel efficiently. AIS Friend function is useful for vessel group management. There are two models: Models Descriptions Applications Plotter for AIS A, AIS B NSR NSI-1000 MKD NES-3010 DC24V NSR NAB-1000 MKD Standalone GNSS plotter NES-3010G DC24V... -
Page 7: Equipment Description
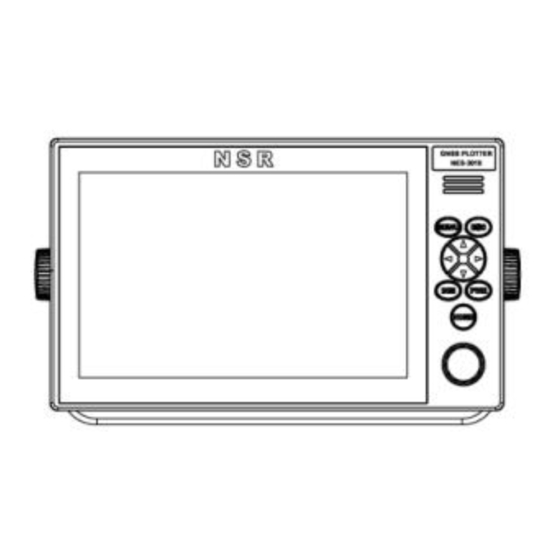
NES-3010(G) USER MANUAL 2. EQUIPMENT DESCRIPTION 2.1 MAIN PANEL 2.2 FUNCTION KEYS The plotter can be operated by key & knob on panel or touch-screen operation. Panel key of NES-3010(G) Description Turn to select an item. Press to confirm the selection or input. Switch between the menu items in CHART screen. -
Page 8: Power On/Off
2.3 POWER ON/OFF Power On Press to power on the equipment, Main screen appears ( take NSI-1000 MKD as sample): Power Off / Restart Press and hold for 3 seconds and choose [Power off] to power off the equipment. -
Page 9: Brightness Adjustment
NES-3010(G) USER MANUAL 2.4 BRIGHTNESS ADJUSTMENT There are two ways to adjust the brightness of screen. ① Press on panel to adjust the brightness, or ② Adjust the brightness in [SETTING]-[SYSTEM]-[Brightness]. Refer to Section 5.1. 2.5 MAIN MENUS ② ① ③... - Page 10 Quickly view own ship status, voyage and long range setting etc. Refer to Section 4.3.3~4.3.7. Messages received. 99+: The number of messages unread. New message editing and sending (NSI-1000 MKD). Refer to Section 4.3.8. Alarm list, Power ON/OFF history, etc. Refer to Section 4.3.9. Function buttons 1: The number of alarms unchecked.
- Page 11 Note: The above screen is the example when NSR AIS NSI-1000 is connected. The following is the example when NSR AIS NAB-1000 is connected. Note: Unless specified otherwise, the following description is an example of NSI-1000 MKD. NES-3010(G) UM.E 20220308-01...
-
Page 12: Navigation Operation
NES-3010(G) USER MANUAL 3. NAVIGATION OPERATION 3.1 ABOUT CHART/MAP Click on main screen, the following [NAVIGATION] screen appears: ① ⑤ ③ ⑥ ④ ② Other Ship (normally blue dot, ⑦ zoom in until it’s a yellow triangle with black frame) ⑧... -
Page 13: Basic Functions
NES-3010(G) USER MANUAL Note: The font color of latitude/longitude will turn gray while the position information is lost. The last position data will be displayed on the screen. 3.1.1 BASIC FUNCTIONS Display own vessel position and provide necessary information; ... -
Page 14: Chart Mode
NES-3010(G) USER MANUAL 3.1.3 CHART MODE Click , then the following [Chart Settings] screen appears: You can set Color Mode / Display Mode / Symbol Mode. For example, Night mode is selected: NES-3010(G) UM.E 20220308-01... -
Page 15: Key Elements On Chart/Map
NES-3010(G) USER MANUAL 3.1.4 KEY ELEMENTS ON CHART/MAP Click the empty area, then the following menu will appear. Selected Point : Press Up, Down, Left, Right key ( ) to move the cross position. : Click to go to the selected waypoint quickly. It’ll draw a blue line between own ship and the waypoint as bellow. - Page 16 NES-3010(G) USER MANUAL Click and choose “Yes” in the pop-up window to exit current navigation. : Click to create the selected point as a new waypoint. Refer to Section 3.2.1. If current cursor pointing on AIS target, click it and then the following AIS target detailed information will appear.
-
Page 17: Operation On Chart/Map Menu
NES-3010(G) USER MANUAL Own Ship Selected AIS Target AIS Target 3.1.5 OPERATION ON CHART/MAP MENU AIS List Operation on Chart/Map Menu includes: Dangerous List Click each item to enter into its sub menu. Way Point Route 3.2 WAY POINT Waypoints are key points on route. Normally they are turning points and important points. This equipment can keep many waypoints. -
Page 18: Add Way Point
NES-3010(G) USER MANUAL 3.2.1 ADD WAY POINT , then the “New Way Point” window is shown as below: To add way point, click You can edit the name by the pop-up soft keypad ( to confirm). Swipe up and down to select latitude and longitude, then choose “Confirm”... - Page 19 NES-3010(G) USER MANUAL New Way Point You can click to select the way point, and the latitude (Lat) /longitude (Lon) of the waypoint, then the distance (Range) and bearing (BRG) from own ship will be displayed. Note: Choose and press one way point until the following window appears, then you can Go to/Edit /Delete the way point.
-
Page 20: Goto Way Point
NES-3010(G) USER MANUAL 3.2.2 GOTO WAY POINT Click . The Nav Mode window of Goto Way Point will be shown as below. Draw a blue line between own ship and the way point. 3.2.3 EDIT WAY POINT Click to edit Way Point. The operation is same as Section 3.2.1 (Add Way Point). 3.2.4 DELETE WAY POINT Click . -
Page 21: Route
NES-3010(G) USER MANUAL 3.3 ROUTE You can create new routes and edit these routes. After confirming the “Route” and choosing NAV function, vessel can be automatically navigated by following the route. The Route list window displays the route name, the total number of route way points and the total mileage. -
Page 22: New Route
NES-3010(G) USER MANUAL Choose and press one route until the following window appears. You can do the following operations of the route, including Navigation/Edit/Delete items. 3.3.1 NEW ROUTE in the Route list. The “New Route” window will be shown ① To create a new route, click as below: ②... - Page 23 NES-3010(G) USER MANUAL Operations of New Route: Back to select previous RouteWP. Jump to select next RouteWP. Edit selected RouteWP. Delete selected RouteWP. Press Up, Down, Left, Right key ( ) to adjust the position of selected RouteWP. Save the new route created. Cancel the operation of new route.
- Page 24 NES-3010(G) USER MANUAL ③ After all route points are set, click to save the new route. The following screen appears: Edit the name of the route by pop-up soft keypad (for example, r011). Then click “Confirm” to finish the operation. New route (r011) is displayed in the Route list as bellow: NES-3010(G) UM.E 20220308-01...
-
Page 25: Edit Route
NES-3010(G) USER MANUAL 3.3.2 EDIT ROUTE In the Route list, choose and press one route until the following window appears. Click , then you can edit the selected route in the Edit Route window. For example, you can add, delete and edit any RouteWP. The operation is same as Section 3.3.1. NES-3010(G) UM.E 20220308-01... -
Page 26: Delete Route
NES-3010(G) USER MANUAL After editing, click to save the route. You can also rename the route by pop-up soft keypad. Then click “Confirm” to finish the operation. 3.3.3 DELETE ROUTE In the Route list, choose and press one route until the following window appears. Click , you can the selected route. -
Page 27: Route Navigation
NES-3010(G) USER MANUAL 3.3.4 ROUTE NAVIGATION In the Route list, choose and press one route until the following window appears. Click and then you can start the navigation by the selected route. An indigo blue line is displayed between the own ship and the starting RouteWP. NES-3010(G) UM.E 20220308-01... - Page 28 NES-3010(G) USER MANUAL Note: Choose one route in the Route list, and click in the Route Preview window. You can also start the route navigation. In Nav Mode window, you can check the current navigation information. : Change the navigation to the previous RouteWP. : Change the navigation to the next RouteWP.
- Page 29 NES-3010(G) USER MANUAL Forward Navigation: Navigate from RouteWP small to large. The window is as below: Reversed Navigation: Navigate from RouteWP large to small. Click . You can change the Forward navigation to Reversed navigation and vice versa. NES-3010(G) UM.E 20220308-01...
-
Page 30: Navigation Modes
NES-3010(G) USER MANUAL Cancel Navigation Click and choose “Yes” in the pop-up window to exit current navigation. This kind of way can be used by all kinds of navigation in the system. 3.4 NAVIGATION MODES Generally, NES-3010(G) plotter has three basic navigation modes: Route Navigation, Point Navigation and Target Navigation. -
Page 31: Ais Operation
NES-3010(G) USER MANUAL . AIS OPERATION This plotter has a dedicated AIS interface, can be connected with ship borne AIS equipment, NSR NSI-1000 or NAB-1000. No matter which AIS equipment is connected with, please make sure to select the right AIS model by setting the “AIS Class” in [SETTING] – [System Setting], otherwise the plotter may not receive the AIS messages properly. -
Page 32: Ship's Data
NES-3010(G) USER MANUAL to assist in determining the location of a vessel or a person in distress. They are typically used on life rafts. AIS on Search and Rescue (SAR) Aircraft: is used on airplanes and helicopters to assist search and rescue operation. 4.1.2 SHIP’S DATA The below data is related to AIS class A. - Page 33 NES-3010(G) USER MANUAL Target Target list display Icon display Own Ship AIS Class A Class A AIS Class B Class B ◇ AIS Base Station Base Station ◇ AIS AtoN Station AtoN AIS-SART SART AIS EPIRB EPIRB AIS MOB On [NAVIGATION] screen, click an AIS target, detailed information will pop up, including static info, dynamic info and voyage-related info.
-
Page 34: Ais List
NES-3010(G) USER MANUAL 4.2.2 AIS LIST This simple AIS List shows the list of AIS targets received. Click to select an AIS target. For example: You can check the detailed information of a selected AIS target. : Put the AIS target in the centre of screen. : Start the navigation to the AIS target. -
Page 35: Dangerous List
NES-3010(G) USER MANUAL 4.2.3 DANGEROUS LIST CPA/TCPA is calculated for each target vessel with own ship. If a target is falling into the preset CPA/TCPA value, it will be regarded as a DANGEROUS TARGET and listed in Dangerous List. 4.3 MENU OPERATION Click on main screen, then the following [AIS] screen appears: It includes AIS LIST and FAVORITIES items. -
Page 36: Ais List
NES-3010(G) USER MANUAL 4.3.1 AIS LIST AIS List displays AIS targets’ information about MMSI / Name / RNG (range) / BRG (bearing) / SOG/COG/ AIS Type. The operations of AIS List include: GO TO SHIP:Click , then the screen will change to navigation mode. And the detailed information of the target is displayed. - Page 37 NES-3010(G) USER MANUAL FAVORITE:Click will record the AIS target in the Favorites List, then you can see the message “Added to Favorites”. Please refer to Section 4.3.2. SEND MSG: Click will send message to the selected AIS target. Selecting this can open the new message window immediately.
- Page 38 NES-3010(G) USER MANUAL Click again, then the AIS targets will be listed by MMSI in descending order. Descending symbols ( ) can be seen as follows: The other two options are the same. For example, click , then the AIS targets will be listed by SOG ascending ( ).
- Page 39 NES-3010(G) USER MANUAL SEARCH:You can enter MMSI or Name in search box by pop-up soft keypad to find the AIS target. Click to close the pop-up soft keypad. By MMSI: Enter MMSI digits to locate a ship. When first 4 or more digits are entered, all ships with MMSI started with the same 4 or more digits will show up immediately.
- Page 40 NES-3010(G) USER MANUAL By Name: Enter ship name to locate a ship. The operation procedure is similar as “By MMSI”. DETAILS:Click any AIS target in AIS List, you can check the details of the target. For example: NES-3010(G) UM.E 20220308-01...
-
Page 41: Favorites
NES-3010(G) USER MANUAL 4.3.2 FAVORITES Click to open the My Favorites List. It shows all favorite AIS targets (friend ships or marked ships etc.) saved by clicking . Swipe up / down to view all. If the AIS message sent by the favorite ship has been received, the name of the ship will be displayed below the MMSI. - Page 42 NES-3010(G) USER MANUAL The operations of [My Favorites] include (mainly select MMSI-413961462 as example): GO TO SHIP: Click , then the screen will change into navigation mode. And the detailed information of the ship is displayed. SEND MSG: Click to send a message to the selected ship.
- Page 43 NES-3010(G) USER MANUAL FRIEND SHIPS: AIS friend is a special feature of this plotter. It helps to identify the “own” ships of the same company or group from other ships. The AIS friend has different color from other ships. You can also mark the targets in [My Favorites].
-
Page 44: View Own Ship Information
NES-3010(G) USER MANUAL 4.3.3 VIEW OWN SHIP INFORMATION Click on main screen, then the following [OWNSHIP] screen appears: NES-3010(G) UM.E 20220308-01... -
Page 45: Voyage Data (Nsi-1000 Mkd)
NAB-1000 MKD: In OWN INFO item, you can view the Basic/Voyage/Dynamic/Static information of own ship as above. 4.3.4 VOYAGE DATA (NSI-1000 MKD) In VOYAGE DATA item, you can check and set the Voyage Data of own ship as follows. NES-3010(G) UM.E 20220308-01... - Page 46 NES-3010(G) USER MANUAL Click to set each item, and click to confirm the changing. For example: Swipe up / down to set ETA. Destination NES-3010(G) UM.E 20220308-01...
- Page 47 NES-3010(G) USER MANUAL Set the destination by the pop-up soft keypad or call from the destination list. Note: New destination can be added to the list by clicking at the upper right corner of [DESTINATION] - [My Destination List] window. Please refer to Section 4.3.7. ...
- Page 48 NES-3010(G) USER MANUAL NAV Status Swipe up / down to set the navigation status. You may select the code from the blow list. Navigation Status under way using engine (Default) at anchor not under command restricted manoeuvrability constrained by draught moored aground engaged in fishing...
- Page 49 NES-3010(G) USER MANUAL Persons Set the person number by the pop-up soft keypad or Ship&Cargo Swipe up / down to set the type of ship and cargo. You may select the cargo type from the blow list. For ship type, please refer to APPENDIX 3. NES-3010(G) UM.E 20220308-01...
-
Page 50: Voyage Setting
NES-3010(G) USER MANUAL Cargo Type All ship of this type Carrying DG,HS,or MP(X) Carrying DG,HS,or MP(Y) 3-Carrying DG,HS,or MP(Z) Carrying DG,HS,or MP(OS) Future use Future use Future use Future use No Additional info Note: After changing, please click to save and wait for the result of communication with NSI-1000. - Page 51 NES-3010(G) USER MANUAL NSI-1000 MKD: Silent Mode While Silent Mode is set to ON, a pop-up message appears on the screen as below. Click to confirm the setting. Note: Silent Mode is selected only when does the captain realize that such setting is necessary for safety of navigation.
- Page 52 NES-3010(G) USER MANUAL CPA /TCPA Set the CPA/TCPA value according to captain’s judgment. When a calculating CPA/TCPA with a target ship is falling into the setting value, an audible alarm will be activated on the screen and the ship will appear in Dangerous List. Note: If CPA/TCPA is set to “0.0”, no dangerous ship is displayed in Dangerous List.
-
Page 53: Longrange Setting (Nsi-1000 Mkd)
OFF: Mute the MOB/SART test signal, and the information will not be listed in the AIS List. NAB-1000 MKD: Note: For Class B AIS, Silent Mode is not available. 4.3.6 LONGRANGE SETTING (NSI-1000 MKD) In LONGRANGE item, you can do the long range setting as follows. ... - Page 54 NES-3010(G) USER MANUAL Mode: Auto or Manual. The long range mode is to allow being set by the user to respond automatically or manually to long range interrogation from such as Inmarsat-C ship earth station. NSI-1000 provides a two-way interface for equipment which provides for long-range communication. ...
-
Page 55: Destination List (Nsi-1000 Mkd)
NES-3010(G) USER MANUAL 4.3.7 DESTINATION LIST (NSI-1000 MKD) In DESTINATION item, you can manage [My destination List] as follows. TOP DESTINATION: Click to top the selected one ( for example, SHANGHAI): DELETE destination: Click to delete the selected one (for example: PUSAN) directly. - Page 56 NES-3010(G) USER MANUAL NEW DESTINATION:Click to add a new destination (for example: PUSAN). NES-3010(G) UM.E 20220308-01...
-
Page 57: Ais Message
NES-3010(G) USER MANUAL 4.3.8 AIS MESSAGE Click on main screen, the following [AIS MESSAGE] screen appears: NSI-1000 MKD: Dialogue Area Message Area NAB-1000 MKD: NES-3010(G) UM.E 20220308-01... - Page 58 Note: For Class B AIS, sending AIS messages are not allowed. NEW MSG (NSI-1000 MKD):In NEW MSG item, you can edit and send message to other AIS. Choose the message type that you desire. If the type is “Addressed Binary” or “Addressed Safety”, it needs to input the MMSI, then edit the message and send.
- Page 59 NES-3010(G) USER MANUAL Input MMSI Input MSG Switch between Uppercase and lowercase Finish Switch between numbers/symbols and letters Click to send MSG NES-3010(G) UM.E 20220308-01...
- Page 60 NES-3010(G) USER MANUAL MSG sent ② For example, Message Type – Binary Broadcast: MSG Type Input MSG NES-3010(G) UM.E 20220308-01...
- Page 61 NES-3010(G) USER MANUAL Click to send MSG MSG sent MSG LOG:In LOG area, you can view the broadcast messages in My Broadcast item (NSI-1000 MKD) or other messages in its MMSI item. For example: NES-3010(G) UM.E 20220308-01...
- Page 62 NES-3010(G) USER MANUAL Click , then click . You can mark unread messages as all read, then the number of unread messages is cleared. Unread MSG Number NES-3010(G) UM.E 20220308-01...
-
Page 63: Ais Diagnotics
NES-3010(G) USER MANUAL Unread MSG Number 4.3.9 AIS DIAGNOTICS Click on main screen, the following [AIS DIAGNOTICS] screen appears: NSI-1000 MKD: NAB-1000 MKD: NES-3010(G) UM.E 20220308-01... - Page 64 NES-3010(G) USER MANUAL 4.3.9.1 ALARM LIST (NSI-1000 MKD) In Alarm List (standard: IEC 62923-1), the alarm messages are listed with the time generated, whether acknowledged or not, and alarm contents. You can also see the both number of current and unacknowledged alarms.
- Page 65 NES-3010(G) USER MANUAL 4.3.9.2 ALARM HISTORY (NSI-1000 MKD) In HISTORY item, you can check the alarm history as below: 4.3.9.3 EVENT LOG In EVENT LOG item, the last 100 AIS events will be recorded, such as Power OFF for more than 15 minutes, Silence ON for more than 15 minutes, Power ON, Silence OFF, etc.
- Page 66 NES-3010(G) USER MANUAL 4.3.9.4 SENSOR STATUS (NSI-1000 MKD) Check the current sensor status. NES-3010(G) UM.E 20220308-01...
-
Page 67: Setting
NES-3010(G) USER MANUAL 5. SETTING Click on main screen, the following [SETTING] screen appears: 5.1 SYSTEM SETTING Click . [System Setting] menu includes following items. Language: Select the language to be used. NES-3010(G) UM.E 20220308-01... - Page 68 AIS Class: Values are “NAB-1000, NSI-1000, Other AIS, No AIS”. AIS type NSI-1000 or NAB-1000 as default. Note: NAB-1000 – NAB-1000 MKD; NSI-1000 – NSI-1000 MKD; Other AIS – Other AIS MKD; No AIS – Standalone GNSS plotter. For example, set AIS Class to NSI-1000, and wait until “Setup Successfully!” appears:...
- Page 69 NES-3010(G) USER MANUAL Sound Alert: “ ” (enable the sound) or “ ” (mute the sound), default is “ ”; Click to confirm the setting. Click to identify each sound. Time: The displayed time can be selected between UTC and LMT. After setting, the upper left corner of the chart displays UTC/LMT time accordingly.
-
Page 70: Software Upgrade
NES-3010(G) USER MANUAL 5.2 SOFTWARE UPGRADE The procedure of software upgrading is as follows: ① Contact NSR or the authorized dealer for latest firmware. Copy it to the root directory of the USB disk and change the name as “update.apk”. ②... - Page 71 NES-3010(G) USER MANUAL MKD Version NES-3010(G) UM.E 20220308-01...
-
Page 72: Version
NES-3010(G) USER MANUAL Error information and Suggestion in Upgrading Error Information Suggestion System Error1 Restart the plotter and try to upgrade again. System Error2 Restart the plotter and try to upgrade again. No USB flash drive detected Re-insert the USB disk or try another one. Check the upgrade software, which should be named Installation package does not exist as “update.apk”... -
Page 73: Advanced
[ADVNACED] screen appears: It’s only used for service technician when the equipment is installed. Password is required to access the submenu. 6.1 COM MONITOR It’s to check the communication sentences on the I/O ports. NSI-1000 MKD: NES-3010(G) UM.E 20220308-01... -
Page 74: I/O Baudrate (Nsi-1000 Mkd)
: All details of NSI-1000 are output to the text view. For example: NAB-1000 MKD: 6.2 I/O BAUDRATE (NSI-1000 MKD) The baud rate for each sensor and output (PILOT/ECDIS/L/R etc.) can be chosen among 4800 / 9600 / 19200 / 38400/ 115200 bps. -
Page 75: Static Data Setting
NSI-1000. Please refer to Section 8.3. 6.3 STATIC DATA SETTING NSI-1000 MKD: In STATIC DATA item, own ship static data include MMSI, Vessel Name, Call Sign, IMO No. etc. Click to change the data, to confirm the setting. - Page 76 NES-3010(G) USER MANUAL For example, MMSI setting and GPS Antenna Position setting: NES-3010(G) UM.E 20220308-01...
- Page 77 NES-3010(G) USER MANUAL Note: 1. For Type of Ship, please go to [OWN SHIP] - [VOYAGE DATA] to make change and refer to [Appendix 3: LIST OF SHIP TYPE]. 2. After changing, please click to save and wait for the result of communication with NSI-1000.
-
Page 78: Forwarding (Nsi-1000 Mkd)
Note: After changing, please click to save and wait for the result of communication with NAB-1000. Please refer to Section 8.3. 6.4 FORWARDING (NSI-1000 MKD) If other sentences, besides normal VDM, need outputting from NSI-1000, setting in FORWARDING is needed. -
Page 79: Advanced Setting (Nsi-1000 Mkd)
NES-3010(G) USER MANUAL Note: After changing, please click to save and wait for the result of communication with NSI-1000. Please refer to Section 8.3. 6.5 ADVANCED SETTING (NSI-1000 MKD) [Advanced Setting] has three items: AIS MODE: Click to set to SOLAS mode from INLAND mode. - Page 80 NES-3010(G) USER MANUAL GNSS: Select GNSS mode among GPS&BDS / GPS&GLO / GPS / BDS/ GLO / INTERNAL. NES-3010(G) UM.E 20220308-01...
-
Page 81: Factory Setting
NES-3010(G) USER MANUAL 6.6 FACTORY SETTING It’s to restore the system setting as factory default settings. NSI-1000 MKD: NAB-1000 MKD: NES-3010(G) UM.E 20220308-01... -
Page 82: Installation
NES-3010(G) USER MANUAL 7. INSTALLATION 7.1 EQUIPMENT INSTALLATION This Plotter can be installed as desktop, or wall mounting, or flush mounting in console. Flush mounting needs special brackets (to be separately ordered) . NES-3010(G) installation refers to the Installation Drawings. Please take following notes: - Install in a place with good ventilation. -
Page 83: Maintenance
NES-3010(G) USER MANUAL 8. MAINTENANCE 8.1 ROUTINE MAINTENANCE In order to keep system functioning, routine maintenance is necessary. Check below once a month. ITEM DESCRIPTION Connections The port connection behind is secured with unused port covered. Cable Cables non damage. If damaged, replace. Grounding Point Check grounding point if rusty. -
Page 84: Communication With Ais Transponder
NES-3010(G) USER MANUAL 8.3 COMMUNICATION WITH AIS TRANSPONDER The result of communication with the AIS transponder is described as follows: Result Display Solution/Remarks Set up successfully! Try to set again. Check if NEMA sentence is detected in [ADVNACE] – [COM MONITOR]. ... -
Page 85: Appendix 1 Technical Specifications
NES-3010(G) USER MANUAL APPENDIX 1 TECHNICAL SPECIFICATIONS General CPU: Quad-Core 64 bit ARM Main Frequency: 1.5 GHz RAM: 2 GB ROM: 8 GB Android GNSS RECEIVER Receiving System: 72 channels parallel RX Frequency: GPS L1, GLONASS L1, BDS B1 RX Code: C/A code Position-fixing Time:... -
Page 86: Appendix 2 Menu Tree
NES-3010(G) USER MANUAL APPENDIX 2 MENU TREE NES-3010(G) UM.E 20220308-01... - Page 87 NES-3010(G) USER MANUAL NES-3010(G) UM.E 20220308-01...
-
Page 88: Appendix 3 List Of Ship Type
NES-3010(G) USER MANUAL APPENDIX 3 LIST OF SHIP TYPE UNDEFINED WIG: ALL SHIPS OF THIS TYPE FISHING VESSEL TOWING VESSEL LENGTH OF THE TOW EXCEEDS 200M OR BREADTH EXCEEDS 25M VESSEL ENGAGED IN DREDGING OR UNDERWATER OPERATIONS VESSEL ENGAGED IN DIVING OPERATIONS VESSEL ENGAGED IN MILITARY OPERATIONS VESSEL SAILING PLEASURE CRAFT... -
Page 89: Appendix 4 Abbreviations
NES-3010(G) USER MANUAL APPENDIX 4 ABBREVIATIONS Acknowledge Addressed Automatic Identification System Alarm Antenna ATON Aid to Navigation AUTO Automatic Auxiliary Broadcast Bearing Channel Clear Course over Ground Closest Point of Approach Delete Dangerous Goods DGNSS Differential Global Navigation Satellite System DGPS Differential Global Positioning System DIFF... - Page 90 NES-3010(G) USER MANUAL Internal Input/Output International Telecom Union Knots Latitude Liquid Crystal Display Longitude Long Range Long-range Message Local Time Minute Minimum Keyboard and Display MMSI Maritime Mobile Service Identity Man Overboard MSAS Multi-functional Satellite Augmentation System Maritime Safety Committee Message Navigation Number...
-
Page 91: Appendix 5 Installation Drawings
NES-3010(G) USER MANUAL APPENDIX 5 INSTALLATION DRAWINGS NES-3010(G) UM.E 20220308-01...
Need help?
Do you have a question about the NSI-1000 MKD and is the answer not in the manual?
Questions and answers