Table of Contents
Advertisement
Available languages
Available languages
Quick Links
Advertisement
Table of Contents

Related Manuals for Humanscale M/Connect 3 USB Data Hub

Summary of Contents for Humanscale M/Connect 3 USB Data Hub
- Page 1 USB Data Hub Assembly Instructions FR 12 North America: +1 800 400 0625...
-
Page 3: Parts Included
M/Connect Hub Power Adapter Installation Guidelines This product is intended to be used with Humanscale’s Monitor Arm product line and the following office desk styles placed on a non-skid surface: 1. Systems Furniture with panel hung surfaces 2. Systems Furniture with a floor mounted panel behind the desk 3. -
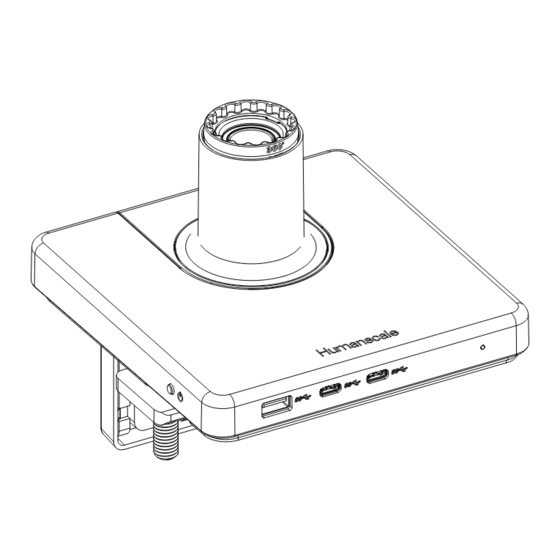
Page 4: Identifying Ports
Identifying Ports ① ② ③ Component Description ① USB-A Port USB 3.2 ② USB-C Port (2) USB 3.2 ③ Hub Power LED White: Power On Green: Monitor Connected Green (Dimmed): Host Connected... - Page 5 Identifying Ports ① ② ③ Component Description ① Power Button Powers unit on and off ② Max 30W PD/QC Compatible (Limited to 15W when USB-A ③ is in use) USB-C Charging Port ③ USB-A Charging Port 5V/2.4A, BC 1.2 Compatible...
- Page 6 Assembly Instructions Installing M/Power Onto Edge of Tabl Clamp Mount A - For installation on open edge of work surface: Slide Mount against work surface edge. ① F ully tighten Clamp screws(A) with 4mm hex key. ② ① ② B - For installation on work surface positioned against a wall or through a grommet hole: NOTE: Grommet holes must be at least 3”...
- Page 7 Sliding Desk Mount Slide unit with loosely mounted bracket against work surface edge. ① Tighten both set screws (B) evenly into bracket to a snug fit. ② ② ① Bolt-Through Mount Drill 1/2” hole in desired location NOTE: To ensure M/Connect makes full contact with desk, locate hole at least 2” away from back edge of desk. Lower M/Connect onto desk aligning bolt with hole.
- Page 8 Attaching a Monitor Arm to M/Connect CAUTION: Maximum weightload of M/Connect is as follows: M2.1: 15.5 lbs. - M8.1: 28 lbs. - M10: 40 lbs. - M/Flex: 60 lbs. total M10 is not to be used on M/Flex when mounted to M/Power DO NOT exceed maximum weight limits.
-
Page 9: Power Cable
Connecting Cables to M/Connect ① USB Cable (For use with USB-C Monitor) Plug a compatible USB-B cable (not included) into the corresponding port on the adapter cable. ① Plug the other end of the cable into a USB output port on the monitor. - Page 10 Replacing the M/Connect Hub ① Remove any cables or devices plugged into the M/Connect Hub. Remove the top cover by carefully pulling up around the edges ① Using a 3mm hex key, remove the screw retaining the adapter cable and unplug the cable ②...
-
Page 11: Electrical Specifications
The FCC requires the user be cautioned that any changes or modifications made to this device that are not expressly approved by Humanscale may void the user's authority to operate the equipment. Connections to this device must be made with shielded cables in order to maintain compliance with the Class B limits in the FCC Rules and Regulations. -
Page 12: Pièces Fournies
Ce produit est destiné à être utilisé avec la ① Voir page 6, ligne de bras support-écran d’Humanscale et Serrer complètement les vis de la pince (A) avec une clé les types de bureaux suivants, placés sur une hexagonale de 4 mm (B). - Page 13 Placer le capuchon protecteur (D) sur l’extrémité inférieure Remplacement du hub M/Connect du boulon ④ Voir page 7 , Retirer tous les câbles et appareils branchés dans le hub M/Connect. Fixer un bras support-écran au M/ Retirer le couvercle supérieur en tirant doucement les Connect bords vers le haut.
- Page 14 La FCC exige que l’utilisateur soit averti que toute modification apportée à cet appareil et qui n’est pas expressément approuvée par Humanscale peut annuler l’autorisation de l’utilisateur d’utiliser l’équipement. Les connexions à cet appareil doivent être effectuées avec des câbles blindés afin de maintenir la conformité...
- Page 16 For our terms and conditions please go to https://www.humanscale.com/about/legal-information/terms-conditions.cfm © 2023 Humanscale Corporation. The text and artwork are copyrighted materials. All rights reserved. The Humanscale mark and logo are trademarks of Humanscale Corporation and are registered in the United States and certain other countries.
Need help?
Do you have a question about the M/Connect 3 USB Data Hub and is the answer not in the manual?
Questions and answers