Advertisement
Quick Links
Advertisement

Summary of Contents for OVERWATCH EH250
- Page 1 USER MANUAL...
- Page 2 About This Manual The contents in this document is for information purposes only and is subject to change at any time without prior notice. We have made every effort to ensure that this User Manual is accurate and complete. However, no liability is assumed for any errors or omissions that may have occurred.
- Page 3 General Notes Do not touch the lens with your fingers. Finger grease may be left on the lens and will result in unclear videos or snapshots. Clean the lens on a regular basis. Always charge the battery fully before use, especially when the device is not used for a long time.
-
Page 4: Table Of Contents
TABLE OF CONTENTS 1. Introduction 2. Box Contents 3. Product Overview 4. Main Menu / Settings 5. Operation... -
Page 5: Introduction
1. Introduction Please read the user manual to understand the functions of your BWC. Any mention of “U Disk” in this manual is referring to the camera drive where you can access your files. This is a quick demonstration on how to connect your BWC to your PC to retrieve your files. -
Page 6: Box Contents
D. Depending on your PC setup, the drive may automatically open, or you can go to MyComputer/This PC and look for the drive under “devices and drives”. 1.2 Connect to PC with Password Disabled. In Password Off Mode, a reminder “USB connecting” will show up on the LCD screen directly after connecting the device to PC via the original USB cable. -
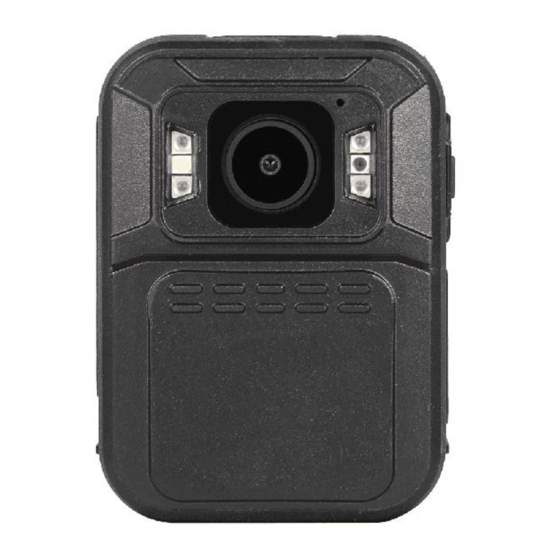
Page 7: Product Overview
3. Product Overview... - Page 8 Item Description Still Green: camera is in standby mode (Power on but not recording) 1. Status Still Red: camera is on pre-recording mode Indicator LED Flashing Red: camera is recording video Flashing Yellow: camera is recording audio only 2. Charging Blue: Charging Status Indicator LED White: Camera is fully charged...
- Page 9 Screen a) In Menu or Playback mode, short press to scroll down next page or file 12. Playback b) In standby or video recording mode, hold to zoom & Scroll Up Button c) In standby mode, press to review files d) In playback mode, press to rewind video a) In menu set-up, short press to make a selection 13.
- Page 10 LCD Interface:...
-
Page 11: Main Menu / Settings
4. Main Menu / Settings To enter the settings menu: Press Menu button and then enter the password. Enter the password by the following commands: ➢ Press Scroll Up button to change the character to the previous letter or number. ➢... - Page 12 The following is a list of the available settings and options. Bold = default. Setting Description Options 2560×1440 30P 2304×1296 30P Resolution The video resolution 1920×1080 30P 1280×720 30P 848×480 30P 40M (8448×4752 16:9) 30M (7304×4104 16:9) 25M (6664×3752 16:9) Megapixels The photo resolution 20M (5984×3366 16:9)
- Page 13 When on, camera will power up automatically and start video recording when it is charged. CarDV Mode Camera will power off as it Off, On normally does when it is disconnected from the power source. When on, camera will start video recording once it powers on.
- Page 14 When GPS is on, position of coordinates will show on the video footages. Then you put the Global coordinates into Google earth, Off, On Positioning that giving you the exact positioning of the footage recorded. -12 to +12 Time Zone Adopt local time in real time zone Default 0 Englsih, 繁體中文,...
- Page 15 Coding format The coding format of video files H.264, H.265 Time Setup Adjust time to real location yyyy/mm/ddhh/mm User can set Device SN and Person Alphanumeric ID setting characters If password is on, user needs to Password enter password to get access to On, Off setting and connection to PC Change...
-
Page 16: Operation
Operation Power on/off hold Power button for 3 seconds to start up and enter standby mode; at any mode with holding Power button for 3 seconds, camera will shut down. PS: at standby / video recording / audio recording mode, short press power button , screen saver can be on/off. - Page 17 PIV (picture in video) In video recording mode, press photo button to capture photo. Zoom In standby or video recording mode, hold Scroll Up button and scroll down button to zoom in and out the image. IR night vision Under dark circumstances, infrared LED will help to record clear image or video.
- Page 18 Photo, and Audio options. Press to button to select, and press OK button to confirm the selection. 1) In video file playback mode, PRESS OK button to pause/resume playback; PRESS scroll-Up button to rewind, PRESS Scroll-down button to fast forward, then PRESS OK button to play normally.
- Page 19 5.14 USB Driver video/picture/audio files can only be deleted on your PC/laptop. After being connected to PC, password interface shows up, please enter the password (default password is 000000), press the (ok) button 6 times and the camera will be recognized by the computer as Extra drive. User can go to camera folder and delete those files not needed.
- Page 20 If you record videos by using H.265 coding format, it is suggested to download a Media Player Codec Pack to assist in video playback, e.g: https://www.mediaplayercodecpack.com/...
Need help?
Do you have a question about the EH250 and is the answer not in the manual?
Questions and answers