Advertisement
Quick Links
What you need:
— Wi-Fi network name
— Wi-Fi network password
— Wi-Fi-capable device (computer, tablet, or smartphone)
— Good Wi-Fi signal to the area where the WiFi module is located
Step 1
Download the Pro Series Pumps CONNECT
app from the App Store or Google Play.
Connect to your Wi-Fi network
a. Open up your WiFi settings menu
and connect to the GLENTRON
network.* If the WiFi Module Setup
page does not open up automatically,
launch a web browser and type
192.168.1.1 into the URL field.
* NOTE: You may get a popup screen
saying Internet connection is not
available. It is okay to proceed and
connect to the GLENTRON network.
b. The WiFi Module Setup window will
appear.
• Scroll down to User Information.
c. Fill out the user information.
• Click 'save'.
When you see, "User configuration
data complete," click OK.
Register your module
a. You will receive an email from GlentronicsConnect.com at the email address you provided.
Check your junk/spam folder in case the email was sent there instead.
b. Click on the link and complete the registration. (Note: this link will expire in 24 hours; if link expires
before you complete Step 5, reset the WiFi module [see letter h. above] then repeat all parts of Step 4.)
• 15 minutes after registration, the module will conduct a request for an over-the-air software update.
If an update is required, the module will automatically update. This may take a few minutes; during
this time the unit may be unresponsive.
c. Launch the app to familiarize yourself with the interface. You can open the app to check on the status
of your system from anywhere, 24/7.
PS-WiFi2 Module
Quick Start Guide
Model PS-WiFi2
Plug the WiFi module into your Pro Series
®
Pumps system as shown on the installation
diagram. (See diagram on reverse side.)
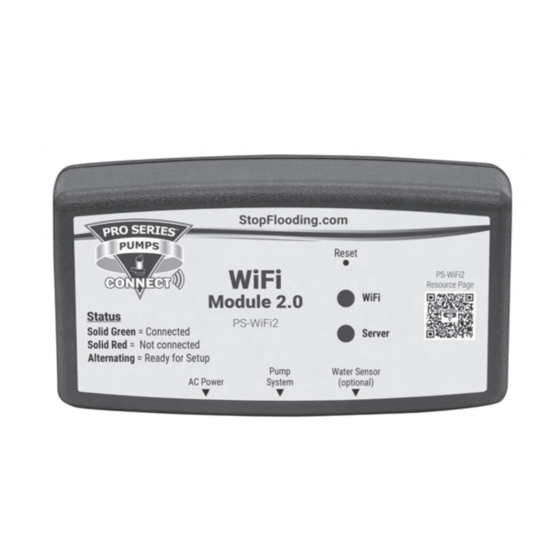
a. 'RED' and 'GREEN' lights
should be alternating.
Step 4
Step 5
Getting set up and connected is simple
1. Download the Pro Series Pumps
CONNECT
2. Plug the WiFi module into your Pro Series
system.
3. Mount the WiFi module.
4. Connect to your Wi-Fi network.
5. Register your product online.
Step 2
NOTICE:
Refer to the full PS-WiFi2
manual for all WARNINGS and CAUTIONS
https://www.stopflooding.com/
ps-wifi2-resources/
Scan QR code to see full
PS-WiFi2 manual and resources
app.
®
Step 3
Mount your module using the included
Velcro or mounting screws.
d. Scroll down, click on Available
Networks button.
e. Select your network from the
dropdown menu.
f. A Network Switch box will appear.
• Confirm your network, click OK.
g. A Secure Network box will appear.
• Enter your network password, click OK.
h. The 'RED' and 'GREEN' lights will
stop alternating if the connection is
successful.
• This may take 1-2 minutes.
• If lights do not stop alternating, reset
your WiFi module by holding the reset
button with a paper clip until both red
lights are on. Then repeat all of Step 4.
Note: We recommend you test the setup by
disconnecting power to the pump system
connected to the WiFi module.
You should receive an email, text or in-app
notification within a few minutes. Once you
have tested the setup and the WiFi module is
functioning, make sure to plug your sump
pump system back in.
Advertisement

Summary of Contents for Pro Series Pumps PS-WiFi2
- Page 1 PS-WiFi2 Module NOTICE: Refer to the full PS-WiFi2 manual for all WARNINGS and CAUTIONS Quick Start Guide https://www.stopflooding.com/ ps-wifi2-resources/ Scan QR code to see full Model PS-WiFi2 PS-WiFi2 manual and resources Getting set up and connected is simple What you need: 1.
- Page 2 Installation Guidelines USB data port connection to compatible USB data port connection to compatible Pro Series CONNECT™ backup or combination system Pro Series CONNECT™ C2 controller Connection with the USB data port enables homeowners to receive a text, email or in-app notification informing them of which alarm is occurring or what maintenance is needed.
Need help?
Do you have a question about the PS-WiFi2 and is the answer not in the manual?
Questions and answers