Advertisement
Quick Links
Instructions and Safety Manual
Nut/Soy Milk Maker
SSK-DJ02US
23-05-01
contents
........................................ 5
............................. 6
.......................
Thank you for purchasing this product.
..... 1
Please read this manual carefully before your first use
and keep it for future reference.
Warranty registration information can be found in this
manual.
10
..
11
This product is strictly for household use only and
.. 13
should not be used for commercial purposes.
...................
13
Advertisement

Summary of Contents for soseki SSK-DJ02US
-
Page 1: Table Of Contents
Instructions and Safety Manual Nut/Soy Milk Maker SSK-DJ02US 23-05-01 contents Thank you for purchasing this product. IMPORTANT SAFEGUARDS ..1 Please read this manual carefully before your first use PARTS ........5 and keep it for future reference. HOW TO USE ...... -
Page 2: Important Safeguards
When using electrical appliances, basic safety precautions should always be followed including the following: Read all instructions. Uses that comply with the precautions in the manual can guarantee correct use and personal safety. Please carefully read the manual before use, and keep the manual for future use. - Page 3 Power cable use Warning The appliance operates on an input voltage of 120V~. Please con rm the voltage before use. Before use, check whether the power cord, plug, cup body, and other components are damaged. If any damage is found, immediately stop using the appliance and contact seller for replacement or repair.
- Page 4 Attention During the preparation of hot beverages, especially if there is a power interruption and the program returns to standby mode, please replace the ingredients and restart the preparation to avoid scorching or over owing. To prevent discoloration or deformation of the appliance, do not use chemical agents such as alcohol or gasoline for cleaning.
- Page 5 Attention The appliance is intended for household use only. During operation, do not lift the appliance. Please strictly follow the water level indicators for cold and hot beverages. Please select the appropriate function according to the instructions. Selecting the wrong function may result in over owing, scorching, or undercooking.
-
Page 6: Parts
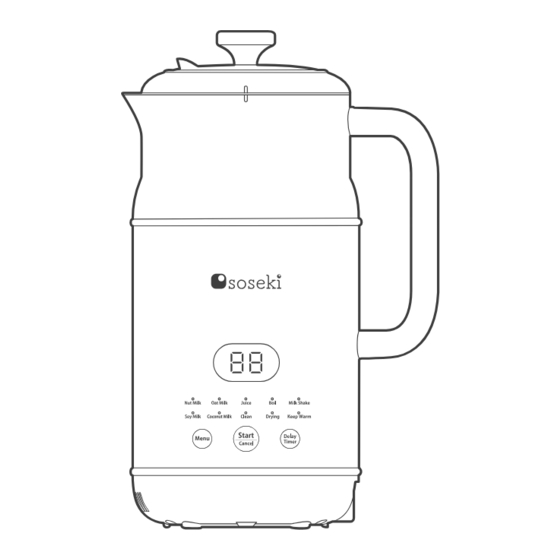
Accessory ・Filter ・Cleaning ・Tablespoon brush Main Body Handle Stainless steel cup Stirring blade Power Control panel interface Base Power cord Power interface ※Please note that there may be slight di erences between the appliance images and the actual item. Please refer to the actual item for accuracy. -
Page 7: How To Use
Smart Altitude Recognition ● To ensure the optimal performance of ingredient preparation, please follow the Wall Socket steps below when using the appliance for the rst time or when the appliance is moved to an area with a signi cant change in altitude: Connector Plug Remove all packaging. - Page 8 ● Operation Display Explanation 1. Buttons ① "Menu": Press the "Menu" button to select the desired function and recipe. ② "Start/Cancel": After selecting the desired function, press the "Start/Cancel" button to start. ③ "Delay Timer": The "Delay Timer" button is only e ective for the "Oat milk" or "Soy Milk" functions.
- Page 9 2. Oat milk: Refer to the recipe or personal taste preferences. Add 2.1oz(60g) of oats and water not exceeding the maximum water level mark. In standby mode, select the "Oat Milk" function and press the "Start/Cancel" button to start. There will be 10 beeps when the preparation is completed. 3.
- Page 10 Usage Instructions 1. Prepare the appropriate amount of ingredients according to the recipe requirements (if the ingredients are larger, cut them into small pieces), and add them to the appliance. 2. Add water, making sure not to exceed the maximum water level mark. 3.
-
Page 11: Maintenance/Storage Instructions
MAINTENANCE/STORAGE INSTRUCTIONS Product Maintenance • After each use, please clean the appliance promptly. • Before cleaning, be sure to disconnect the power supply. • The appliance can be wiped clean with a damp cloth dipped in neutral detergent, and then dried with a dry cloth. -
Page 12: Troubleshooting Guide
TROUBLESHOOTING GUIDE For situations where the machine "Cannot Operate" or has "Abnormal Operation," please check the following before seeking repairs: Problem Possible Issues Recommended Solutions Machine does Contact the seller for · Is the appliance faulty? not heat up replacement or repair. Buttons are Contact the seller for ·... - Page 13 TROUBLESHOOTING GUIDE For situations where the machine "Cannot Operate" or has "Abnormal Operation," please check the following before seeking repairs: Problem Possible Issues Recommended Solutions · Is there a temperature Disconnect the power and let the detection error? product rest for 1 hour before using. Display shows E3 If the issue persists, contact the seller ·...
-
Page 14: Product Specifications
PRODUCT SPECIFICATIONS P rod uc t S p ec i ca t i o n s Rated Voltage 120 V ~ Rated Frequency 60 Hz Rated Heating Power 800W Rated Mixing Power 250W Capacity 1.05QT(1.0L) Size 205 mm x 150 mm x 322 mm N.W.
Need help?
Do you have a question about the SSK-DJ02US and is the answer not in the manual?
Questions and answers