
Summary of Contents for Hyperion HYA60701
- Page 1 Two Way Articulation Probe User Manual HYA60701/02/03(Wired) WHYA60701/02/03(Wireless)
-
Page 3: Table Of Contents
Contents Product Outlook (wired model)......... 4 Product Outlook (wireless model)......6 Getting Started......... 8 Charging the battery..........10 Installing Accessories ........12 Op e r a t io n s..........14 Function buttons........15 Spectifications. -
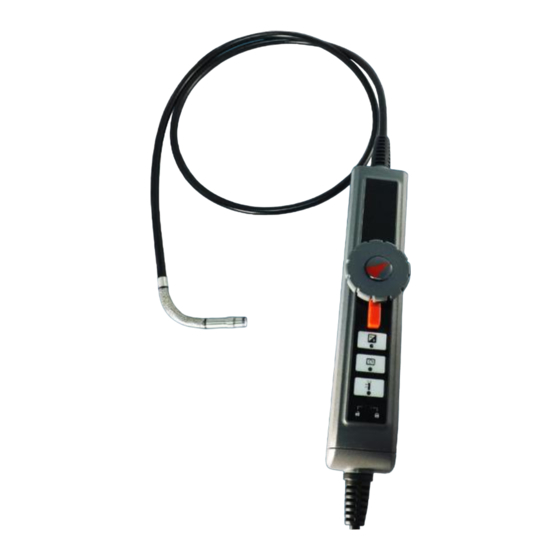
Page 4: Product Outlook (Wired Model)
Product outlook (wired model) - Page 5 Probe - To guide camera head to inspection area Bending Neck- To bend camera to change view angle Camera Head - Lighting and image capture Fitting Ring - Fix and fit accessories Thread Protective Ring - Thread protection Red Cap - protect camera head while not in use Control Wheel - To adjust bending neck angle Control Wheel shaft lock- To lock bending neck angle Boost button - Using in dark environment to enhance the...
-
Page 6: Product Outlook (Wireless Model)
Product outlook( wireless model) *Back channel adjustment... - Page 7 Probe - To guide camera head to inspection area Bending Neck- To bend camera to change view angle Camera Head - Lighting and image capture Fitting Ring - Fix and fit accessories Thread Protective Ring - Thread protection Red Cap - protect camera head while not in use Control Wheel - To adjust bending neck angle Control Wheel shaft lock- To lock bending neck angle Boost button - Using in dark environment to enhance the...
-
Page 8: Getting Started
Getting started For wired model Step1: Connect Articulation probe to main system with align dot then tighten the screw nut. Step2: Turn on the system until the image is displayed. For wireless model Step1: This articulation handle must use the same channel as the main system during wireless transmission. - Page 9 Step2: To activate the articulation probe, turn on the LED adjustment dial on the right hand side of the handle, roll up / down the wheel to adjust the brightness .To turn off this articulation, just roll up this wheel until you hear a "click" sound.
-
Page 10: Charging The Battery
Charging the battery Insert the handle into the rear botton slot of the system to re-charge both units simultaneously. You can also charge the articulation probe alone through USB, form your PC/laptop. Simply connect the handle to a PC or Laptop using a standard Mini USB cable to charge. - Page 11 Reference chart for power indicator status Light Indication Status Green In use Battery full Dark Red Low battery Please charge the battery immediately Orange Charging while in use Charging while in Charging while power off Charging while power None Full battery (During The light off when the power off) battery is fully charged...
-
Page 12: Installing Accessories
Installing Accessories Mirror Step1: Rotating out thread protective ring Step2: Rotate fitting ring to bottom Step3: Put the mirror into camera tip till the threading is screwed tight Step4: Align side LED opening with mirror adaptor. The mirror adaptor need to fit in side LED opening Step5: Rotate fitting ring upward to fix and tighten mirror... - Page 13 NOTE: You might repeat step 4-5 to adjust the mirror adaptor if the LED light is shaded.
-
Page 14: Operations
Operations Articulation Rotate the control wheel clockwise to bend tip right, counter clockwise to bend left. Lock To fix bending neck angle, just switch the lock shaft clockwise to the lock position. LOCK... -
Page 15: Function Buttons
Function buttons Boost button Using in dark environment to enhance the brightness NOTE: Please hold the probe steady to get clear images. *Before boost *After boost Rotate button Four 90° view rotation to identify codes... - Page 16 Particle free button + The button works with mirror to enable particle free function *w/o particle free *with particle free...
-
Page 17: Spectifications
Specifications Wired (HYA 60701/02/03) 6mm VGA Articulation Dimension 228 x 35 x 53 mm Weight 400g Camera Head Length 23.3mm Camera Head Material Stainless steel Tube Length (without Tip) 1m,2m,3m Tube Diameter Resolution VGA (640 x 480) Light source White LED 10~60mm Working Temperature -20℃... - Page 18 Wireless(WHYA 60701/02/03) 6mm VGA Articulation Dimension 201 x 35 x 53 mm Weight 265g Battery Rechargeable Li Battery 3.7V Brightness Control Variable Camera Head Length 23.3mm Camera Head Material Stainless steel Tube Length (without Tip) 1m,2m,3m Tube Diameter Resolution VGA (640 x 480) Light source White LED 10~60mm...
-
Page 19: Cautions For Use
Cautions for Use To avoid danger, do not put the insert tube into any flammable liquid or gas The insert tube contains a series of small wires that control the optics and electronics of the camera tip. To ensure reliability, do not bend the insert tube more than 90°, and always keep the insert tube in a large arc as possible for storage This product is designed for indurstrial use only. - Page 20 Bending neck is composed with precision components, DO NOT put under heavy load on this DO NOT rotate the wheel when it is at the maximum angle Never use the bending neck as a HOOK...
- Page 21 Please straighten the bending neck everytime before storage NEVER bend the bending neck with hand, operate by control wheel only Please keep the insert tube straight while in use DO NOT bundle the insert tube less than a 15cm circle while not in use...
- Page 22 Liquid immersion passed: unleaded gasoine, diesel, machine oil, brake oil, transmission oil, and water. Don't tight accessory too hard, just screw tightly until accessory is fixed Use cleaning liquid and swab provided in the cleaning kit for camera head cleaning.
- Page 23 step1 step2 step3 step4 Fixed...
- Page 24 GMGA MEASURING Address: No. 33 Alley 99/120 Dinh Cong Ha, Dinh Cong Ward, Hoang Mai District, 10000 Hanoi City, Vietnam Telephone: +84 845 969 336 Email: info@gmga.vn Website: https://gmga.vn/...
Need help?
Do you have a question about the HYA60701 and is the answer not in the manual?
Questions and answers