Advertisement
Quick Links
Advertisement

Summary of Contents for Classic Instruments Zeus Link SN73Z
- Page 1 Classic Instruments SN73Z Zeus Link Installation Manual...
-
Page 2: Table Of Contents
Table of Contents Welcome from the Team at Classic Instruments! ......................3 Connecting the Zeus Link to your Vehicle ........................4 Speedometer Wiring ..................................5 Fuel, Temperature, Oil pressure & Volt Wiring ..........................6 Tachometer Wiring ..................................7 Boost & Pressure Gauges Wiring ..............................8 Direct Fit Gauge Wiring ................................... -
Page 3: Welcome From The Team At Classic Instruments
LIMITED WARRANTY Classic Instruments, Inc. (CI) warrants to the original purchaser that any CI product manufactured or supplied by CI will be free from defects in material and workmanship under normal use and service for a period of seven (7) years from date of purchase. -
Page 4: Connecting The Zeus Link To Your Vehicle
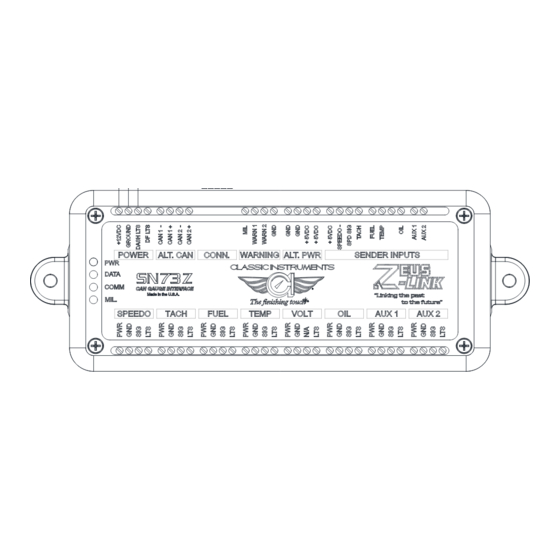
Connecting the Zeus Link to your Vehicle 1) Connect +12V keyed & fused power to the “+12VDC” position of the Zeus Link. a. (a 5A fuse is recommended) 2) Connect a good ground to the “GROUND” position of the Zeus Link. 3) Connect a dash light power wire to the “DASHLTS”... -
Page 5: Speedometer Wiring
Speedometer Wiring 1) Connect the speedometer’s power [Pink] wire to the SPEEDO “PWR” position of the Zeus Link. 2) Connect the speedometer’s ground [Black] wire to the SPEEDO “GND” position of the Zeus Link. 3) Connect the speedometer’s signal [Purple] wire to the SPEEDO “SIG” position of the Zeus Link. 4) Connect the speedometer’s dash light [Grey] wire to the SPEEDO “LTS”... -
Page 6: Fuel, Temperature, Oil Pressure & Volt Wiring
Fuel, Temperature, Oil pressure & Volt Wiring 1) Connect each gauge’s power connection to the FUEL, TEMP, VOLT, or OIL “PWR” position of the Zeus Link. 2) Connect each gauge’s ground connection to the FUEL, TEMP, VOLT, or OIL “GND” position of the Zeus Link. -
Page 7: Tachometer Wiring
Tachometer Wiring 1) Connect the tachometer’s power [Pink] wire to the TACH “PWR” position of the Zeus Link. 2) Connect the tachometer’s ground [Black] wire to the TACH “GND” position of the Zeus Link. 3) Connect the tachometer’s signal [White] wire to the TACH “SIG” position of the Zeus Link. 4) Connect the tachometer’s dash light [Grey] wire to the TACH “LTS”... -
Page 8: Boost & Pressure Gauges Wiring
Boost & Pressure Gauges Wiring 1) Connect each gauge’s power wire [Pink] to the AUX1 or AUX2 “PWR” position of the Zeus Link. 2) Connect each gauge’s ground wire [Black] to the AUX1 or AUX2 “GND” position of the Zeus Link. 3) Connect each gauge’s signal wire [White] to the AUX1 or AUX2 “SIG”... -
Page 9: Direct Fit Gauge Wiring
Direct Fit Gauge Wiring 1) Connect the gauge harness’s power [Pink] wire to the SPEEDO “PWR” position of the Zeus Link. 2) Connect the gauge harness’s ground [Black] wire to the SPEEDO “GND” position of the Zeus Link. 3) Connect the gauge harness’s dash light [Grey] wire to the “DF LTS” position of the Zeus Link. 4) Connect the gauge harness’s speed signal [Purple] wire to the SPEEDO “SIG”... - Page 10 Zeus Link App 1) Connect the Zeus Link module to your vehicle CAN or OBD2 network. 2) Apply power to the Zeus Link module. 3) Ensure that Bluetooth is enabled on your mobile device. 4) Start the Zeus Link app. When prompted, select your data source you will use with the Zeus Link. 5) Add the physical gauges you have connected to the Zeus Link module to the app.
- Page 11 a. Speedometer configuration: i. Select your input source for your speed signal and the maximum speed scale of your speedometer. Tap “UPDATE” to apply your changes. b. Tachometer configuration: i. Select your input source for your tach signal and the maximum RPM scale of your tachometer.
- Page 12 c. Fuel configuration: i. Select what resistance range the fuel sending unit you have connected to the Zeus Link module has. ii. Select if the fuel gauge rotates a “QUARTER” circle (from empty to full) or a three- quarter circle “FULL” (from empty to full). Tap “UPDATE” to apply your changes. d.
- Page 13 e. Voltage configuration: i. Input source is not required for this gauge. ii. Select if the voltage gauge rotates a “QUARTER” circle (from min to max) or a three- quarter circle “FULL” (from min to max). Tap “UPDATE” to apply your changes. f.
- Page 14 6) Once all your physically connected gauges have been entered, press the “DONE” button. a. Select “YES” to save this configuration to the Zeus Link module. Diagnostics The diagnostics tab at the top of the Zeus Link app gives valuable information about each gauge. From the diagnostics tab, you can also check the calibration and functionality of each gauge you have connected.
Need help?
Do you have a question about the Zeus Link SN73Z and is the answer not in the manual?
Questions and answers