Advertisement
Quick Links
Advertisement

Related Manuals for HYSapientia HYS-AFO-05B

Summary of Contents for HYSapientia HYS-AFO-05B
- Page 1 & healthy eating HYS-AFO-05B...
- Page 2 Important Safeguards..........3-5 Know Your Air Fryer Oven........6-7 Before First Use..............8 Using Your Air Fryer Oven........9-14 Air Fry Tips................15 Troubleshooting..............16 Cleaning&Maintenance..........17 How To Set...............18-21 Accessories Instructions........22-28 Accessories Combination......29-30 About HYSapientia Dual Zone Air Fryer Oven..................31 Frequently Asked Questions.......32...
- Page 3 When using electric appliances, basic safety precautions should always be followed: 1. Read all instructions. supervised to ensure that they do 2. The appliances are not intended not play with the appliance. to be operated by means ofan 11. Do not let the cord hang over the external timer or separate edge of the table or counter or remote-control system.
- Page 4 18. Do not use outdoors. curtains, draperies, walls, and 19. Do not touch hot surfaces and the like, when in operation. Do the air outlet on the back; use not store any item on top of the the handle. During air frying, appliance when in operation.
- Page 5 36. The air fryer does not have a microwave function, so if you want to heat food, you can wrap it in aluminium foil and heat it at 100°C. 37. Do not use this product near showers, bathtubs, washbasins, swimming pools, etc. Do not rinse this product with water. 38.
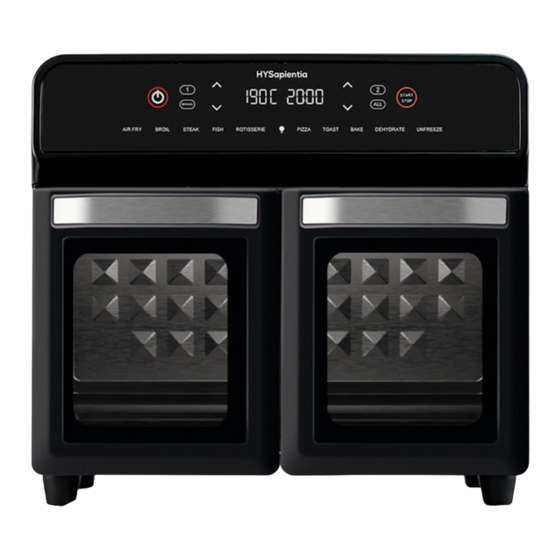
- Page 6 1. Control Panel 8. Air Fryer basket 2. Door of compartment 1 9. Rotisserie Rack 3. Door of compartment 2 10. Half-width Air Fryer Basket 4. Power Cord 11. Half-width Oven Rack 5. Fetch Rack 12. Half-width Bake Tray/Crumb Tray 6.
- Page 7 1. Power ON/OFF 13. AIR FRY 2. Whole Compartment Manual Mode 14. BROIL 3. Compartment 1 Selection 15. STEAK 4. Temperature Down 16. FISH 5. Temperature Up 17. ROTISSERIE 6. Temperature Display 18. Light Switch 7. Time Display 19. PIZZA 8.
- Page 8 Remove all packaging materials before first use. Wash the Air Fryer Basket, Oven Rack and Bake Tray with hot water, some dishwashing liquid, and a non-abrasive sponge. Dry before placing trays into Air Fryer Oven. Place the Bake Tray in the bottom of the Air Fryer Oven. •...
- Page 9 USING YOUR AIR FRYER OVEN The Air Fryer Oven preset function is only for reference; the actual cooking time and temperature can be set according to the specific food. Operating Instructions 1. Power on (power on initialization) After plugging in the power supply, the control board enters standby mode: the buzzer drops a hint and all the buttons are displayed.
- Page 10 2.When the start button is pressed again, the program will pause. The light ring outside the start button will flash at an interval of 0.5s, the temperature display on the left digital tube will remain on, and the time display on the right digital tube will pause and flash at an interval of 0.5s.
- Page 11 USING YOUR AIR FRYER OVEN 3.Opening the door of the corresponding cavity displays the OPEN prompt for the corresponding cavity. 4.When the corresponding cavity is running, the digital tube shows the countdown for one minute, the corresponding cavity opens the light prompt, and the corresponding digital tube shows the HOT END prompt when the program is finished.
- Page 12 1.In the standby mode, press to enter the Whole Compartment Custom Mode. The Whole Compartment Custom Mode is only applicable to the Whole Compartment Working Mode (the temperature sensing logic is consistent); The default temperature and time are 180 degrees for 20 minutes. Press the Start button to start running the set time and temperature.
- Page 13 USING YOUR AIR FRYER OVEN General display and operation logic: 1.The temperature column displays the set temperature, and the time column counts down the minutes. Return to the default display state of the current menu when returning to zero (the current menu is highlighted);After cooling,it enters the standby state.
- Page 14 USING YOUR AIR FRYER OVEN Preset Program The oven is designed with several preset programs, as shown in the following figure. Preset programs automatically control cooking time and temperature. Select a preset program, the display will show the corresponding time and temperature, and the icon lights up. Press the Start button and the oven works according to the selected preset program.
- Page 15 AIR FRY TIPS TIPS ON USING THE AIR FRY SETTING The air fryer oven boasts excellent cooking speed. To achieve optimal results, pay attention to the varying temperature requirements for different foods, and it is advisable to avoid using excessively high temperatures to ensure that the food retains its ideal texture and nutritional value.
- Page 16 Problem Solution The Air Fryer Oven Ensure the unit is plugged into a does not work dedicated power outlet. Use smaller batches for more even cooking Food is not cooked Raise temperature and continue cooking Turn over food halfway through cooking process Food is not fried evenly...
- Page 17 Never immerse cords, plugs, or the appliance in water or any other liquid. Do not plug in the appliance or operate the control panel with wet hands. • Clean the appliance after every use. • Always unplug the appliance and let it cool down completely before cleaning.
- Page 18 Before starting, please insert the divider board into the oven cavity. Plug in the power cord, then click " ". (ON/OFF) Click button " " to select Compartment 1. Press the mode button, and select the mode. (AIR FRY, BROIL, STEAK, FISH, ROTISSERIE, PIZZA, TOAST, BAKE, DEHYDRATE, UNFREEZE) Click button "...
- Page 19 Before starting, please remove the divider board from the oven cavity. Plug in the power cord, then press " ". (ON/OFF) Click button " " to select the whole compartment mode. Press the mode button, and select the mode. (AIR FRY, BROIL, STEAK, FISH, ROTISSERIE, PIZZA, TOAST, BAKE, DEHYDRATE, UNFREEZE) Click "...
- Page 20 Click button " " to select Compartment 2. Press the mode button and select the mode. (AIR FRY, BROIL, STEAK, FISH, ROTISSERIE, PIZZA, TOAST, BAKE, DEHYDRATE, UNFREEZE) Click the temperature adjustment arrow " " to adjust the temperature. Click the time adjustment arrow " "...
- Page 21 Please remove the divider board from the oven cavity before starting. Plug in the power cord, then press " ". (ON/OFF) Click the " " button. (In this mode, all the function preset buttons at the bottom are disabled, leaving only the oven light button.) Click the temperature adjustment arrow "...
- Page 22 Bake Tray Oven Rack The Bake Tray is deep enough Use an Oven Rack to allow hot air to heat food evenly to cook food or use it as a crumb tray. from the top fan. Place the Bake Tray on level 1. Place the Oven Rack on level 2.
- Page 23 Air Fryer Basket can hold Use Fetch Rack to install and more small and large remove the rotisserie rack. quantities of food. 1.When installing, align both Place the Air Fryer Basket on ends of the same letter, first level 1.2 align the B end, and then install the A end.
- Page 24 Use Gloves to remove all accessories after cooking to prevent burns. Wear gloves and move hot accessories. No food contact Oven Cavity Diagram...
- Page 25 Rotisserie Rack can fix larger food and the synchronous motor in the oven makes the food rotate 360 degrees in the oven to achieve the best cooking effect. 1.Pass the shaft through the fork, adjusting the distance of the fork according to the size of the food. 2.Pass the screw through the hole above the fork and tighten to secure the fork.
- Page 26 The Bake Tray is deep enough Use an Oven Rack to allow hot air to heat food evenly to cook food or use it as a crumb tray. from the top fan. Place the Bake Tray on level Place the Oven Rack on level 1.2.3 1.2.
- Page 27 Air Fryer Basket can hold more small and large quantities of food. Place the Air Fryer Basket on level 1.2 Fries/Chicken Nuggets/ Potato Wedges/Doritos Oven Cavity Diagram...
- Page 28 Please place the Bake Tray at the bottom when cooking to catch any crumbs or grease drips. Be careful not to reverse the ends of the Rotisserie, otherwise it will cause motor failure. All accessories are dishwasher safe (except gloves). Please refrain from touching the accessories with your hands before they cool down.
- Page 29 Oven Rack Air Fryer Basket Bake Tray Bake Tray Oven Rack Oven Rack Air Fryer Basket Oven Rack Bake Tray Bake Tray Air Fryer Basket Rotisserie Rack Air Fryer Basket Bake Tray...
- Page 30 Oven Rack Oven Rack Air Fryer Basket Air Fryer Basket Air Fryer Basket Oven Rack Bake Tray Bake Tray Bake Tray Oven Rack Air Fryer Basket Bake Tray Bake Tray...
- Page 31 1000rpm. The HYSapientia Dual Zone Air Fryer Oven employs a special air duct that can absorb air from both sides of the oven, generating a 360° thermal cyclone at the top of the oven, thus creating a powerful hot air effect similar to an air fryer.
- Page 32 What if my food is not cooked or overcooked in the preset mode? If the food is not cooked or overcooked in a specific preset mode, you can slightly adjust the temperature and time in that mode for the next cooking, as the preset mode is only for reference. Does the air fryer have a microwave function? The air fryer does not have a microwave function.
- Page 33 & healthy eating Cook Book Support Web:www.hysapientia.com Support E-mail:service@hysapientia.com...
Need help?
Do you have a question about the HYS-AFO-05B and is the answer not in the manual?
Questions and answers