Advertisement
Available languages
Available languages
Quick Links
Advertisement

Summary of Contents for Vlectro OP 012824
- Page 1 INSTRUCTION MANUAL Night vision wild camera...
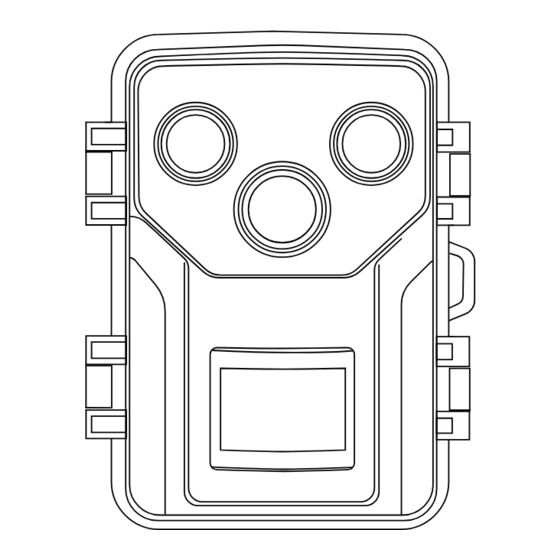
- Page 3 Onderdelen ❷ ❸ ❻ ❹ ❺ ❿ ❼ ❶ ❽ ❾ 1. Camera 6. Schakelaar 2. Luidspreker 7. Batterijvak 3. Voedingspoort 6V 1,5A 8. Bedieningspaneel 4. USB-poort 9. 2,0" scherm 5. SD-kaartsleuf 10. 940nm geen gloeien IR LED...
- Page 4 Accessory Bevestigingsset Micro USB-kabel Installatieriem Specificatie Fotoresolutie: 20MP/16MP12MP/8MP/5MP Resolutie: 1080P/720P/D1/480 Detectiehoek: Tot 120° Detectieafstand: 80ft (dag), 65ft (nacht) Vul Lichte leiden Golflengte: 940nm (Geen Gloed) Vullicht LED Hoeveelheid: 2 stuks Triggertijd: 0,2s - 0,5s ...
- Page 5 Kenmerken Modus: Foto's (standaard) / Video's / Foto's & Video's Fotoresolutie: 20MP / 16MP / 12MP / 8MP / 5MP (standaard) Videoresolutie: 1920*1080P / 1280*720P (standaard) / 720*480P / 640*480P Tijdsverloop video: 8MP (3840*2160P) /5MP (3072*1728P) standaard / 3MP (2304*1296P) Audio-opname: Aan (standaard) / Uit ...
- Page 6 1. Zet de schakelaar van "Off" op "Test". Menutoets Menu-interface Modus Fotoresolutie Fotoserie Videoresolutie Videoresolutie TL Videolengte 2. Druk op de knop Menu en begin de camera-instellingen aan te passen. 3. Wanneer u klaar bent met het instellen van de camera, draait u de Schakel van "Test"...
- Page 7 Bevestig de camera aan de muur met behulp van de montagekit. Bind de camera aan een boom met behulp van de installatiegordel.
-
Page 8: Pièces Détachées
Pièces détachées ❷ ❸ ❹ ❺ ❻ ❿ ❼ ❶ ❽ ❾ 1. L'appareil photo 6. Interrupteur 2. Le président de l'assemblée 7. Compartiment à piles 3. Port d'alimentation 6V 1,5A 8. Clavier de commande 4. Port USB 9. Écran de 2,0 pouces 5. -
Page 9: Spécifications
Accessoire Kit de fixation Câble micro USB Ceinture d'installation Spécifications Résolution photo : 20MP/16MP12MP/8MP/5MP Résolution : 1080P/720P/D1/480 Angle de détection : Jusqu'à 120 Distance de détection : 80 pieds (jour), 65 pieds (nuit) Longueur d'onde de la LED de remplissage : 940nm (non ... -
Page 10: Caractéristiques
Caractéristiques Mode : Photos (par défaut) / Vidéos / Photos et vidéos Résolution photo : 20MP / 16MP / 12MP / 8MP / 5MP (par défaut) Résolution vidéo : 1920*1080P / 1280*720P (par défaut) / 720*480P / 640*480P Vidéo Time Lapse : 8MP(3840*2160P) /5MP(3072*1728P)par ... - Page 11 1. Faire passer l'interrupteur de "Off" à "Test". Touche de menu Interface de menu Mode de fonctionnement Résolution des photos Série de photos Résolution vidéo Résolution vidéo TL Durée de la vidéo 2. Appuyez sur le bouton Menu et commencez à régler les paramètres de l'appareil photo.
- Page 12 Fixer la caméra au mur à l'aide du kit de montage Attachez l'appareil photo à un arbre à l'aide de la courroie d'installation.
- Page 13 Teile ❷ ❸ ❹ ❺ ❻ ❿ ❼ ❶ ❽ ❾ 1. Kamera 6. Schalter 2. Sprecher 7. Batteriefach 3.Stromversorgungsanschluss 8. Steuerkreuz 6V 1.5A 4. USB-Anschluss 9. 2.0" Bildschirm 5. SD-Kartensteckplatz 10. 940nm nicht leuchtende IR-LED...
-
Page 14: Spezifikation
Zubehör Fixierungs-Kit Micro-USB-Kabel Installationsgürte Spezifikation Fotoauflösung: 20MP/16MP12MP/8MP/5MP Auflösung: 1080P/720P/D1/480 Erfassungswinkel: Bis zu 120° Erkennungsweite: 80ft (Tag), 65ft (Nacht) Fülllicht LED-Wellenlänge: 940nm (kein Glühen) Fill Light LED Anzahl: 2 Stück Auslösezeit: 0,2s - 0,5s Wasserdicht: IP66 ... - Page 15 Eigenschaften Modus: Fotos (Standard) / Videos / Fotos & Videos Fotoauflösung: 20MP / 16MP / 12MP / 8MP / 5MP (Standard) Video-Auflösung: 1920*1080P / 1280*720P (Standard) / 720*480P / 640*480P Zeitraffer-Video: 8MP(3840*2160P) /5MP(3072*1728P)Standard / 3MP(2304*1296P) Audio-Aufnahme: Ein (Standard) / Aus ...
- Page 16 1. Drehen Sie den Schalter von "Aus" auf "Test". Menü-Taste Menü- Schni stelle Modus Fotoauflösung Fotoserie Auflösung des Videos TL videl Auflösung Länge des Videos 2. Drücken Sie die Menütaste und beginnen Sie, die Kameraeinstellungen anzupassen. 3. Wenn Sie die Einstellungen der Kamera abgeschlossen haben, drehen Sie den von "Test"...
- Page 17 Befestigen Sie die Kamera mit dem Montagesatz an der Wand. Befestigen Sie die Kamera mit dem Montagegurt an einem Baum.
-
Page 18: Parti Di Ricambio
Parti di ricambio ❷ ❸ ❹ ❺ ❻ ❿ ❼ ❶ ❽ ❾ 1. La macchina fotografica 6. Interruttore 2. Altoparlante 7. Vano batteria 3. Porta di alimentazione 6V 1,5A 8. Pad di controllo 4. Porta USB 9. Schermo da 2,0 5. - Page 19 Accessorio Kit di fissaggio Micro USB Cinghia di installazione del cavo Specifiche Risoluzione fotografica: 20MP/16MP12MP/8MP/5MP Risoluzione: 1080P/720P/D1/480 Angolo di rilevamento: Fino a 120° Distanza di rilevamento: 80ft (giorno), 65ft (notte) Luce di riempimento LED Lunghezza d'onda: 940nm (senza ...
- Page 20 Caratteristiche Modalità: Foto (predefinita) / Video / Foto e Video Risoluzione foto: 20MP / 16MP / 12MP / 8MP / 5MP (predefinita) Risoluzione video: 1920*1080P / 1280*720P (predefinita) / 720*480P / 640*480P Video in time lapse: 8MP (3840*2160P) / 5MP (3072*1728P) ...
- Page 21 1. Girare l'interruttore da "Off" a "Test". Tasto menu Menu-interfaccia Modalità Risoluzione delle foto Serie di foto Risoluzione video Risoluzione video TL Lunghezza video 2. Premere il pulsante Menu e iniziare a regolare le impostazioni della fotocamera. 3. Una volta terminata l'impostazione della fotocamera, ruotare il tasto passare da "Test"...
- Page 22 Montare la telecamera a parete utilizzando il kit di montaggio. Legare la telecamera a un albero utilizzando la cinghia di montaggio.
- Page 23 Piezas ❷ ❸ ❹ ❺ ❻ ❿ ❼ ❶ ❽ ❾ 1. Cámara 6. Interruptor 2. Altavoz 7. Compartimento de las pilas 8. Panel de control Puerto de alimentación 6V 1.5A 4. 4. Puerto USB 9. Pantalla de 2,0 5. Ranura para tarjetas SD 10.
- Page 24 Accesorio Kit de fijación Cable micro USB Cinta de instalación Especificación Resolución fotográfica: 20MP/16MP12MP/8MP/5MP Resolución: 1080P/720P/D1/480 Ángulo de detección: Hasta 120°. Distancia de detección: 80 pies (día), 65 pies (noche) Luz de relleno LED Longitud de onda: 940 nm (sin brillo) ...
- Page 25 Características Modo: Fotos (por defecto) / Vídeos / Fotos y Vídeos Resolución fotográfica: 20MP / 16MP / 12MP / 8MP / 5MP (por defecto) Resolución de vídeo: 1920*1080P / 1280*720P (por defecto) / 720*480P / 640*480P Vídeo Time Lapse: 8MP(3840*2160P) /5MP(3072*1728P)por ...
- Page 26 1. Gire el interruptor de "Off" a "Test". Menú Interfaz de menú Modo Resolución de las fotos Serie de fotos Resolución de vídeo Resolución TL videl Duración del vídeo 2. Pulse el botón Menú y comience a ajustar la configuración de la cámara.
- Page 27 Monte la cámara en la pared con el kit de montaje Ata la cámara a un árbol utilizando la correa de instalación.
- Page 28 Parts ❷ ❸ ❹ ❺ ❻ ❿ ❼ ❶ ❽ ❾ 1. Camera 6. Switch 2. Speaker 7. Battery compartment 3. Power Supply Port 6V 1.5A 8. Control Pad 4. USB Port 9. 2.0" Screen 5. SD Card Slot 10. 940nm No Glow IR LED...
-
Page 29: Specification
Accessory Fixation Kit Micro USB Cable Installation Belt Specification Photo Resolution: 20MP/16MP12MP/8MP/5MP Resolution: 1080P/720P/D1/480 Detection Angle: Up to 120° Detection Distance: 80ft (day), 65ft (night) Fill Light LED Wavelength: 940nm (No Glow) Fill Light LED Quantity: 2 pcs ... - Page 30 Features Mode: Photos (default) / Videos / Photos & Videos Photo Resolution: 20MP / 16MP / 12MP / 8MP / 5MP (default) Video Resolution: 1920*1080P / 1280*720P (default) / 720*480P / 640*480P Time Lapse Video: 8MP(3840*2160P) /5MP(3072*1728P)default ...
- Page 31 1. Turn the switch from "Off" to "Test". Menu-key Menu-interface Mode Photo resolution Photo series Video resolution TL videl resolution Video length 2. Press the Menu button and start to adjust the camera settings. 3. When you have finished setting up the camera, turn the switch from "Test"...
- Page 32 Mount the camera to the wall using the mounting kit Tie the camera to a tree using the installation belt.
- Page 33 Części ❷ ❸ ❹ ❺ ❻ ❿ ❼ ❶ ❽ ❾ 1. Kamera 6. Przełącznik 2. Głośnik 7. Komora baterii 3. Port zasilania 6V 1.5A 8. Control Pad 4. Port USB 9. Ekran 2,0" 5. Gniazdo kart SD 940nm dioda LED IR bez poświaty...
- Page 34 Akcesoria Zestaw mocujący kabel micro USB Pas instalacyjny Specyfikacja Rozdzielczość zdjęć: 20 MP/16 MP12 MP/8 MP/5 MP Rozdzielczość: 1080P/720P/D1/480 Kąt wykrywania: Do 120° Odległość wykrywania: 80 stóp (dzień), 65 stóp (noc) Długość fali światła wypełniającego LED: 940nm (bez poświaty) ...
- Page 35 Cechy Tryb: Zdjęcia (domyślnie) / Filmy / Zdjęcia i filmy Rozdzielczość zdjęć: 20 MP / 16 MP / 12 MP / 8 MP / 5 MP (domyślnie) Rozdzielczość wideo: 1920*1080P / 1280*720P (domyślnie) / 720*480P / 640*480P Wideo poklatkowe: 8MP(3840*2160P) ...
- Page 36 1. Przełącz przełącznik z pozycji "Off" na "Test". Klawisz menu Interfejs menu Tryb Rozdzielczość zdjęć Seria zdjęć Rozdzielczość wideo Rozdzielczość wideo TL Długość wideo 2. Naciśnij przycisk Menu i zacznij dostosowywać ustawienia kamery. 3.Po zakończeniu konfigurowania kamery obróć przycisk Przełącz z "Test" na "Wł.", aby rozpocząć robienie zdjęć lub nagrywanie filmów.
- Page 37 Zamontuj kamerę na ścianie za pomocą zestawu montażowego. Przywiąż kamerę do drzewa za pomocą paska montażowego.
-
Page 38: Declaration Of Conformity
DECLARATION OF CONFORMITY Confinity NV, Dorp 16, 9830, Sint-Martens-Latem, Belgium declares the following device in sole responsibility: Brand name: Vlectro Product type: Night vision wild camera Item number: OP_012824 Complies with the following harmonization rules: EN55032:2015+AC:2016+A11:2020 EN 55035:2017+A11:2020 ENIEC61000-3-2:2019 EN61000-3-3:2013+A1:2019...
Need help?
Do you have a question about the OP 012824 and is the answer not in the manual?
Questions and answers
jak przeglądać zdjęcia w kamerze
To view photos on the Vlectro camera OP 012824:
1. Turn the switch from "Off" to "Test".
2. Use the control pad and screen (2.0 inch) to navigate through the menu and view stored photos.
Make sure an SD card is inserted with saved photos.
This answer is automatically generated