
Subscribe to Our Youtube Channel
Related Manuals for DEVANTI EAC-C-RC-11C-WH


Summary of Contents for DEVANTI EAC-C-RC-11C-WH
- Page 1 Full Function Portable Evaporative Cooler Instruction Manual Model:EAC-C-RC-11C-WH...
-
Page 2: Important Safeguards
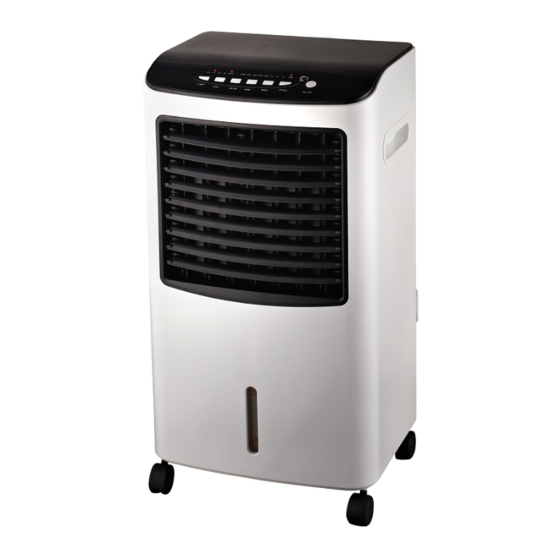
Important Safeguards • Do not insert or allow foreign objects to enter any ventilation or exhaust opening as this may cause an electric shock, fire or could When using electrical appliances, in damage the unit. order to reduce the risk of fire, electric • Use the unit only as described in this booklet shock and/or injury, these basic Any other use not recommended by the safety precautions should always be manufacturer may cause fire, electric shock followed: or injury to persons. • Fully remove the power cord from the power For Your Safety cord tidy before use. Always uncoil the power cord before applying power. - Page 3 Features of Your Full Function Portable Evaporative Cooler Control Panel Handle Louver Water Level Indicator Air Filter Castor Wheels (4Pcs) Filter Cover Storage For Power Cord Power Cord Water Tank Ice Bracket Remote Control Water Filter Ice Crystals...
- Page 4 Features of Your Full Function Portable Evaporative Cooler Anion Cool Air Vane Time Wind Mode Indicator Indicator Indicator Indicators Indicators Speed Indicators Power Indicator Remote Sensor Timer Cool Button Anion Button Vane Button Wind Mode On/Off Wind Button Button Button Speed Button Control Panel Remote Ice Bracket Control Water Filter Ice Crystals The buttons of the same descriptions on the main unit/remote control have the same functions.
- Page 5 Your Full Function Hints for Better Cooling Portable Evaporative 1. Your cooler requires a supply of fresh air. Cooler Place the cooler near an open window or leave the door to the room open. Then open another outside window or door on the Congratulations on the purchase of your new opposite side of the room so that you create Full Function Portable Evaporative Cooler. “flow through” ventilation. The cooler will not work properly in a closed room. Before first using your Mistral Full Function Portable Evaporative Cooler it is most important 2. As an addition place the cooler near the that you read and follow the instructions in this entrance to the room. The cooler will draw use and care booklet, even if you feel you are cool air from other parts of the house and quite familiar with this type of appliance. further bring down temperature. Your attention is drawn particularly to the section 3. Start your cooler when the room is still cool. dealing with IMPORTANT SAFEGUARDS. Find You may leave it running all day. You will find a place and keep this booklet handy for future that this system works best and keeps the reference. room cooler. Your Full Function Portable Evaporative 4. Place ice crystals box in your refrigerator Cooler is safe and easy to use. It has been and let it freeze for 1 to 2 hours, then place...
-
Page 6: Operation
Operation 4. Turn the unit ON by pressing the ON/OFF button once. The unit will start with the fan in normal mode and on hi speed setting. Further operation can be performed via pressing OPERATION(Do Not connect the the SPEED, MODE, VANE, ANION, COOL and power plug as yet) TIMER buttons. 5. If you wish to turn the unit off at a pre- 1. Remove all packaging and check the determined time, please press the TIMER appliance for any damages during button. The unit can be set to turn off at transportation. Place the unit on a level any time between 0.5 hour and 7.5 hours surface in a stable upright position. from “Turn On” by pressing the TIMER button. If no time is selected, the unit will 2. Pour clean cold water into the water tank, operate continuously. The time set can be observing the water level indicator and do incremented in 0.5hr steps and the selected not overfill past the MAX water indicator time is indicated by a combination of mark. indicator lights. e.g. 5.5 hrs is indicated by the 4hr LED, the 1hr LED and the 0.5hr LED being 3. Pour clean illuminated simultaneously. cold water 1.Rotate the into water Locker tank here 6. To initiate the cooling function, press the COOL button. It will take approximately 2... -
Page 7: Specifications
If the 0.5hr and 1.0hr lights are on at the same speed. time, it means the unit will continue to run for 1.5hrs before automatically switching OFF. The • Sleep mode: Programmed to provide TIMMER function is OFF when no time LEDs are comfort while the user is asleep. illuminated. Note: All above can be operated via the Specifications remote control shown on page 3. Model No EAC-C-RC-11C-WH D. VANE: Press once, the indicating LED will light up, and the louver of the air cooler Rated Voltage & 220-240V~50Hz begins to swing horizontally and blow cool air. Frequency Press the button again, the light is now OFF. Rated Power The louver of the air cooler stops swinging, and the air will be blowing in one direction. Capacity of Water 8.0L... -
Page 8: How To Clean
How to Clean Air Filter To ensure effective humidifying and filtering, it is Clean the air filter at least once every two weeks recommended that the filter be cleaned once to prevent inferior fan operation due to dust every two weeks. accumulation. Disconnect the unit from the mains supply before Take out the Air filter. Refer to Fig.2. cleaning. To clean the exterior surfaces simply wipe over with a soft damp cloth. Should it be necessary, greasy marks may be removed from the surfaces by using mild soap and a cloth dampened in hot water. Avoid all other types of detergents, cleaners, solvents that may contain chemicals, which could damage parts of the unit. Thoroughly dry all parts before storage or further use. Water Tank 1. Take out the water tank. Refer to Fig. 1. 1. Rotate the locker up 2. Take out the water tank from the unit Fig. 2 Wash the air filter by immersing it gently in warm water with a neutral detergent. Rinse the filter Fig. 1 and dry it in a shady place. Put the Air filter and Filter cover back into the unit. Note: Do not put this cooler directly under a water tap, use a proper container to fill water to avoid splashing and damaging to the electric appliance. -
Page 9: Troubleshooting
Trouble Shooting Always check full product operation as detailed above before calling for assistance, unless there is damage to the power cord or plug - in this situation, stop using the product immediately. On humid days the unit may not appear to be cooling correctly. This is due to the air already being saturated with water. Adding more water to the air will not result in pulling the air temperature down. In these conditions, it is advisable to operate the unit as a fan only to circulate room air. For Your Safety • Always operate the unit as detailed below. • If the plug and supply power cord are damaged, it must be replaced by the manufacturer, its service agent or a suitable qualified person in order to avoid a hazard. • CAUTION: To reduce the risk of electric shock, DO NOT remove the cover (or back) whilst the unit is in operation or connected to the mains supply. • This product operates with water - operate and move the product with extreme care. • Do not operate the unit with a damaged power cord or plug, or after the unit malfunctions, or is damaged in any manner. Return the complete unit to the place of purchase for in-warranty replacement, or inspection and repair.
Need help?
Do you have a question about the EAC-C-RC-11C-WH and is the answer not in the manual?
Questions and answers