Table of Contents
Advertisement
Available languages
Available languages
Quick Links
Escanee para ver este manual en otros idiomas y actualizaciones
Scan for manual in other languages and further updates
Manuel dans d'autres langues et mis à jour
Manual em outras línguas e actualizações
Toda la documentación del producto
Complete documents about the product
Documentation plus complète sur le produit
Mais documentação do produto
EAS ELECTRIC SMART TECHNOLOGY, S.L.U.
P.I. San Carlos, Camino de la Sierra, S/N, Parcela 11
03370 Redován (Alicante) - ESPAÑA
Visítanos en:
www.easelectric.es
INVERSOR FOTOVOLTAICO
MANUAL DE USUARIO E
INSTALACIÓN
OWNER AND
INSTALLATION MANUAL
DE RED (TRIFÁSICO)
THREE-PHASE GRID TIED
SOLAR INVERTER
EINSOLAR15Y
EINSOLAR25Y
Escanee para ver este manual en otros idiomas y actualizaciones
Scan for manual in other languages and further updates
Manuel dans d'autres langues et mis à jour
Manual em outras línguas e actualizações
V.2
Advertisement
Chapters
Table of Contents

Related Manuals for EAS Electric EINSOLAR25Y


Summary of Contents for EAS Electric EINSOLAR25Y
- Page 1 Scan for manual in other languages and further updates Manuel dans d'autres langues et mis à jour Manual em outras línguas e actualizações EAS ELECTRIC SMART TECHNOLOGY, S.L.U. P.I. San Carlos, Camino de la Sierra, S/N, Parcela 11 03370 Redován (Alicante) - ESPAÑA...
-
Page 2: Table Of Contents
1. SÍMBOLOS DE LA ETIQUETA PELIGRO, ADVERTENCIA RECICLABLE Y SÍMBOLOS DE LA ETIQUETA Y ATENCIÓN REUTILIZABLE SEGURIDAD Y ADVERTENCIAS DESEMBALAJE ALTO VOLTAJE, EVITAR HUMEDAD NO TOCAR Contenido Accesorios incluidos Resumen del producto INSTALACIÓN ALTA TEMPERATURA Requisitos de instalación APILAR MÁX. 7 Ubicación de montaje NO TOCAR Montaje... -
Page 3: Seguridad Y Advertencias
Compruebe que su entrega incluye todos los accesorios abajo indicados y EAS Electric deben tener la formación adecuada y la cualificación corresponde con su pedido. necesaria para realizar los procedimientos correspondientes. DEBEN tener experiencia y conocimientos para llevar a cambio las opera- ciones mediante métodos seguros y profesionales. -
Page 4: Instalación
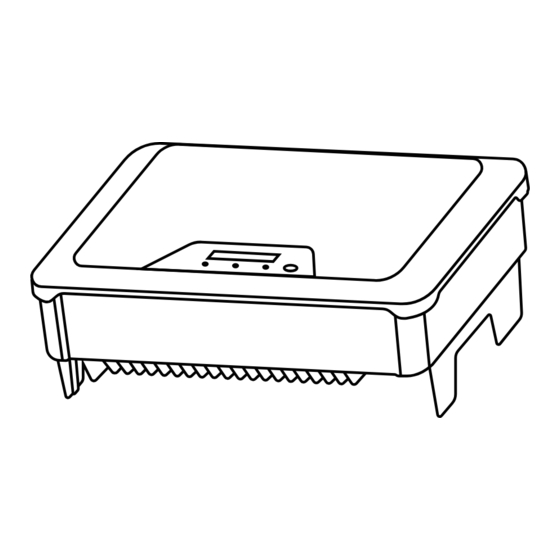
4. INSTALACIÓN Nº Componente Descripción Mostrar y configurar parámetros 4.1 Requisitos de instalación Para encender/apagar el inversor Interruptor DC Instale el inversor en lugares donde no pueda tocarse por accidente. El método, superficie e ubicación de instalación deben ser adecuados al Terminal(es) PV Conexión con panel fotovoltaico peso y dimensiones del inversor. -
Page 5: Ubicación De Montaje
4.3 Instalación 4.2 Ubicación de montaje Use la placa de montaje como plantilla para taladrar orificios de 10mm NO monte el inversor cerca de ningún material inflamable. de diámetro y 70mm de profundidad. NO monte el inversor cerca de materiales explosivos. Fije la placa de montaje con los tornillos y los pernos de expansión incluidos en los accesorios de montaje. -
Page 6: Puesta En Marcha
Sección transversal del conductor de protección: 16mm² 5.2.2 Tipos de interruptor de CA Instale un disyuntor miniatura individual de 2 fases de acuerdo con las siguientes especificaciones. Corriente máxima Corriente nominal del Modelo de salida (A) disyuntor de CA(A) EINSOLAR15Y EINSOLAR25Y 36.3... -
Page 7: Protección Por Corriente Residual
6. COMUNICACIÓN 5.3 Montaje y conexión de los cables de CC Los módulos fotovoltaicos de los strings conectados deben tener el mismo tiempo e idéntica alineación y ángulo de inclinación. 6.1 Control del sistema mediante Datalogger - Wi-Fi /RS485/GPRS (opcional) Antes de poner en marcha y conectar los conjuntos fotovoltaicos, el 6.1.1 Instalación del Datalogger Wi-Fi /GPRS interruptor de CC DEBE estar abierto. -
Page 8: Modos De Respuesta A Demanda (Drms)
Al instalar el RS485, debe retirarse la placa de sellado y no debe 7. ENCENDIDO Y FUNCIONAMIENTO realizarse ninguna operación hasta que se haya desconectado y descargado la corriente alterna y continua para evitar descargas 7.1 Comprobaciones de seguridad previas eléctricas. -
Page 9: Indicadores Led Del Inversor
7.3 Display y lógica de control 7.2 Indicadores LED del inversor Cuando el inversor se pone en marcha, los símbolos LED del Cuando el inversor se pone en marcha, puede controlarlo con el botón que display tienen los significados siguientes: se encuentra junto a la pantalla LCD. -
Page 10: Parámetros Técnicos
9. PARÁMETROS TÉCNICOS 8. DESCONEXIÓN DE LAS FUENTES DE VOLTAJE Antes de realizar cualquier operación con el inversor, desconéctelo de EINSOLAR25Y Modelo EINSOLAR todas las fuentes de voltaje como se describe en este manual. ENTRADA/CC Potencia máxima fotov. (Wp) 22500... - Page 11 <3% THDi a potencia nominal DATOS GENERALES Nota: “*” La corriente de irrupción y la corriente de falla 425*351*200 Dimensiones (An*Al*Fo) mm de salida máxima son valores de prueba. Peso (kg) Emisión acústica (típica) dB(A) <45 EFICIENCIA Eficiencia máxima 98.6% 98.6% LED/LCD o LED Interfaz de usuario...
- Page 12 10. SOLUCIÓN DE PROBLEMAS Modos de respuesta de calidad de energía del inversor Modo de respuesta de Funcionamiento predeterminado Alarma de falla a tierra calidad de energía según AS/NZS 4777.2:2015 Este inversor cumple con la normativa IEC 62109-2 cláusula 13.9 relativa al control de alarma de fallas a tierra.
- Page 13 Si ocurre ocasionalmente, se trata de 1. Desconecte el inversor de la red eléctrica y una anomalía puntual de la red, el del sistema fotovoltaico, y vuelva a inversor volverá a su funcionamiento conectarlo después de que el LED se normal tras detectar que la red es apague.
- Page 14 Compruebe la conexión del dispositivo 3. Si pasa mucho tiempo y no se DRM. Si el dispositivo DRM está bien soluciona, compruebe: Fallo del conectado mientras se produce este fallo, Error S0 del interruptor S0 del · si el disyuntor de CA está desconectado póngase en contacto con el servicio ·...
- Page 15 11. MANTENIMIENTO DEL SISTEMA 12. REINICIOS Si se reconecta el inversor a la corriente eléctrica, siga las instrucciones de Para mantener el rendimiento del inversor a largo plazo, se recomienda puesta en marcha y de seguridad de la sección 6 cuando sea aplicable (p.ej. los realizar un mantenimiento regular del mismo: cables CC deben volver a montarse).
- Page 16 14. CONDICIONES DE GARANTÍA 12. Las averías que tengan su origen o sean consecuencia directa o indirecta de: contacto con líquidos, productos químicos y otras Este producto tiene una garantía de reparación de cinco años sustancias, así como de condiciones derivadas del clima o el a partir de la fecha de venta, contra todo defecto de funcio- entorno: terremotos, incendios, inundaciones, calor excesivo o namiento proveniente de la fabricación, incluyendo mano de obra...
-
Page 17: Symbols On The Label
1. SYMBOLS ON THE LABEL DANGER, WARNING RECYCLABLE AND SYMBOLS ON THE LABEL REUSABLE AND CAUTION SAFETY AND WARNINGS UNPACKING HIGH VOLTAGE AVOID DAMP AND Contents Scope of delivery MOISTURE AVOID CONTACT Product overview INSTALLING HIGH TEMPERATURE Installation requirement SHIPMENT STACK LIMIT: 7 Mounting location AVOID CONTACT Mounting... -
Page 18: Safety And Warnings
All persons who are responsible for mounting, installation, commis- 3.1 Scope of Delivery sioning, maintenance, tests, and service of EAS Electric inverter Please inspect and check for completeness in the scope of delivery. products must be suitably trained and qualified for corresponding Confirm with purchase order. -
Page 19: Installing
4. INSTALLING Mark Num. Component Description LED/LCD Display and setting device at field 4.1 Installation Requirement DC Switch For switch on/off the inverter Please install the inverter(s) in places that can avoid inadvertent contact. PV Terminal (s) Connected with PV Panel Installation method, location and surface must be fitting for the inverter’s weight and dimensions. -
Page 20: Mounting Location
4.3 Mounting 4.2 Mounting Location Use the mounting bracket as a template and drill holes of 10mm DO NOT mount the inverter near any inflammable materials. diameter and 70mm depth. DO NOT mount the inverter near any explosive materials. Fix the mounting bracket with the screws and expansion bolts packed in mounting accessories. -
Page 21: Commissioning
Model current (A) current(A) M6×12 pan head screw EINSOLAR15Y PE Conductor cross-section: 16mm² EINSOLAR25Y 36.3 5. COMMISSIONING 5.1 Safety Instructions Measure the frequency and voltage of grid connection and make sure they follow the inverter’s grid connection specifications. An external circuit-breaker on the AC side (or a fuse) at 1.25*AC rated current is strongly recommended. -
Page 22: Dc Wire Assembly And Connection
6. COMMUNICATION 5.3 DC Wire Assembly and Connection PV modules of the connected strings must be of: the same time, identical 6.1 System monitoring via Datalogger - RS485/Wi-Fi /GPRS (Optional) alignment and tilting angle. Before commissioning and connecting the PV arrays, the DC switch MUST 6.1.1 Wi-Fi /GPRS Datalogger Installation be open. -
Page 23: Output Power Control Via Smart Meter
7. START UP AND OPERATION When installing RS485, the COM sealing plate needs to be removed. All operation MUST NOT proceed until AC and DC 7.1 Safety Check Before Start Up power is securely disconnected and discharged to prevent Please check before switching on any voltage resources connected to the electric shocks. -
Page 24: Inverter Led Indicators
7.2 Inverter LED Indicators 7.3 Display and Control Logics When the inverter operates, LED symbols on display have the When inverter starts up and operates, there is a control button beside LCD following meanings: Display of the inverter. Please follow the logics listed below. -
Page 25: Disconnecting From Voltage Sources
8. DISCONNECTING FROM VOLTAGE SOURCES 9. TECHNICAL PARAMETERS Before proceeding any operations on inverter, please disconnect the EINSOLAR25Y Module EINSOLAR inverter from all voltage resources as described in this manual. INPUT/DC Max. PV Power (Wp) 22500 30000 Following these steps in described sequence are mandatory. - Page 26 <3% THDi at rated power GENERAL DATA Note: “*” The inrush current and Max output fault current Dimensions (W*H*D) mm 425*351*200 are really test values. Weight (kg) Noise emission (typical) dB(A) <45 EFFICIENCY Max. Efficiency 98.6% User Interface LCD&LED or LED 98.2% Euro Efficiency DC connection type...
- Page 27 10. TROUBLE SHOOTING Inverter power quality response modes Earth Fault Alarm Default operation per AS/ Power quality response This inverter complies with IEC 62109-2 clause 13.9 for earth fault alarm modes NZS 4777.2:2015 monitoring. If an Earth Fault Alarm occurs, the error code 6 will be displayed on the LCD.
- Page 28 If it happens occasionally, it belongs 1. Disconnect the inverter from the utility to the short-time abnormality of the grid and the PV array, and reconnect it power grid, the inverter will return to after LED turns off. normal operation after detecting that the power grid is normal, and there is 2.
- Page 29 3. If it cannot be recovered for a long time, Check the connection of DRM device. If please confirm: the DRM device is connected normally DRM S0 Error DRM switch S0 fault · whether the AC circuit breaker is disconnected while this fault occurs, please contact ·...
- Page 30 11. SYSTEM MAINTENANCE 12. RESTARTS For the inverter’s long-term performance, it is suggested to maintain When reconnecting the inverter for electrical power supply, please follow the commissioning procedures and safety instructions as described in your inverter regularly: Section 6 when applicable (e.g. DC Wires need to be reassembled). NOTICE:...
- Page 31 14. GUARANTEE CONDITIONS 13. Faults that have their origin or are a direct or indirect This product has a five-year repair guarantee from the date of sale, consequence of: contact with liquids, chemicals and other against all manufacturing malfunctions, including repair work and substances, as well as conditions derived from the climate or the replacement parts.
Need help?
Do you have a question about the EINSOLAR25Y and is the answer not in the manual?
Questions and answers