Table of Contents
Advertisement
Quick Links
Advertisement
Table of Contents

Related Manuals for Mofi MasterPhono

Summary of Contents for Mofi MasterPhono
- Page 2 Inside Front Cover...
- Page 3 Thank you for purchasing the MasterPhono Preamplifier MasterPhono is designed to extract the maximum amount of information from your turntable, tonearm, and cartridge - and get you as close as possible to the sound Mobile Fidelity Sound Lab mastering engineers achieve in the studio.
-
Page 4: Important Safety Instructions
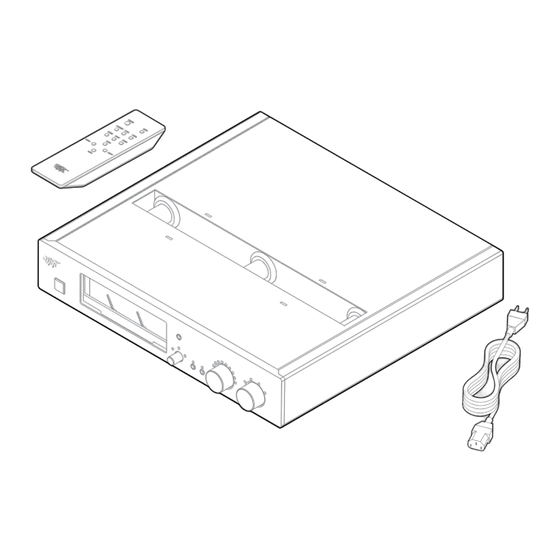
Important Safety Instructions The lightning flash with the arrowhead symbol within an equilateral triangle is 11. Power-cord protection: Power-supply cords should be routed so that they are intended to alert you to the presence of “dangerous voltage” inside the product not likely to be walked on or pinched by items placed on or against them. - Page 5 In the Box 1. Phono preamplifier 2. Remote control 3. Power cord...
-
Page 6: Installation
INSTALLATION Check all connections before you plug in the power cord or turn on the main system. MasterPhono will operate at its best when properly installed in a location free from magnetic fields such as those generated by equipment with... - Page 7 XLRs are recommended for optimal performance. Connect the MasterPhono outputs to your preamp inputs. Connect your turntable’s output to a MasterPhono input as recommended (see below). Designed for use with low-impedance or current-source phono cartridges, Input 1 bypasses and turns off the Ohms selector and LEDs.
- Page 8 Signal Ground: Used to ground a turntable’s arm. Note: Some systems might have lower hum with a different arrangement, experiment until you achieve the best result. Connect the power cord from the MasterPhono mains input to your power conditioner or main’s outlet.
- Page 9 Setting Ohms and Gain Note: The Ohms selector is disabled on Input 1. Note: The mono, filter, ohms, and gains settings are stored for each input. When switching inputs, the previous settings are restored when the input is selected. Ohms Selection: For most MM cartridges, 47k is the recommended loading setting.
-
Page 10: Basic Operation
Basic Operation MasterPhono’s main power switch is located on the rear panel, just above the power cord. “O” is off; “I” is on. MasterPhono will remain in standby mode until switched on by activating the Power button on the front panel. -
Page 11: Remote Operation
Close the battery door and replace the screws. CU RR EN T V-X LR Remote Functions: V-R CA POWER: Switches MasterPhono on or puts it in GAI N+ standby mode. MUTE: Toggles the mute function. LOAD-... -
Page 12: Troubleshooting
Possible Solutions: Check your cables, connections, and turntable. Location; Try moving the MasterPhono to a higher Make sure Mute is off. or lower shelf, or sideways to minimize any noise If everything seems in order, contact your dealer. - Page 13 MasterPhono Feature List • Standard signal input via RCA and XLR (the • All critical resistor 0.1% or 0.5% tolerance for “voltage input”) precise filtering and voltages • 10-position loading adjustment, including “Custom” • Stereo/mono switch via RCA plug • High-pass filter switch •...
- Page 14 MasterPhono™ - Specifications Inputs: Current mode & Voltage mode, balanced and unbalanced Voltage input Loading Options: 15 Ohms, 30 Ohms, 50 Ohms, 75 Ohms, 100 Ohms, 500 Ohms, 1K Ohms, 10K Ohms, 47K Ohms+150pF, & Option Gain Overall: (MM) 40db, (MM) 50db, (MC) 60db, (MC) 70db...
- Page 15 FCC Warnings: Caution: Any changes or modifications to this device not explicitly approved by manufacturer could void your authority to operate this equipment. Note: This equipment has been tested and found to comply with the limits for a Class B digital device, pursuant to part 15 of the FCC Rules.
- Page 16 Inside Back Cover...
- Page 17 MoFi Electronics – 1811 W Bryn Mawr Ave Chicago IL...
Need help?
Do you have a question about the MasterPhono and is the answer not in the manual?
Questions and answers