Advertisement
Quick Links
Kiloview LinkDeck
IP Control Panel
Contents
◼ Packing List
◼ Device interfaces and functions
◼ Device connection, login and use guide
◼ Device upgrade and restore to factory settings
Before using this product, it is recommended that you read the guide carefully. To ensure your personal safety and avoid physical or
electrical damage to the device, please strictly follow the instructions of this guide to install and use it under the guidance of
professionals. Incorrect electrical connections or physical installation may cause permanent damage to the device and even threaten
personal safety.
A leading expert in IP-based video transmission solutions
User Manual
(V5.3)
Advertisement

Summary of Contents for Kiloview LinkDeck
- Page 1 A leading expert in IP-based video transmission solutions User Manual Kiloview LinkDeck IP Control Panel (V5.3) Contents ◼ Packing List ◼ Device interfaces and functions ◼ Device connection, login and use guide ◼ Device upgrade and restore to factory settings Before using this product, it is recommended that you read the guide carefully.
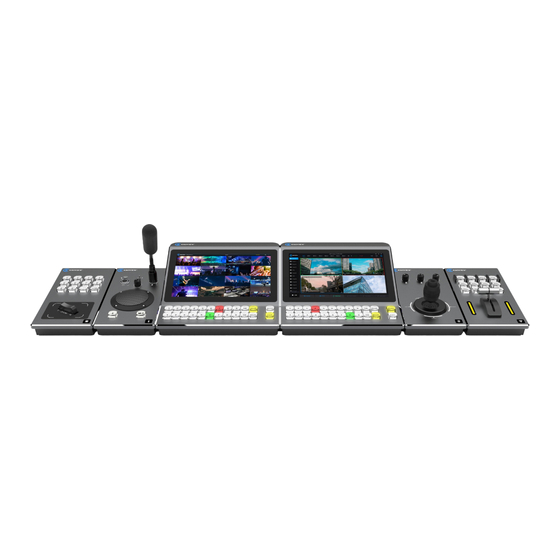
- Page 2 The LinkDeck IP control panel consists of the Panel Deck (host panel), Take Deck, PTZ Deck, Zoom Deck, and KIS Deck. With modular design, these panels have unified size and installation standards, allowing users to select and combine the modules as needed.
- Page 3 Introduction Panel Deck is the core control component of LinkDeck, equipped with a 10.1-inch LCD touch screen and 24 dual-color physical buttons. It can display the required interface on the built-in HD screen, enabling comprehensive monitoring of inputs and outputs. Both the physical and soft buttons can be customized...
- Page 4 Introduction to Take Deck Take Deck is equipped with a "T-Bar" that allows switching between PVW and PGM to achieve the fading effects. The component also features 12 physical buttons that can be customized according to application requirements, such as graphics overlay, live streaming, recording and locking.
- Page 5 Introduction to PTZ Deck PTZ Deck supports four-dimensional joystick control, allowing precise adjustments and quick settings for PTZ camera movements and configurations, including focus, Iris, Tune, and other parameters.
- Page 6 Introduction to Zoom Deck Zoom Deck is equipped with 12 buttons and a Zoom controller, allowing quick operations such as switching between preset camera positions, zooming in/out, and adjusting the focal length. It also supports saving preset information for future reference.
-
Page 7: Equipment List
Equipment List Panel Deck Equipment List Panel Deck unit×1 Power adapter (12V/3A) × 1 User manual × 1 Certificate/warranty card/promotional materials × 1 Other Deck Equipment List (1) Other Deck components × 1 (2) Dual-head USB-C cable ×... -
Page 8: Equipment Interfaces
Equipment Interfaces Panel Deck Interfaces and Buttons 10.1-inch LCD touchscreen 7 * USB Type-C Physical control buttons HDMI OUT Power ON/OFF 100/1000M Adaptive Ethernet ( PoE++) Power interface (DC 12V/3A) Note The panel Deck is the core control component of the Link Deck, so this document focuses on introducing Panel Deck; ... - Page 9 Take Deck Interfaces and Buttons Control buttons T key T-Bar 2 * USB Type-C Effect indicator lights Note: The description of the functions of Take Deck is based on the controlling of the Multiview Pro (custom button functions will be supported with further updates).
- Page 10 Take Deck Button Function Description: 1) Control Buttons: REC Button: Press to start/stop recording; LIVE Button: Press to start/stop live streaming; HOLD Button: Press to enable/disable locking; FTB Button: Press to enable/disable fade to black; DSK1 (TAKE) - DSK4 (TAKE): Custom events for direct switching of DSK1-4 overlay effects to PGM (without dynamic effects and delay);...
- Page 11 PTZ Deck Interfaces and Buttons Control Knobs Q key Joystick 2* USB Type-C. Explanation The PTZ Deck buttons and interfaces are described using Multiview Pro as an example (future versions may allow customizing button functions); The current PTZ Deck and Zoom Deck versions only support controlling PTZ cameras in the PVW window. ...
- Page 12 2) Joystick: Adjust the camera Pan, Tilt, Zoom and the lens zoom; pressing the joystick button will lock the PTZ Deck and Zoom Deck controls. (If multiple PTZ Decks and Zoom Decks are connected to the Panel Deck simultaneously, pressing the joystick will lock all of them, and pressing it again will unlock all of them.) Zoom Deck Interfaces and Buttons Control Buttons...
- Page 13 Zoom Deck Button Function Description Control Buttons Numeric Buttons: Represent preset positions (combination of "." and a numeric key); save a preset position. For example, after adjusting the camera to a new position using the joystick, pressing "." followed by the number key "1"...
-
Page 14: Connection Diagram
4 Connection Diagram Power adapter HDMI monitor Other Deck Panel Deck Type-C Network Switches Multiview Pro Device Application Connection Diagram Note Customers can define and purchase the other panel modules needed. The other panels are connected to the Panel Deck through dual-head Type-C interfaces. - Page 15 Press the power button on the right side of the Panel Deck, all the deck components connected will start automatically. The screen will display the KILOVIEW logo. Please wait patiently for the startup process. After the device is powered on, follow the system instructions on the Panel Deck touchscreen to complete the initial system configuration.
- Page 16 The screen lock password is required when configuring system parameters on the LinkDeck touchscreen. Please ensure it’s protected; LinkDeck does not have a default IP address, so manual IP address configuration or DHCP is required for network configuration.
- Page 17 Startup Guide Completion After the completion of the startup guide, you will enter the main interface of the Panel Deck, which appears blank and cannot control yet. At this point, you need to add templates and control objects through the management page manually. Please refer to Sections 6 and 7 for the operating steps.
- Page 18 6 Accessing the Device Management Page Method 1: Accessing the Device Management Page via the Touchscreen Click on the icon in the bottom left corner of the touch screen to open the settings menu. Click on "System Settings" and enter the screen lock password set during the startup guide to access the device management page.
- Page 19 Method 2: Accessing the Device Management Page via a Browser Open the browser within the local network, enter the device IP address followed by the suffix (IP/index.html) to access the LinkDeck device management page. For example, if the device's IP address is 192.168.2.125, open “http://192.168.2.125/index.html” in the browser to access the web management page.
-
Page 20: Template Settings
Template Settings Default Templates Step 1: Creating a New Template Click on "Create a New Template" in the default template section, enter the template name, and click "OK" to complete the template creation. See the diagram below:... - Page 21 Step 2: Editing the Newly Created Template Click on the newly created template to enter the template editing page. Fill in the template content, such as the host IP, port, username, and password. After filling in the template content, selecting project and window lists is necessary. Otherwise, control errors may occur when multiple projects are present.
- Page 22 Obtaining Control Object Information Step 1: Enabling the Control Object Taking Multiview Pro as an example of the control object. Once Multiview Pro is enabled, you can obtain the relevant information required by the template from the software page. See the example below: HTTP Port: 81;...
- Page 23 Note A separate account needs to be created in the control object for LinkDeck to use. Using the "admin" user to log into LinkDeck may cause the "admin" user to be logged out or unable to log in from other clients.
- Page 24 7.3 Enabling the Template After completing the template settings, click "Save and Activate" to enable the template. See the diagram below:...
- Page 25 The various Decks of LinkDeck can control the Multiview Pro using the physical buttons and the soft buttons on touchscreen. See the diagram below: Note If LinkDeck fails to retrieve the control object's control content, please verify if the template settings are correct; ...
-
Page 26: Firmware Upgrade
Please visit: https://www.kiloview.com/en/support/download/ In the filter list, select "NDI" > "LinkDeck" and find the latest firmware download under the "Software" tab. Upgrading Device Firmware Log in to the device management and click on "System " > "Firmware Upgrade" to access the firmware upgrade page. - Page 27 Restore If the device is not functioning correctly due to incorrect parameter configuration or for any other reason requiring a factory reset, follow the method below: Log in to the web management page, click "System" > "Restore" through the web interface. Note: After a factory reset, the following parameters will be changed to the default values: The login user "admin"...
Need help?
Do you have a question about the LinkDeck and is the answer not in the manual?
Questions and answers