Table of Contents
Advertisement
Quick Links
CUBE R1
NDI High Bandwidth+NDI|HX
Multi-Channel Recording System
(V 3.3)
Contents
◼ Packing List
◼ Device interfaces and functions
◼ Device connection, login and use guide
◼ Device upgrade and restore to factory settings
Before you start using this product, it is recommended that you carefully read the instruction manual. To ensure your safety and to
prevent physical or electrical damage to the device, please follow the guidelines in the manual or use this product under the guidance
of professionals. Faulty electrical connections or physical installation methods may cause permanent damage to the device or even
pose a threat to personal safety.
Due to continuous product updates,the product you purchased may have undergone changes compared to the content in this manual.
Please refer to the actual product inside the packaging for accurate information.
Leading solution provider of IP-Based video transmission
Quick Start Guide
Advertisement
Table of Contents

Summary of Contents for Kiloview CUBE R1
- Page 1 Leading solution provider of IP-Based video transmission Quick Start Guide CUBE R1 NDI High Bandwidth+NDI|HX Multi-Channel Recording System (V 3.3) Contents ◼ Packing List ◼ Device interfaces and functions ◼ Device connection, login and use guide ◼ Device upgrade and restore to factory settings Before you start using this product, it is recommended that you carefully read the instruction manual.
-
Page 2: Packing List
1 Packing List (1) (CUBE R1)×1 (2) Power Adapter×2 (3) Certificate/Warranty Card×1 (4) "Quick Start" manual×1... -
Page 3: Device Interfaces
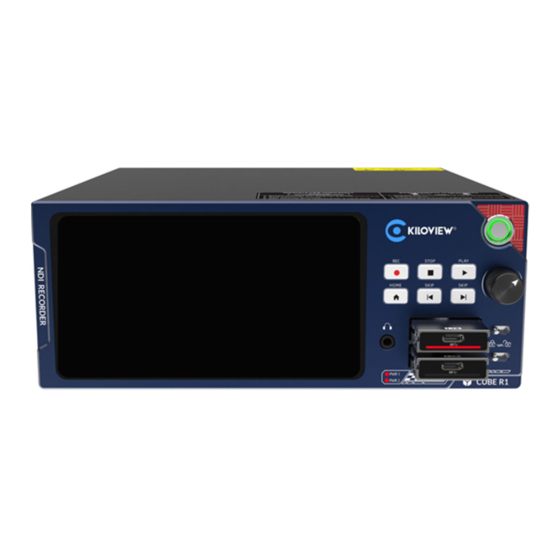
2* Power supply Interface Description The (4) and (11) Line OUT interfaces of CUBE R1 are designed for audio output during video playback, but only one of the two interfaces can be used at a time; After inserting the DISK driver into CUBE R1, the (7) interface must be used to lock the DISK drive, otherwise, recording cannot be started. -
Page 4: Button Descriptions
Playback mode: Control playback speed by rotating the scroll wheel. Button Descriptions The buttons on the CUBE R1's front panel have different functions on different pages, please do make sure the status if it’s when recording or playing back. -
Page 5: Application Scenarios
Switch HDMI monitoring Port Description When recording more than 3 CH 1080P60 NDI High Bandwidth sources with CUBE R1, using the 10G SFP+ optical port is suggested. CUBE R1 offers 2*10G SFP+ optical ports for network redundancy design. - Page 6 6.1 CUBE R1 Startup Guide Press the power button on the right side of the CUBE R1 front panel, and the device enters the startup status while the screen displays KILOVIEW logo. Please wait patiently until the startup process completed.
-
Page 7: Network Configuration
The CUBE R1 startup guide includes network configuration. The network configuration supports DHCP or Static IP, and you can configure accordingly. See the image below: 6.3 Time Zone Configuration During the initial startup guide for CUBE R1, regional and time settings need to be configured. - Page 8 Once all settings are done, you can use the CUBE R1. Attention CUBE R1 has no default IP address, so during network configuration, you need to manually configure the IP address or use DHCP to obtain an IP address.
-
Page 9: Device Login
7 Device Login Visit CUBE R1's web UI with your browser to log in to CUBE R1. The default username and password for logging in to the device is: "admin". Attention For security purpose, you are recommended to change your password immediately after the first login! ... -
Page 10: Device Usage
CUBE R1 only supports the ex-FAT file system format; please confirm that the format of the DISK is ex-FAT before recording started; The recording storage location of CUBE R1 is the hard DISK by default; if you need to modify the storage location, please refer to 9.2 Storage Strategy. -
Page 11: Start Recording
8.2 Start Recording Step 1: Set multiview layout Click on the right-hand navigation bar and choose the view list (1/4/9 grids) from the layout options. Step 2: Find the NDI sources in source list, and drag it to the corresponding window. The "Auto discovery"... - Page 12 Step 3: Start Recording Once the CUBE R1 is configured, click START to begin recording, or press and hold the " REC" button on the CUBE R1 front panel for 3 seconds to start recording.
- Page 13 In the playback page, select a DISK driver to view the recorded video files. The selected video file information will be displayed and you can play back the file. Additionally, CUBE R1 supports remote file downloading via a web interface. To do so, navigate to Playback >My Disk>Resource List, click the icon at the lower right corner of the recorded file, choose "Download", and the recorded file will be downloaded to your local device.
-
Page 14: Touch Screen - Settings
CUBE R1 supports the settings for transcoding options, configuring NTP server for synchronization, and recording time periods. As shown in the figure below, click" Apply" in the upper right corner to save and exit after setting. - Page 15 9.2 Storage Strategies CUBE R1 has two NVMe SSD slots and allows the selection of local disk storage and NAS network storage. It also supports setting the file trim strategies: fixed size or fixed time.
-
Page 16: Network Settings
9.3 Network Settings CUBE R1 has three network connections, including two SFPs and one Ethernet with bandwidth of 1Gbps. Users can configure the network status, IP address, and other related information of multiple interfaces of the device through the Settings>Network menu. CUBE R1 also offers customized settings for each network interface. -
Page 17: System Settings
9.4 System Settings The CUBE R1 system settings page allows users to configure device name, language, location and area and other information. -
Page 18: Upgrade Device Firmware
Step 2: Tap the settings icon on the touch display to enter "System". Step 3: Tap the "Upgrade" button, CUBE R1 will automatically search for the upgrade file and then pop up an upgrade window to proceed with the upgrade. - Page 19 Method 2: Upgrade firmware via browser Log in to the CUBE R1 Web UI, click System Settings> Firmware Upgrade to enter the firmware upgrade page. Upload the firmware file downloaded from the official website and click "Firmware Upgrade". Usually, the system will prompt you to restart after successfully uploading the firmware. If you need to confirm, please click confirm;...
-
Page 20: Restore Factory Setting
11 Restore Factory Setting If improper device parameter settings caused the device not working properly, you can try to reset the device to factory settings. There are two ways for factory reset: Method 1: When the device can be logged in to the Web management page normally, use the Web interface's System Settings>... - Page 21 To ensure data safety, we strongly recommend that you regularly back up all important data stored on various storage devices to avoid irrecoverable losses caused by accidental data loss. Kiloview will not be responsible for any losses or damages caused by the use or operation of the solid-state drive used in this device.
Need help?
Do you have a question about the CUBE R1 and is the answer not in the manual?
Questions and answers