
Related Manuals for Atac PMQ830L

Summary of Contents for Atac PMQ830L
- Page 1 PMQ830L PMQ830LG User’s Manual 2 Ports Modbus to MQTT Gateway / Data Logger Wi-Fi, Ethernet connection v.202301a *** this user’s manual is subject to change without prior notice.
-
Page 2: Table Of Contents
Introduction ____________________________________________________________________ 3 Overview ______________________________________________________________________ 4 Specifications __________________________________________________________________ 5 Product Panel Views _____________________________________________________________ 6 Wiring Architecture ______________________________________________________________ 8 Configuration ___________________________________________________________________ 9 Power On the device __________________________________________________________ 10 IP Search Utility Setup ________________________________________________________ 11 Web browser Configuration ____________________________________________________ 14 System Setup Network setup Serial Port setup MQTT setup... -
Page 3: Introduction
Introduction This 2-Port Modbus to MQTT Gateway / Data Logger provides the easy way of connecting Modbus Serial and TCP devices to MQTT Broker via Wireless and Ethernet LAN. The wireless supports 802.11 b/g/n in AP/Station mode with WEP/WPA/WPA2 encryption for data transmission security. -
Page 4: Overview
Overview This 2-Port Modbus to MQTT Gateway / Data Logger support MQTT protocol provides a perfect solution to make your industrial Sensor devices connect to Industrial Internet of Things (IIoT) via Wireless and/or Ethernet LAN. To run with MQTT client tools on the PC/NB or mobile devices, users can simply and effectively publish/subscribe data or command to/from remote sensors. -
Page 5: Specifications
Specifications Modbus Device to MQTT with Data Logger 2-Port Serial to Ethernet & Wi-Fi Features Support Modbus RTU/ASCII to MQTT Support Modbus Data Logger via MQTT Support 32 Topics, length adjustable Support 4 remote TCP connections as topics Easy settings by web Browser configuration On line F/W upgrade Support CVS file for Data Logger WiFi... -
Page 6: Product Panel Views
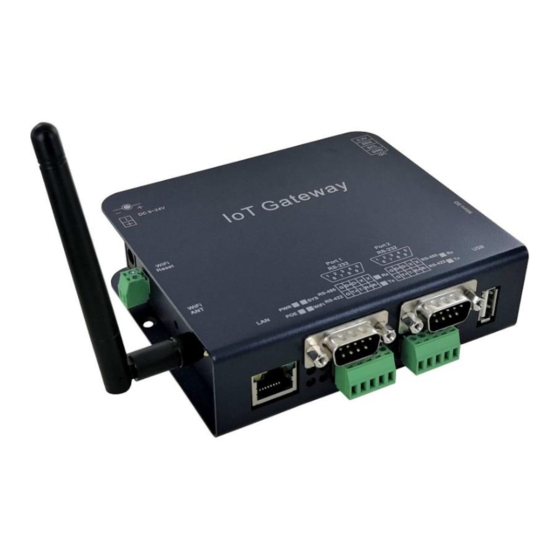
Product Panel Views Antenna USB host for OpenWrt only RS-232/422/485 Ethernet RJ45 Antenna Connector The connector for antenna is a standard reverse SMA jack. Simply connect it to a 2.0dBi dipole antenna (Standard Rubber Duck) and it is 50 Ohms impedance and can support 2.4GHz frequency Ethernet Port The connector for network is the usual RJ45. - Page 7 DC Power outlet Reset Button (Wi-Fi) 1) Press & hold Reset button about 5 seconds until SYS LED flashes then release the button will reset network IP and gateway IP back to default. The other parameters keep the same as last confirmation.
-
Page 8: Wiring Architecture
Wiring Architecture RS-232 2. RS-422/RS-485 When you finish the steps mentioned above and the LED indicators are as shown, the Gateway is installed correctly. You can check the Software Setup CD to find Utility to setup the IP Address. To proceed with the parameters set up, please use a web browser (IE or Chrome) to continue the settings. -
Page 9: Configuration
Configuration When setting up this Gateway for the first time, the first thing you should do is to configure the IP address. The following topics are covered in this chapter: IP Search Utility Setup Configuration through Web browser Power on the Modbus MQTT gateway 1. -
Page 10: Ip Search Utility Setup
IP Search Utility Setup Install the IP search tool “CvIotFinder Setup.exe” on the PC. Upon running IP search tool (CvIotFinder), if a firewall warning pops up, please click to accept the program pass through firewall. - Page 11 CvIotFinder will pop up on the screen after installation or you may double click the icon on desk top of host computer to open this tool. Search IP completed. Ethernet IP WiFi IP Click “Setup” button will pop up a window. You may change Name, Description, IP, Netmask of device.
- Page 12 To change Gateway’s IP subnet to be same as per PC/NB, clicking “Setup” button for modification of IP, Subnet, name & description. Username and Password input is required. Click “Setup” again to save modification. If to change PC/NB’s IP subnet to be same as per Gateway, modify or add new IP of PC/NB.
-
Page 13: Web Browser Configuration
9. Input Login/Password: admin/admin Web Browser Configuration There are pages of “System”, “Network”, “Serial”, “MQTT”, “Topic”, “Logger” and “History”. System 1.1 System:... - Page 14 1.1.1 In this page, you may change Password, set up Auto Reset time, modify Device Name and Device Description. 1.1.2 Date: to input data/time manually or to click “Sync with browser”. 1.1.3 Daily Reboot: to click dropdown button get 3 options for daily reboot. 1.1.4 RTC: to show whether RTC is working or not.
- Page 15 1.3 Ethernet: Appearance of Ethernet setup 1.4 3G/4G: Appearance of 3G/4G LTE connection (for 4G model) 1.5 Services: to set up HTTP, NTP. 1.6 Firmware: for purpose of firmware update. Click “Browse” to open file manager.
- Page 16 Then, select the .bin file with specified version and click “open” button. When the selected file name appears on the input column, click “Update” button. 1.7 Up to now, Setup is successfully configured. Please click “Save” and go to other pages for configuration or click “Save and Restart”...
- Page 17 2.1.3 Password: to set password for this Access Point. 2.1.4 Encrypt 2.1.5 Mode: as a “Access Point”, it is constant as “STATIC” 2.1.6 Assign “IP address”, “Subnet Mask” manually or use default. “Country” is mandatory for WiFi connection. 2.1.7 When select “Infrastructure”, this device work as a station to connect with remote Router.
- Page 18 2.1.8 At item SSID, click “Scan” will get list of available SSID of remote Routers, select one to link with right password. 2.1.8 On the NB/PC, choose same SSID to link. NB/PC must close Ethernet in advance otherwise the data transmission would not work. 2.2 Ethernet: 2.2.1 click dropdown of Mode to select “STATIC”, “DHCP”.
- Page 19 Gateway and DNS: check with MIS for IP address of Router. The Gateway must be set with correct Router’s IP enable to connect with Internet. 2.5 TCP KeepAlive: 2.6 Up to now, Setup is successfully configured. Please click “Save” for this page temporarily and go to other pages for configuration or click “Save and Restart”...
- Page 20 3 Serial To set up serial port parameters (9600,n,8,1), “Serial 1” is for “Port 1” connection, “Serial 2” is for “Port 2” connection. 3.1 Baud Rate: 300 bps to 921.6K bps 3.2 Parity: None, Even, Odd 3.3 Data Bits: 5, 6, 7, 8 3.4 Stop Bits: 1, 2 3.5 Flow Control: None, XON/XOFF 3.6 RxDelay(ms)
- Page 21 4 MQTT 4.1 Identify: GUID: it must be the only one in all client side. This value is a default. 4.2 Connection: configuration of MQTT Broker. 4.2.1 Input Host name and Socket Port number of MQTT Broker. example: test.mosqitto.org is a free Broker for testing purpose only. 4.2.2 User Name and Password upon request.
- Page 22 5 TOPIC 5.1 Identify: The GUID to be assigned and as prefix before key wordings (red color as below) 5.2 Medias: To set Modbus protocol as RTU or ASCII or TCP” at Serial Port or remote TCP port. 5.2.1 Serial ports To send Serial port with Modbus to RTU, ASCII or TCP protocol.
- Page 23 5.2.2 Socket ports 5.3 Topics 5.3.1 ● PUBLISH a topic to MQTT Broker as per the name in the cell of “RegName”. ● SUBSCRIBE a topic from MQTT Broker as per name in the cell of “RegName”. There should be a topic as per “cviot-48c4-9e65-f905-a657/Register/set_<RegName>”...
- Page 24 5.3.4 Slave: Input ID of Modbus Slave. ID of different Modbus devices in same Serial port or TCP port must not repeated. 5.3.5 R.Start: Register Start address. 1 – 9999 : Read/Writeable Coils (modbus function code 0x01) 10001-19999 : Read only Coils (modbus function code 0x02) 30001-39999 : Read only Registers (modbus function code 0x04)
- Page 25 5.3.9 Count: to set length of registers for Modbus protocol 5.3.10 INT.S: Interval time (seconds) for data subscribing and publishing. 5.3.11 QoS: MQTT quality of service. 5.3.12 Retain: For “Publish” purpose, retain last value in MQTT Broker until next publish. 5.3.13 SUB.: Subscribe data/command from MQTT Broker.
- Page 26 6 Logger 6.1 Logger Config 6.1.1 Console Logger: 6.1.2 Data Logger: 6.1.3 Data Interval (seconds: 6.1.4 Disk Capacity and Remaining: 6.2 Variable: to show status of connections...
- Page 27 6.3 Console: to update status of payload upon subscription or publishing. 7. History To click “download” will get a “.tar” file download. Unzip this file and open it with text editor. To click “Remove” will erase all data starting a new storage. 8.
Need help?
Do you have a question about the PMQ830L and is the answer not in the manual?
Questions and answers