Advertisement
Advertisement
Table of Contents

Summary of Contents for LyxPro LyxJam LYXEDM800
- Page 1 ELECTRONIC DRUM KIT SKU: LYXEDM800 User Guide...
-
Page 2: Table Of Contents
WARRANTY Thank you for purchasing the LyxPro™ Electronic Drum Kit. This Assembly Guide is intended to provide you with guidelines to ensure that operation of this product is safe and does not pose risk to the user. Any use that does not conform to the guidelines described in this Assembly Guide may void the limited warranty. -
Page 3: Parts
PARTS FRAME: ACCESSORIES: Inner legs (2) 12. Wiring harness (1) 23. Kick pedal (1) Outer legs (2) 13. Module adapter (1) 24. Hi-hat pedal (1) Cross bar (5) 14. Sound module (1) 25. Kick (1) 4. Feet (4) 15. Ride cymbal (1) 26. -
Page 4: Assembly Instructions
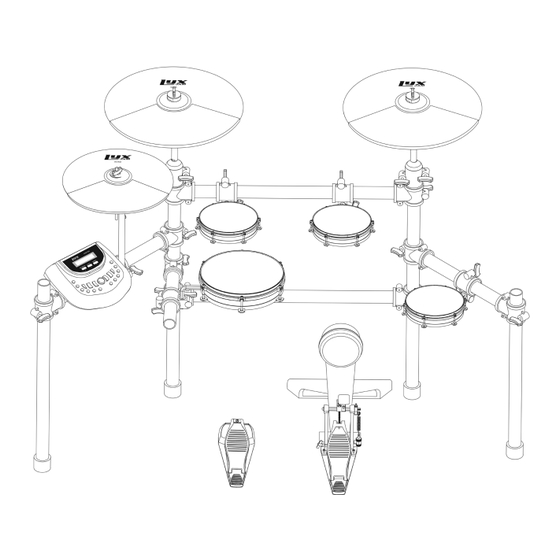
ACCESSORIES FOR ASSEMBLY: Philips screwdriver (1) Slotted screwdriver (1) Key (1) Cleaning cloth (1) Self-fastening straps Audio adapter (1) ASSEMBLY INSTRUCTIONS Place the frame on the floor and swing the arms away from the center as shown. Insert the feet into the frame, adjusting to ensure the legs are all level on the floor. - Page 5 Install the cymbal rods into the sleeves on cymbal stands as shown. Use the included Philips screwdriver to tighten the set screw. 4. Install the cymbal + stand assemblies on the clamp stands.
- Page 6 Carefully fit the rod sleeves into the arm clamps. Insert the three (3) rods and one (1) L-rod through the corresponding rod sleeves into the arm clamps in the arrangement shown below. 6. Connect the tom pads and snare pad to the rods by aligning the holes on the side of each pad with the rod, then carefully sliding the rod through the holes.
- Page 7 Remove the screws that come pre-installed in the kick pad. Align the holes on the kick brace with the holes on the kick pad as shown. Insert the four (4) screws you removed into the holes and use the Philips screwdriver to tighten them.
- Page 8 10. Install the module adapter on the remaining clamp, then tighten the knob to secure it in place. 11. Insert the 25-pin connector from the wiring harness into the corresponding slot on the bottom of the sound module. Plug the audio jack connectors into the corresponding ports underneath each of the drum and cymbal pads.
-
Page 9: Specifications
SPECIFICATIONS Drum & Cymbals: • Tom Pad diameter with mesh: 8″ (20.32 cm) • Snare Pad diameter with mesh: 10″ (25.4 cm) • Crash Cymbal diameter: 12″ (30.48 cm) • Ride Cymbal diameter: 12″ (30.48 cm) • Hi-Hat Controller diameter: 8″ (20.32 cm) •... - Page 10 1-866-849-3049 LyxPro, LyxJam, and their associated logos are trademarks of C&A IP Holdings, LLC. in the U.S. All other products, brand names, company names, and logos are trademarks of their respective owners, used merely to identify their respective products, and are not meant to connote any sponsorship, endorsement or approval.
Need help?
Do you have a question about the LyxJam LYXEDM800 and is the answer not in the manual?
Questions and answers