Advertisement
Quick Links
Overview
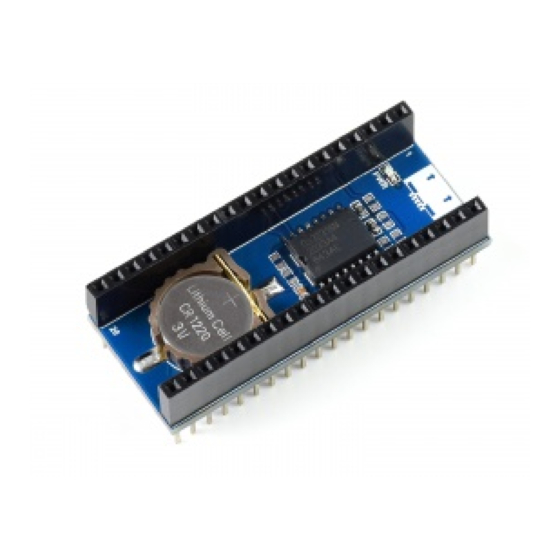
The Pico-RTC-DS3231 is an RTC expansion module
specialized for Raspberry Pi Pico. It incorporates high
precision RTC chip DS3231 and uses an I2C bus for
communication. More external sensors are allowed to be
connected thanks to the stackable design.
Features
Standard Raspberry Pi Pico header, supports Raspberry
Pi Pico series.
Onboard high precision RTC chip DS3231, with backup battery holder.
Real-Time Clock Counts Seconds, Minutes, Hours, Date of the Month,
Month, Day of the Week, and Year with Leap-Year Compensation Valid Up
to 2100.
Optional format: 24-hour OR 12-hour with an AM/PM indicator.
2 x programable alarm clock.
Provide online documentation (Raspberry Pi Pico C/C++ and MicroPython
example demos).
Specification
Operating voltage: 3.3V
Backup battery voltage: 2.3V~5.5V
Operating temperature: -40°C ~ 85°C
Power consumption: 100nA (sustains data and clock information)
Pinout
Pico RTC DS3231
Precision RTC Module for
Raspberry Pi Pico, Onboard
DS3231 Chip
Advertisement

Related Manuals for PICO Pico-RTC-DS3231

Summary of Contents for PICO Pico-RTC-DS3231
- Page 1 Overview Pico RTC DS3231 The Pico-RTC-DS3231 is an RTC expansion module specialized for Raspberry Pi Pico. It incorporates high precision RTC chip DS3231 and uses an I2C bus for communication. More external sensors are allowed to be connected thanks to the stackable design. Precision RTC Module for Features Raspberry Pi Pico, Onboard DS3231 Chip Standard Raspberry Pi Pico header, supports Raspberry Pi Pico series. Onboard high precision RTC chip DS3231, with backup battery holder. Real-Time Clock Counts Seconds, Minutes, Hours, Date of the Month, Month, Day of the Week, and Year with Leap-Year Compensation Valid Up to 2100. Optional format: 24-hour OR 12-hour with an AM/PM indicator. 2 x programable alarm clock. Provide online documentation (Raspberry Pi Pico C/C++ and MicroPython example demos). Specification Operating voltage: 3.3V Backup battery voltage: 2.3V~5.5V Operating temperature: -40°C ~ 85°C Power consumption: 100nA (sustains data and clock information) Pinout...
-
Page 2: Setup Environment
Dimensions User Guide Setup environment 1. For an application development environment for Pico on Raspberry Pi, please refer to the Raspberry Pi Chapter 2. For the Windows environment setting, you can refer to link This tutorial uses the VScode IDE for development in a Windows environment. Raspberry Pi 1. Log in Raspberry Pi With SSH or press Ctrl+Alt+T at the same time while using the screen to open the terminal. 2. Download and unzip the demo codes to the directory Pico C/C++ SDK. Reference tutorial for users who have not yet installed the SDK. #Note that the directory of SDK may be different for different users, you need t o check the actual directory. Generally, it should be ~/pico/. ... - Page 3 1. Hold the BOOTSEL button of Pico, and connect the USB interface of Pico to Raspberry Pi then release the button. 2. Compile and run the pico-rtc-ds3231 examples: cd ~/pico/pico‐rtc‐ds3231_code/c/build/ cmake .. make sudo mount /dev/sda1 /mnt/pico && sudo cp rtc.uf2 /mnt/pico/ && sudo sync && sud o umount /mnt/pico && sleep 2 && sudo minicom ‐b 115200 ‐o ‐D /dev/ttyACM0 3. Open a terminal and use minicom to check the sensor's information. python 1. Refer to Raspberry Pi's guides to setup Micropython firmware for Pico. 2. Open the Thonny IDE, drag the demo to IDE, and run on Pico as below. Pico-10DOF-IMU005.jpg Pico-RTC-DS3231005.jpg 3. Click the "run" icon to run the MicroPython demo codes. ...
- Page 4 Windows Download and unzip the demo to your Windows desktop, refer to Raspberry Pi's guides to set up the Windows software environment settings. Press and hold the BOOTSEL button of Pico, connect the USB of Pico to the PC with a MicroUSB cable. Import c or python program into Pico to make it run. Use the serial tool to view the virtual serial port of Pico's USB enumeration to check the print information, the DTR needs to be opened, the baud rate is 115200, as shown in the picture below: Pico-RTC-DS3231007 (1).jpg Others The LED light are not used by default, if you need to use it, you can solder a 0R resistor on the R8 position. Click to view the schematic diagram The INT pin of DS3231 is not used by default. if you need to use it, you can solder the 0R resistor on the R5,R6,R7 positions. Click to view the schematic diagram Solder the R5 resistor, connect the INT pin to the GP3 pin of Pico, to detect the output status of the DS3231 alarm clock. Solder the R6 resistor, connect the INT pin to the 3V3_EN pin of Pico, to turn off the Pico power when the DS3231 alarm clock outputs low level.
-
Page 5: Demo Codes
Solder the R7 resistor, connect the INT pin to the RUN pin of the Pico, to reset Pico when DS3231 alarm clock outputs low level. Resource Document Schematic DS3231 Datasheet Demo codes Demo codes Development Software Thonny Python IDE (Windows V3.3.3) Zimo221.7z Image2Lcd.7z Pico Quick Start Download Firmware MicroPython Firmware Download C_Blink Firmware Download [Expand] [Expand] Video Tutorial Pico Tutorial I - Basic Introduction Pico Tutorial II - GPIO [Expand] Pico Tutorial III - PWM [Expand] Pico Tutorial IV - ADC [Expand] Pico Tutorial V - UART [Expand] Pico Tutorial VI - To be continued... [Expand] MicroPython Series 【MicroPython】 machine.Pin Function... - Page 6 【MicroPython】 machine.PWM Function 【MicroPython】 machine.ADC Function 【MicroPython】 machine.UART Function 【MicroPython】 machine.I2C Function 【MicroPython】 machine.SPI Function 【MicroPython】 rp2.StateMachine C/C++ Series 【C/C++】 Windows Tutorial 1 - Environment Setting 【C/C++】 Windows Tutorial 1 - Create New Project Arduino IDE Series Install Arduino IDE 1. Download the Arduino IDE installation package from Arduino website . 2. Just click on "JUST DOWNLOAD". ...
- Page 7 3. Click to install after downloading. 4. Note: You will be prompted to install the driver during the installation process, we can click Install. Install Arduino-Pico Core on Arduino IDE 1. Open Arduino IDE, click the File on the left corner and choose "Preferences". ...
- Page 8 2. Add the following link in the additional development board manager URL, then click OK. https://github.com/earlephilhower/arduino‐pico/releases/download/globa l/package_rp2040_index.json Note: If you already have the ESP8266 board URL, you can separate the URLs with commas like this: https://dl.espressif.com/dl/package_esp32_index.json,https://github.co m/earlephilhower/arduino‐pico/releases/download/global/package_rp2040_i ndex.json 3. Click on Tools -> Dev Board -> Dev Board Manager -> Search for pico, it shows installed since my computer has already installed it. ...
- Page 9 Upload Demo At the First Time 1. Press and hold the BOOTSET button on the Pico board, connect the Pico to the USB port of the computer via the Micro USB cable, and release the button when the computer recognizes a removable hard drive (RPI-RP2). ...
- Page 10 2. Download the demo, open arduino\PWM\D1-LED path under the D1-LED.ino. 3. Click Tools -> Port, remember the existing COM, do not need to click this COM (different computers show different COM, remember the existing COM on your computer). 4. Connect the driver board to the computer with a USB cable, then click Tools - > Ports, select uf2 Board for the first connection, and after the upload is complete, connecting again will result in an additional COM port. ...
- Page 11 5. Click Tool -> Dev Board -> Raspberry Pi Pico/RP2040 -> Raspberry Pi Pico. 6. After setting, click the right arrow to upload. ...
-
Page 12: Technical Support
If you encounter problems during the period, you need to reinstall or replace the Arduino IDE version, uninstall the Arduino IDE needs to be uninstalled cleanly, after uninstalling the software you need to manually delete all the contents of the folder C:\Users\ [name]\AppData\Local\Arduino15 (you need to show the hidden files in order to see it) and then reinstall. Pico-W Series Tutorial (To be continued...) Open Source Demo MicroPython Demo (GitHub) MicroPython Firmware/Blink Demo (C) Official Raspberry Pi C/C++ Demo Official Raspberry Pi MicroPython Demo Arduino Official C/C++ Demo Support Technical Support If you need technical support or have any feedback/review, please click the Submit Now button to submit a ticket, Our Submit Now support team will check and reply to you within 1 to 2 working days. Please be patient as we make every effort to help you to resolve the issue. Working Time: 9 AM - 6 AM GMT+8 (Monday to Friday)
Need help?
Do you have a question about the Pico-RTC-DS3231 and is the answer not in the manual?
Questions and answers