Table of Contents
Advertisement
Quick Links
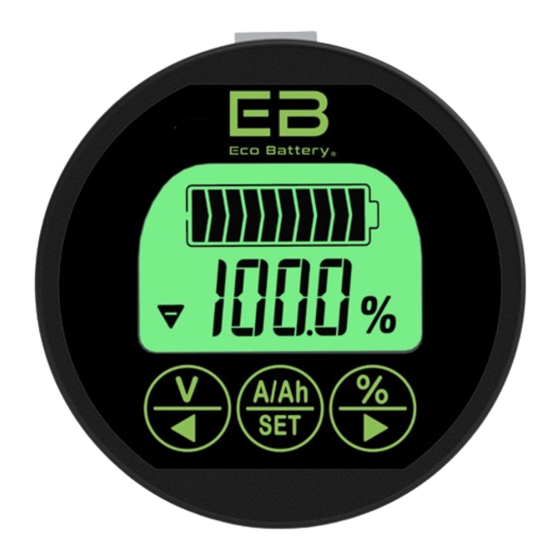
LCD Battery Monitor
Introduction
The Eco Battery LCD Battery Monitor Kit is designed specifically for
Eco Battery Lithium (LiFePo4) batteries. The LCD can display
voltage, amperage, and % of battery capacity. This kit includes LCD
display gauge, a sampling shunt, connection cable, and hardware.
NOTE: It is advised that your battery be fully charged before you
begin installation. For installation videos on golf carts and other
FAQ's, please visit:
www.ecobattery.com/install
Bill of Materials
1X
LCD Display and bracket
1X
500A Sampling Shunt
1X
3M Connection Cable
1X
Positive Lead Wire
2X
M8x30 Brass Bolt
2X
M8 Brass Nut
2X
M8 Brass Lock Washer
2X
M8 Brass Washer
Part# BMK-72
Power off and/or remove fuses to all devices connected to
the battery before installation. Golf carts should be in tow mode.
Connect shunt only as shown in this manual, inline with the
negative circuit. Incorrectly installing shunt in positive circuit will
irreversibly damage the shunt and monitor.
Do not cut or extend shielded wire that connects the shunt
to the LCD monitor. If extending is necessary, please order a longer
cable from www.ecobattery.com.
1. Disconnect all negative battery cables, and ensure they will
not touch the battery terminals during installation.
2. Determine mounting location for the LCD display. Ensure
there is adequate length of shielded cable to reach from the
battery's negative terminal to the LCD. Check for adequate
clearance behind LCD mounting location, and that you will not
damage any components behind where you will be drilling.
3. Use a 2-1/8" or 54mm hole saw to make a hole in the
desired location.
4. Mount the LCD in the hole you drilled, and secure it from
behind the panel by using the included bracket and wing nut.
5.Connect shielded cable to LCD, and route other end of
cable near the battery negative terminal.
Installation Instructions
Before you Begin:
LCD Installation
Shunt Installation
image of completed installation
1. Use a mini flat head screwdriver to connect the bare end of
the positive lead wire to either of the 2 small "+" terminals on the
shunt. Attach the other end with the ring terminal to battery B+.
Note: Make sure the highest drawing cables are installed on
B+ first (touching the battery terminal), with the shunt wire on top.
2. Attach the shunt's B- side directly to the battery's negative
terminal, using a M8x30mm brass bolt, 1 brass flat washer, and 1
brass lock washer.
Important: If you have a 12V voltage reducer (for lights, radio,
etc.)
or 120V inverter installed, remove it's input fuse before
proceeding. These devices can cause battery terminal arcing upon
connection, and can void your battery warranty. Always install
converter or inverter input fuses after all battery cables have been
connected.
3. Connect all negative power and charging cables (that were
originally connected to battery B-) to the "P-" side of the shunt,
using a M8x30 brass bolt, 2 brass flat washers, 1 brass lock
washer, and a M8 brass nut. The bolt should be installed from the
bottom, with the nut on top.
4. Connect shielded cable to shunt. LCD should power on.
Copyright 2020 Eco Battery, LLC, all rights reserved
Advertisement
Table of Contents

Summary of Contents for EB BMK-72
- Page 1 LCD Battery Monitor Installation Instructions Shunt Installation Part# BMK-72 Before you Begin: Power off and/or remove fuses to all devices connected to the battery before installation. Golf carts should be in tow mode. Connect shunt only as shown in this manual, inline with the negative circuit.
- Page 2 Programming Display Parameters Specifications Upon initial power on, the LCD will display the battery capacity Voltage Range 8V - 100V Current Range 0-500A percentage. Press to display battery capacity in Ah, Press Idle Pow er Use 6 mA Sleep Pow er Use 60 uA Back light Pow er Use 100mA...
Need help?
Do you have a question about the BMK-72 and is the answer not in the manual?
Questions and answers