Table of Contents
Advertisement
Available languages
Available languages
Quick Links
Digitaler Backstubentimer
Digital baking timer | Temporizador digital para
hornos de pan | Minuteur de cuisson numérique |
Timer digitale da forno | Cyfrowy timer do piekarni
Bedienungsanleitung
KT102
Operating Manual | Manual de instrucciones |
Mode d'emploi | Istruzioni per l'uso | Instrukcja
obsługi
Advertisement
Chapters
Table of Contents

Subscribe to Our Youtube Channel
Related Manuals for ADE KT102


Summary of Contents for ADE KT102
- Page 1 Digital baking timer | Temporizador digital para hornos de pan | Minuteur de cuisson numérique | Timer digitale da forno | Cyfrowy timer do piekarni Bedienungsanleitung KT102 Operating Manual | Manual de instrucciones | Mode d’emploi | Istruzioni per l’uso | Instrukcja obsługi...
- Page 2 Liebe Kundin, lieber Kunde ! Sie haben sich für den Kauf eines qualitativ hochwertigen Produkts entschieden, das intelligente Funktionen mit einem außergewöhnlichen Design vereint. Dieser Timer ist ideal für die Anforderungen in einer der Backstube ausgestattet. Wir wünschen Ihnen viel Freude damit! IM_Web_KT102_ADE_202202_V1...
-
Page 3: Allgemeines
Allgemeines Über diese Anleitung Diese Bedienungsanleitung be- schreibt den sicheren Umgang und die Pflege des Artikels. Bewahren Sie diese Bedienungsanleitung auf, falls Sie später etwas nachlesen möchten. Wenn Sie den Artikel an jemand anderen weitergeben, geben Sie auch diese Anleitung mit. - Page 4 Zeichenerklärung Dieses Symbol in Verbindung mit dem Wort GEFAHR warnt vor schweren Verletzungen. Dieses Symbol in Verbindung mit dem Wort WARNUNG warnt vor Verletzungen mittleren und leich- ten Grades. Dieses Symbol in Verbindung mit dem Wort HINWEIS warnt vor Sachschäden. Dieses Symbol kennzeichnet zusätzliche Informationen und allgemeine Hinweise.
-
Page 5: Table Of Contents
Inhaltsverzeichnis Allgemeines ............3 Sicherheit ............... 6 Bestimmungsgemäßer Gebrauch ....9 Lieferumfang ............9 Auf einen Blick ............10 Batterien einlegen/wechseln .......12 Uhrzeit einstellen ..........13 Timer aufstellen/befestigen ......15 Kurzzeitmessung durchführen ....16 Sonstige Funktionen ........18 Reinigen ..............19 Störung und Abhilfe ........20 Technische Daten ..........20 Konformitätserklärung ........21 Garantie ..............22 Entsorgen .............22... -
Page 6: Sicherheit
Sicherheit ‚ Dieser Artikel kann von Kindern ab 8 Jahren und darüber sowie von Personen mit verringerten physischen, sensorischen oder mentalen Fähigkeiten oder Mangel an Erfahrung und Wissen benutzt werden, wenn sie beaufsichtigt oder bezüglich des sicheren Gebrauchs des Artikels unterwie- sen wurden und die daraus resultierenden Gefahren verstehen. - Page 7 muss sofort medizinische Hilfe in Anspruch genommen werden. GEFAHR für Kinder ‚ Kinder von Verpackungsmaterial fernhalten. Bei Verschlucken besteht Erstickungsgefahr. GEFAHR von Brand/Verbrennung und/ oder Explosion ‚ Explosionsgefahr bei unsachgemäßem Aus- wechseln der Batterien. Batterien nur durch denselben oder gleichwertigen Batterietyp ersetzen.
- Page 8 ‚ Kontakt der Batterieflüssigkeit mit Haut, Augen und Schleimhäuten vermeiden. Bei Kontakt betroffene Stellen sofort mit reichlich klarem Wasser ausspülen und umgehend Arzt aufsuchen. VORSICHT vor Sachschäden ‚ Timer vor starken Stößen, Erschütterungen und Feuchtigkeit schützen. ‚ Batterien aus dem Artikel nehmen, wenn diese verbraucht sind oder Timer länger nicht benutzt werden soll.
-
Page 9: Bestimmungsgemäßer Gebrauch
‚ Batterie- und Gerätekontakte bei Bedarf vor dem Einlegen reinigen. ‚ Keine Änderungen an dem Artikel vorneh- men. Reparaturen nur von einer Fachwerk- statt durchführen lassen. Unsachgemäß durchgeführte Reparaturen können erhebliche Gefährdungen für den Benutzer verursachen. Bestimmungsgemäßer Gebrauch Dieser Backstubentimer ist für den Einsatz in Backstuben, Bäckereien und Küchen gedacht. -
Page 10: Auf Einen Blick
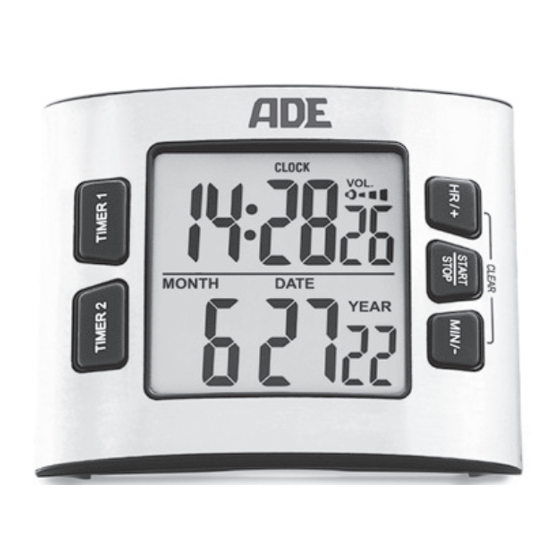
Auf einen Blick 1 Display 2 Taste HR/+ 3 Taste START/STOP 4 Taste MIN/- 5 Taste TIMER 2 6 Taste TIMER 1... - Page 11 Lautsprecher Magneten für Wandbestigung Ausklappbarer Standfuß Batteriefach für 2x R03 (AAA) Taste zum Einstellen der Lautstärke Bebriebsmodus-Schalter CLOCKSET/TIMER/CLOCK...
-
Page 12: Batterien Einlegen/Wechseln
Batterien einlegen/wechseln Für den Gebrauch benötigen Sie zwei Batterien des Typs R03 (AAA), 1,5 V. 1. Verschlusslasche eindrücken und Batterie- fachdeckel abnehmen. 2. Batterien so einlegen, wie auf dem Boden des Batteriefachs abgebildet. Auf die rich- tige Polarität (+/-) achten. 3. -
Page 13: Uhrzeit Einstellen
Uhrzeit einstellen Sobald der Timer mit Strom versorgt wird, ertö- nen zwei Pieptöne und im Display wird „12:00“ angezeigt. 1. Betriebsmodus-Schalter auf CLOCKSET schieben. 2. START/STOP drücken. Im Display blinkt „12“ (oder „24“). 3. Mit HR/+ oder MIN/- das gewünschte Stun- denformat wählen. - Page 14 5. Weiter vorgehen, wie beschrieben: − Taste HR/+ oder MIN/- drücken, um den gewünschten Wert einzustellen. − Jeweils START/STOP drücken, um eine Einstellung zu speichern. ‚ Wenn Sie HR/+ bzw. MIN/- gedrückt halten, erfolgt der Vorlauf der angezeigten Werte schneller. ‚...
-
Page 15: Timer Aufstellen/Befestigen
7. START/STOP drücken, um Vorgang abzuschließen. 8. Betriebsmodus-Schalter auf CLOCK schieben. Im Display wird die eingestellte Uhrzeit und das Datum angezeigt. Timer aufstellen/befestigen HINWEIS vor Sachschaden Timer bei Magnetbefestigung nicht über den Untergrund schieben. Dies könnte zu Kratzern führen. − Standfuß ausklappen und Timer auf einen ebenen und vibrationsfreien Untergrund stellen. -
Page 16: Kurzzeitmessung Durchführen
Kurzzeitmessung durchführen Bei einer Kurzzeitmessung starten Sie einen Countdown. Sie können zwei Messungen gleichzeitig durchführen. 1. Betriebsmodus-Schalter auf TIMER schieben. 2. Taste TIMER 1 oder TIMER 2 drücken. Die Display-Anzeige blinkt entsprechend. 3. Mit HR/+ oder MIN/- die gewünschte Zeit- dauer einstellen. - Page 17 Außerdem blinkt die entsprechende Dis- play-Anzeige sowie „TIME´S UP“. 5. START/STOP drücken, um die Pieptöne zu unterbrechen oder ca. 1 Minute warten, bis die Pieptöne automatisch beendet werden. 6. Gleichzeitig Tasten HR/+ und MIN/- drü- cken, um die Anzeige wieder auf Null zu setzen und das Blinken zu beenden.
-
Page 18: Sonstige Funktionen
‚ Die Anzeige muss auf Null stehen, um eine Zeitdauer eingeben zu können (ggf. gleich- zeitig Tasten HR/+ und MIN/- drücken). Sonstige Funktionen Lautstärke einstellen 1. Betriebsmodus-Schalter auf TIMER stellen. 2. Durch wiederholtes Drücken der Lautstärke-Taste (Rückseite) die gewünschte Lautstärke einstellen: leise - mittel - laut - stumm Beachten Sie die Display-Anzeige. -
Page 19: Reinigen
1. Batterien aus dem Batteriefach nehmen und einen Moment warten. 2. Batterien wieder einlegen. Richtige Polarität der Batterien (+/-) beachten. 3. Weiter vorgehen, wie im Kapitel „Uhrzeit einstellen“ beschrieben. Reinigen HINWEIS vor Sachschaden Timer nicht in Wasser oder andere Flüssigkeiten tauchen. Keine harten, kratzenden oder scheuernden Reini- gungsmittel verwenden. -
Page 20: Störung Und Abhilfe
Sie z. B. die Timer-Funktion nutzen, muss der Schalter auf TIMER stehen. Beim Ablauf des Timers ertönen keine Pieptöne. ‚ Sie haben den Timer stumm geschaltet, siehe „Lautstärke einstellen“. Technische Daten Modell: Digitaler Backstuben- timer KT102 Batterie: 2x R03 (AAA), 1,5 V Bemessungsstrom: 30 μA... -
Page 21: Konformitätserklärung
Aus diesem Grund sind Design- und technische Änderungen jederzeit möglich. Konformitätserklärung Hiermit erklärt die ADE Germany GmbH, dass der digitale Backstubentimer den Richtlinien 2014/30/EU und 2011/65/EU entspricht. Die Erklärung verliert ihre Gültigkeit, falls an dem Gerät eine nicht mit uns abgestimmte Än- derung vorgenommen wurde. -
Page 22: Garantie
Garantie Die Firma ADE Germany GmbH garantiert für 2 Jahre ab Kaufdatum die kostenfreie Behebung von Mängeln aufgrund von Material- oder Fabri- kationsfehlern durch Reparatur oder Austausch. Bitte geben Sie den Artikel im Garantiefall mit dem Kaufbeleg (unter Angabe des Reklamati- onsgrundes) an Ihren Händler zurück. - Page 23 Artikel entsorgen Entsorgen Sie den Artikel entsprechend der Vor- schriften, die in Ihrem Land gelten. Dieses Symbol besagt, dass dieses Elektro- bzw. Elektronikgerät am Ende seiner Lebensdauer nicht im Hausmüll entsorgt werden darf, sondern vom Endnutzer einer getrennten Samm- lung zugeführt werden muss. Zur Rückgabe stehen in Ihrer Nähe kostenfreie Sammelstellen für die Verwertung der Geräte zur Verfügung.
- Page 24 Ohne Neuerwerb sind die o.a. Vertreiber ver- pflichtet, auf Verlangen des Endnutzers bis zu drei Altgeräte (max. Kantenlänge von 25 cm) unentgeltlich zurückzunehmen. Die Batterien sind vor dem Entsorgen aus dem Grundgerät zu entnehmen! Die Batterien müs- sen getrennt von den anderen Geräteteilen entsorgt werden.
- Page 25 − Vor dem Entsorgen müssen die Batterien vollständig entladen werden. Lassen Sie hierfür das Gerät so lange eingeschaltet, bis im Display keine Anzeige mehr sichtbar ist. − Nehmen Sie danach die Batterien aus dem Gerät wie im Abschnitt „Batterien einlegen/ wechseln“...
- Page 26 Dear Customer! You have chosen to purchase a high-quality product, which combines intelligent functions with an exceptional design. This timer ideally meets the requirements of the baking industry. We wish you much pleasure!
-
Page 27: General Information
General information About this operating manual This operating manual describes how to operate and maintain your product safely. Keep this operating manual in a safe place for future reference. If you pass this product on to someone else, pass on this operating manual as well. - Page 28 Explanation of symbols This symbol combined with the word DANGER warns of serious injuries. This symbol combined with the word WARNING warns of moderate and mild injuries. This symbol combined with the word NOTE warns of material damage. This symbol indicates additional information and general notes.
- Page 29 Table of Contents General information ........27 Safety ..............30 Intended use ............33 Scope of delivery..........33 At a glance ............34 Inserting/changing batteries .......36 Setting the time ..........37 Setting up/attaching the timer....39 Using the timer ..........40 Other functions ..........42 Cleaning..............43 Fault and remedy ..........43 Technical data ...........
-
Page 30: Safety
Safety ‚ This product may be used by children aged 8 and above, as well as by persons with reduced physical, sensory, or mental capacities or lacking experience and knowledge if they are supervised or have been instructed in the safe use of the product and understand the risks that may arise. - Page 31 DANGER for children ‚ Keep children away from packaging material. There is a risk of choking if swallowed. RISK of fire/burning and/or explosion ‚ There is a risk of explosion if the batteries are replaced improperly. Replace the batteries only with the same or an equivalent battery type.
- Page 32 ‚ Avoid contact of the battery fluid with skin, eyes, and mucosa. In case of contact, immediately rinse the affected areas with plenty of clean water and consult a doctor. BEWARE of material damage ‚ Protect the timer from strong shocks, vibrations, and moisture.
-
Page 33: Intended Use
‚ Do not make any changes to the product. Only allow repairs to be carried out by a specialist workshop. Repairs carried out improperly can considerably endanger the user. Intended use This baking timer is intended for use in bakehouses, bakeries, and kitchens. Scope of delivery ‚... -
Page 34: At A Glance
At a glance 1 Display 2 HR/+ button 3 START/STOP button 4 MIN/- button 5 TIMER 2 button 6 TIMER 1 button... - Page 35 Speaker Magnets for wall mounting Fold out support foot Battery compartment for 2x R03 (AAA) Volume adjustment button CLOCKSET/TIMER/CLOCK mode switch...
-
Page 36: Inserting/Changing Batteries
Inserting/changing batteries For use, you will need two R03 (AAA), 1.5V batteries. 1. Push in the locking tab and remove the battery compartment cover. 2. Insert the batteries as shown on the bottom of the battery compartment. Pay attention to the correct polarity (+/-). 3. -
Page 37: Setting The Time
Setting the time When you turn on the timer, two beeps are emitted and “12:00” appears on the display. 1. Slide the mode switch to CLOCKSET. 2. Press START/STOP. “12” (or “24”) flashes on the display. 3. Use HR/+ or MIN/- to select the desired hour format. - Page 38 5. Proceed as described: − Press the HR/+ or MIN/- button to set the desired value. − Press START/STOP each time to save a setting. ‚ If you keep HR/+ or MIN/- pressed, the displayed values will change faster. ‚ A confirmation tone sounds by default each time you press the button.
-
Page 39: Setting Up/Attaching The Timer
7. Press START/STOP to finish the setup. 8. Slide the mode switch to CLOCK. The set time and date are shown on the display. Setting up/attaching the timer NOTE on material damage Do not push the timer over the surface when it is attached using the magnets. -
Page 40: Using The Timer
Using the timer When timing, you start a countdown. Two measurements can be taken at the same time. 1. Slide the mode switch to TIMER. 2. Press the TIMER 1 or TIMER 2 button. The corresponding display indicator starts to flash. 3. - Page 41 5. Press START/STOP to mute the timer or wait approx. 1 minute until the timer mutes automatically. 6. Press the HR/+ and MIN/- buttons simultaneously to zero the display so that it stops flashing. 7. Sliding the mode switch back to CLOCK returns to the time/date display.
-
Page 42: Other Functions
Other functions Adjusting the volume 1. Slide the mode switch to TIMER. 2. You can adjust the volume (soft - medium - loud - mute) by repeatedly pressing the volume adjustment button on the back of the device. Watch the display. Resetting the timer Reset the timer to factory defaults if abnormal or incorrect values are displayed. -
Page 43: Cleaning
Cleaning NOTE on material damage Do not immerse the timer in water or other liquids. Do not use rough, scratching or abrasive cleaning agents. − If necessary, remove dust with a soft, dry cloth, or wipe with a slightly damp cloth. Fault and remedy No function. -
Page 44: Technical Data
No beeps are emitted when the timer has elapsed. ‚ The timer has been muted, see “Adjusting the volume”. Technical data Model: KT102 digital baking timer Battery: 2x R03 (AAA), 1.5 V Rated current: 30 μA Distributor (no service address): ADE Germany GmbH Neuer Höltigbaum 15... -
Page 45: Declaration Of Conformity
Hamburg, February 2022 ADE Germany GmbH Warranty ADE Germany GmbH warrants for 2 years from the date of purchase that it will remedy any defects due to faulty material or workmanship free of charge by repair or replacement. In the... -
Page 46: Disposal
Disposal Disposing of the packaging Dispose of the packaging according to type. Dispose of cardboard with waste paper and of films with recyclable materials. Disposing of the product Dispose of the product in accordance with the regulations that apply in your country. Devices must not be disposed of in normal household waste. - Page 47 Bring the old device to a collection point for electronic waste or to a recycling depot. For more information, contact your local waste disposal firm or your local administrative body. Standard and rechargeable batteries should not be disposed of along with household waste All batteries and rechargeable batteries must be brought to a local or district collection...
- Page 48 ¡Estimada/o clienta/e! Se ha decidido por la compra de un producto de gran calidad que aúna funciones inteligentes con un diseño extraordinario. Este temporizador está perfectamente equipado para las necesidades de un horno de pan. ¡Le deseamos que disfruten con él!
- Page 49 Información general Acerca de estas instrucciones Este manual de instrucciones describe el manejo seguro y el cuidado del artículo. Conserve este manual de instrucciones por si necesita volver a consultarlo. Si le entrega el artículo a otra persona, acompáñelo también de estas instrucciones.
- Page 50 Explicación de símbolos Este símbolo unido a la palabra PELIGRO advierte de heridas graves. Este símbolo unido a la palabra ADVERTENCIA advierte de heridas de grado medio o leve. Este símbolo unido a la palabra INDICACIÓN advierte de daños materiales. Este símbolo significa información adicional e indicaciones generales.
- Page 51 Índice Información general ........51 Seguridad .............54 Uso adecuado.............57 Volumen de entrega ........57 De un vistazo ............58 Colocación/sustitución de las pilas ....60 Ajustar la hora ............61 Colocar/fijar el temporizador .......63 Realizar mediciones de periodos cortos . 64 Otras funciones ..........66 Limpieza ...............68 Problemas y soluciones ........69 Datos técnicos ............69 Declaración de conformidad ......70...
-
Page 52: Seguridad
Seguridad ‚ Pueden utilizar este aparato niños mayores de 8 años, así como personas con capacidades físicas, sensoriales o mentales reducidas o con falta de experiencia y conocimientos, siempre que sean supervisados o se les enseñe el uso seguro del artículo y comprendan los peligros resultantes. - Page 53 RIESGOS para los niños ‚ Mantenga alejados a los niños del material de embalaje. Este puede suponer un riesgo de asfixia si se ingiere. RIESGO de incendio/combustión y/o explosión ‚ Peligro de explosión debido a una sustitución incorrecta de las pilas. Cambie las pilas únicamente por otras iguales o del mismo tipo.
- Page 54 ‚ Evite el contacto del líquido de las pilas con la piel, ojos y mucosas. En caso de contacto, limpie inmediatamente la zona afectada con agua limpia y acuda al médico sin pérdida de tiempo. PRECAUCIÓN por daños materiales ‚ Proteja el temporizador contra golpes fuertes, sacudidas y humedad.
-
Page 55: Uso Adecuado
sol. ¡Riesgo elevado de fugas! ‚ Cuando sea necesario, limpie los contactos del aparato y de las pilas antes de colocarlas. ‚ No lleve a cabo ninguna modificación en el artículo. Realice las reparaciones únicamente en un taller especializado. Las reparaciones realizadas de forma inadecuada pueden suponer un riesgo elevado para el usuario. -
Page 56: De Un Vistazo
De un vistazo 1 Pantalla 2 Botón HR/+ 3 Botón START/STOP 4 Botón MIN/- 5 Botón TIMER 2 6 Botón TIMER 1... - Page 57 Altavoz Imanes para fijación en una superficie metálica Soporte plegable Compartimento para pilas, 2x R03 (AAA) Botón de ajuste del volumen Interruptor de modo de funcionamiento CLOCKSET/TIMER/CLOCK...
-
Page 58: Colocación/Sustitución De Las Pilas
Colocación/sustitución de las pilas Para utilizar el despertador son necesarias dos pilas del tipo R03 (AAA), 1,5 V. 1. Presione la lengüeta de cierre y retire la tapa del compartimento de las pilas. 2. Coloque las pilas del modo que se indica en la base del compartimento de las pilas. -
Page 59: Ajustar La Hora
‚ Elimine las pilas gastadas conforme a la normativa medioambiental, consulte «Eliminación». Ajustar la hora En cuanto el temporizador recibe corriente, se oyen dos pitidos y en la pantalla aparece «12:00». 1. Mueva el interruptor de modo de funcionamiento a la posición CLOCKSET. 2. - Page 60 5. Continúe como se describe: − Pulse el botón HR/+ o MIN/- para seleccionar el valor que desee. − Pulse después START/ STOP para guardar cada uno de los ajustes. ‚ Si mantiene pulsado HR/+ o MIN/-, los valores que se muestran avanzarán más rápido.
-
Page 61: Colocar/Fijar El Temporizador
8. Mueva el interruptor de modo de funcionamiento a la posición CLOCK. En la pantalla se muestran la hora y la fecha establecidas. Colocar/fijar el temporizador ADVERTENCIA de daños materiales No desplace el temporizador sobre la superficie cuando esté fijado con los imanes. -
Page 62: Realizar Mediciones De Periodos Cortos
Realizar mediciones de periodos cortos Cuando se mide un periodo corto se inicia una cuenta atrás. Pueden realizarse dos mediciones simultáneamente. 1. Mueva el interruptor de modo de funcionamiento a la posición TIMER. 2. Pulse el botón TIMER 1 o TIMER 2. En la pantalla parpadeará... - Page 63 4. Pulse START/STOP para iniciar el temporizador. Una vez transcurrido el tiempo establecido, se oyen unos pitidos durante aproximadamente 1 minuto. Además, en la pantalla parpadeará el indicador correspondiente y «TIME’S UP» («TIEMPO FINALIZADO»). 5. Pulse START/STOP para interrumpir los pitidos o espere 1 minuto hasta que los pitidos cesen automáticamente.
-
Page 64: Otras Funciones
Tenga en cuenta que: ‚ Con el botón START/STOP puede parar en cualquier momento la cuenta atrás y continuarla nuevamente. ‚ Mediante el interruptor de modo de funcionamiento puede volver a hacer que se muestre la hora con el temporizador en funcionamiento (posición CLOCK). - Page 65 2. Pulsando varias veces el botón de volumen (en la parte posterior), ajuste volumen que desee: bajo - medio - alto - silencio Observe el indicador en la pantalla. Reiniciar el temporizador (RESET) Restablezca los valores de fábrica del temporizador cuando en la pantalla se muestren valores inusuales o claramente erróneos.
-
Page 66: Limpieza
Limpieza ADVERTENCIA de daños materiales No introduzca el temporizador en agua ni en ningún otro líquido. No utilice productos de limpieza duros, que puedan rayar o que haya que frotar. − Cuando sea necesario, quite el polvo al temporizador con un paño suave y seco o límpielo con un paño ligeramente humedecido. -
Page 67: Datos Técnicos
El temporizador no responde al pulsar los botones. ‚ ¿Está colocado correctamente el interruptor de modo de funcionamiento de la parte posterior? Por ejemplo, si desea utilizar la función de temporizador, el interruptor debe estar colado en TIMER. No se emite ningún pitido al finalizar el tiempo. ‚... -
Page 68: Declaración De Conformidad
Declaración de conformidad ADE Germany GmbH declara por la presente que el temporizador digital para hornos de pan cumple las directivas 2014/30/UE y 2011/65/UE. La declaración perderá su validez en caso de se haya realizado una modificación en el aparato... -
Page 69: Garantía
Hamburgo, febrero de 2022 ADE Germany GmbH Garantía La empresa ADE Germany GmbH garantiza durante 2 años a partir de la fecha de compra, la subsanación de los defectos debidos a fallos de material o fabricación, mediante reparación o cambio del equipo. En caso de solicitar la aplicación de la garantía, lleve el artículo a... -
Page 70: Eliminación
Eliminación Eliminación del embalaje Deseche el envoltorio adecuadamente. Lleve el papel y cartón al contenedor de cartón y las láminas al de plásticos. Eliminación del artículo Elimine el artículo conforme a la normativa correspondiente aplicable en su país. Los aparatos no deben eliminarse con la basura doméstica normal. - Page 71 Para ello, se deben reciclar las piezas del aparato y así evitar un daño al medio ambiente. Deposite el aparato antiguo en un punto de recogida de restos electrónicos o desechos reciclables. Para más información, diríjase a su empresa de recogida de residuos o administración local.
- Page 72 Chère cliente, cher client ! Nous sommes ravis que vous ayez choisi un appareil de haute qualité, qui allie des fonctions intelligentes à un design exceptionnel. Ce minuteur est parfaitement équipé pour répondre aux besoins d’un fournil. Nous espérons qu'il vous apportera entière satisfaction.
-
Page 73: Généralités
Généralités À propos de ce mode d’emploi Ce mode d’emploi décrit l’utilisation conforme ainsi que les procédures d’entretien de l’article. Conservez ce manuel pour toute référence ultérieure. Si vous cédez l’article à une tierce personne, transmettez-lui également ce mode d’emploi. Le non-respect de ce mode d’emploi peut entraîner des blessures ou endommager l’article. - Page 74 Légende Ce symbole, associé au mot DANGER, prévient de blessures graves. Ce symbole, associé au mot ATTENTION, prévient de blessures moyennes et légères. Ce symbole, associé au mot AVERTISSEMENT, prévient de dommages matériels. Ce symbole désigne des informations supplémentaires ainsi que des indications d’ordre général.
- Page 75 Table des matières Généralités ............73 Sécurité ..............76 Utilisation conforme ........79 Contenu de l’emballage .........79 Aperçu ..............80 Insérer/changer les piles.........82 Régler l’heure .............83 Positionner/fixer le minuteur .......85 Déclencher la minuterie rapide ....86 Autres fonctions ..........89 Nettoyage ............90 Dysfonctionnement et solutions ....90 Caractéristiques techniques ......91 Déclaration de conformité...
-
Page 76: Sécurité
Sécurité ‚ Cet article peut être utilisé par des enfants dès l’âge de 8 ans ainsi que par des personnes aux capacités physiques, sensorielles ou mentales limitées ou de peu d’expérience et de connaissances si ceux-ci sont sous surveillance ou ont été instruits de l’utilisation conforme de l’article et comprennent les risques qui en découlent. - Page 77 pile, sollicitez immédiatement une aide médicale. DANGER pour les enfants ‚ Tenir l’emballage à l’écart des enfants. Risque d’étouffement en cas d'ingestion. DANGER d’incendie/brûlure et/ou d’explosion ‚ Risque d’explosion en cas de remplacement non conforme des piles. Remplacez les piles uniquement par des piles du même type ou similaires.
- Page 78 ‚ Éviter le contact du liquide de la pile avec la peau, les yeux et les muqueuses. En cas de contact, rincer immédiatement et abondamment à l’eau claire et consulter rapidement un médecin. ATTENTION Risque de dommages matériels ‚ Protéger le minuteur des coups, des secousses et de l'humidité.
-
Page 79: Utilisation Conforme
du soleil. Risque accru de fuite pour les piles ! ‚ Si besoin, nettoyer les bornes de la pile et de l’appareil avant l’insertion. ‚ Ne modifiez pas les composants de l’appareil. Les réparations doivent être uniquement effectuées par un atelier spécialisé. -
Page 80: Aperçu
Aperçu 1 Écran 2 Touche HR/+ 3 Touche START/STOP 4 Touche MIN/- 5 Touche TIMER 2 6 Touche TIMER 1... - Page 81 Haut-parleur Aimants pour fixation murale Pied repliable Compartiment pour 2 piles R03 (AAA) Touche pour le réglage du volume Commutateur de mode de fonctionnement CLOCKSET/TIMER/ CLOCK...
-
Page 82: Insérer/Changer Les Piles
Insérer/changer les piles Le réveil fonctionne à l’aide de deux piles R03 (AAA), 1,5 V. 1. Enfoncez le fermoir et retirer le couvercle du compartiment à piles. 2. Placez les piles tel qu’indiqué par le dessin sur le fond du compartiment à piles. Respectez la polarité... -
Page 83: Régler L'heure
‚ Mettre les anciennes piles au rebut en respectant les prescriptions environnementales, voir « Mise au rebut ». Régler l’heure Dès que le minuteur est alimenté, deux bips sonores retentissent et à l’écran apparaît « 12:00 ». 1. Positionnez le commutateur de mode de fonctionnement sur CLOCKSET. 2. - Page 84 4. Appuyez sur la touche START/STOP pour confirmer la sélection. Le chiffre des heures clignote à l’écran. 5. Procéder ensuite comme indiqué. − Appuyer sur la touche HR/+ ou MIN/- pour régler la valeur souhaitée. − Appuyez à chaque fois sur la touche START/STOP pour enregistrer un réglage.
-
Page 85: Positionner/Fixer Le Minuteur
− Minutes − Année − Mois − Jour 7. Appuyez sur START/STOP pour terminer le processus. 8. Positionnez le commutateur de mode de fonctionnement sur CLOCK. L'heure et la date réglées apparaissent à l’écran. Positionner/fixer le minuteur AVERTISSEMENT Risque de dommages matériels Si vous vous servez de la fixation magnétique, ne faites pas glisser le minuteur sur les surfaces. -
Page 86: Déclencher La Minuterie Rapide
− Dépliez le pied et placez le minuteur sur une surface plane et à l'abri des vibrations. − Vous pouvez également fixer le minuteur sur une surface métallique. Déclencher la minuterie rapide La minuterie amorce un compte à rebours. Vous pouvez réaliser deux mesures simultanées. - Page 87 4. Appuyez sur START/STOP pour lancer la minuterie. Une fois la durée programmée écoulée, des bips sonores retentissent pendant environ une minute. Par ailleurs, l’affichage « TIME’S UP » correspondant clignote à l’écran. 5. Appuyez sur START/STOP pour interrompre le bip sonore, ou bien attendez que celui-ci s’éteigne automatiquement au bout d’une minute.
- Page 88 Nota : ‚ Le bouton START/STOP permet d'interrompre le compte à rebours à tout moment ou de le relancer. ‚ Le commutateur de mode de fonctionnement vous permet aussi d’afficher l’heure, même pendant le compte à rebours (Position CLOCK). Le compte à rebours se poursuit en arrière-plan.
-
Page 89: Autres Fonctions
Autres fonctions Régler le volume 1. Positionnez le commutateur sur TIMER. 2. Appuyez plusieurs fois sur la touche du volume (à l’arrière) pour régler le volume souhaité : faible - moyen - fort - silencieux. Notez l’affichage à l'écran. Réinitialiser le minuteur (RESET) Revenez aux paramètres par défaut du minuteur lorsque l’écran indique des données inhabituelles ou manifestement erronées. -
Page 90: Nettoyage
Nettoyage AVERTISSEMENT Risque de dommages matériels Ne pas plonger le minuteur dans l'eau ou tout autre liquide. Ne pas utiliser de produit de nettoyage corrosif, agressif ou abrasif. − Si nécessaire, éliminer la poussière avec un chiffon sec et doux ou essuyer le minuteur avec un chiffon légèrement humide. -
Page 91: Caractéristiques Techniques
Aucun bip sonore ne retentit à la fin du compte à rebours. ‚ Vous avez configuré le minuteur sur silencieux, voir le chapitre « Régler le volume ». Caractéristiques techniques Modèle : Minuteur de cuisson numérique KT102 2 piles R03 (AAA), Pile : 1,5 V Intensité nominale : 30 μA... -
Page 92: Déclaration De Conformité
Pour cette raison, des modifications de design et des modifications techniques peuvent survenir à tout moment. Déclaration de conformité ADE Germany GmbH déclare que le minuteur de cuisson numérique est conforme aux directives 2014/30/UE et 2011/65/UE. La déclaration perd sa validité si l’appareil subit une modification sans notre accord. -
Page 93: Garantie
Garantie La société ADE Germany GmbH garantit la prise en charge gratuite de défauts matériels ou de fabrication pendant 2 ans à compter de la date d’achat, par une réparation ou un remplacement. Dans le cas où vous souhaitez faire usage de cette garantie, veuillez remettre l’article ainsi que la... - Page 94 Mise au rebut de l’article Veuillez éliminer l’article selon les prescriptions en vigueur dans votre pays en matière de traitement des déchets. Les appareils électriques ne doivent pas être éliminés avec les déchets ménagers classiques. À la fin de sa durée de vie, l’article doit être soumis à...
- Page 95 Les piles et batteries ne doivent pas être éliminées avec les déchets ménagers Toutes les piles et batteries doivent être déposées dans un point de collecte de votre localité ou rapportées à leur point d’achat. Les piles et batteries seront ainsi traitées dans le respect de l’environnement.
- Page 96 Gentile cliente! La ringraziamo per aver scelto un prodotto di alta qualità che unisce funzioni intelligenti e un design fuori dal comune. Questo timer è perfettamente adatto alle esigenze di una panetteria. Vi auguriamo buon divertimento!
-
Page 97: Informazioni Generali
Informazioni generali Informazioni sulle presenti istruzioni Queste istruzioni per l'uso descrivono l'utilizzo sicuro e la cura del prodotto. Conservarle per eventuali consultazioni future. In caso di cessione del prodotto a terzi, consegnare anche le presenti istruzioni per l'uso. La mancata osservanza delle istruzioni per l'uso può... - Page 98 Descrizione dei simboli Questo simbolo accompagnato dalla parola PERICOLO mette in guardia contro il rischio di gravi lesioni. Questo simbolo accompagnato dalla parola AVVERTENZA indica il rischio di lesioni di lieve o media entità. Questo simbolo accompagnato dalla parola ATTENZIONE indica il rischio di danni alle cose.
- Page 99 Indice dei contenuti Informazioni generali ........97 Sicurezza ............100 Destinazione d'uso ........103 Ambito della fornitura........103 Descrizione ............104 Inserimento e sostituzione delle batterie ........... 106 Impostazione dell'ora ........107 Collocazione e fissaggio del timer ..109 Misurazione di tempi brevi ......110 Altre funzioni ............112 Pulizia ..............113 Risoluzione dei problemi ......114...
-
Page 100: Sicurezza
Sicurezza ‚ Il dispositivo può essere utilizzato da bambini con un’età superiore a 8 anni e da persone che hanno capacità fisiche, sensoriali o mentali ridotte, oppure con mancanza di esperienza o di conoscenza, solo sotto la supervisione di una persona responsabile o se hanno ricevuto e compreso le istruzioni e i pericoli che potrebbero manifestarsi durante l’uso del... - Page 101 le batterie lontano dalla portata di bambini piccoli. In caso di ingestione di una batteria, consultare immediatamente un medico. PERICOLO per i bambini ‚ Tenere lontano dalla portata dei bambini il materiale di imballaggio. Rischio di soffocamento in caso di ingestione. PERICOLO di incendio, ustioni e/o esplosione ‚...
- Page 102 ‚ Evitare il contatto del liquido delle batterie con la pelle, gli occhi e le mucose. In caso di contatto sciacquare immediatamente con abbondante acqua pulita e consultare immediatamente il medico. ATTENZIONE a danni materiali ‚ Proteggere il timer da urti, oscillazioni e umidità.
-
Page 103: Destinazione D'uso
‚ Se necessario, pulire i contatti del dispositivo e delle batterie prima di inserirle. ‚ Non apportare alcuna modifica all'articolo. Rivolgersi esclusivamente ad un tecnico specializzato per la riparazione del prodotto. Riparazioni non eseguite correttamente possono essere causa di seri pericoli per l'utente. -
Page 104: Descrizione
Descrizione 1 Display 2 Tasto HR/+ 3 Tasto START/STOP 4 Tasto MIN/- 5 Tasto TIMER 2 6 Tasto TIMER 1... - Page 105 Altoparlante Magneti per il fissaggio a parete Base pieghevole Vano batterie per 2 batterie R03 (AAA) Tasto per l’impostazione del volume Interruttore della modalità di funzionamento CLOCKSET/TIMER/ CLOCK...
-
Page 106: Inserimento E Sostituzione Delle Batterie
Inserimento e sostituzione delle batterie Per il funzionamento sono necessarie due batterie del tipo R03 (AAA), 1,5 V. 1. Premere la linguetta e rimuovere il coperchio del vano batteria. 2. Inserire le batterie come indicato sul fondo del vano batterie. Prestare attenzione alla corretta polarità (+/-). -
Page 107: Impostazione Dell'ora
‚ Provvedere allo smaltimento corretto delle batterie, vedi "Smaltimento". Impostazione dell'ora Non appena il timer viene alimentato, vengono emessi due segnali acustici e sul display viene visualizzato "12:00". 1. Portare l’interruttore della modalità di funzionamento in posizione CLOCKSET. 2. Premere START/STOP. Sul display lampeggia "12"... - Page 108 Sul display lampeggia la cifra dell’ora. 5. Procedere come descritto: − Premere il tasto HR/+ o MIN/- per impostare il valore desiderato. − Premere ogni volta START/STOP per salvare un’impostazione. ‚ Se si tengono premuti HR/+ o MIN/- le cifre visualizzate scorreranno più...
-
Page 109: Collocazione E Fissaggio Del Timer
7. Premere START/STOP per terminare la procedura. 8. Portare l’interruttore della modalità di funzionamento in posizione CLOCK. Sul display verrà visualizzata l’ora e la data impostata. Collocazione e fissaggio del timer ATTENZIONE a eventuali danni al prodotto Evitare di spostare il timer sulla superficie in caso di fissaggio a magnete. -
Page 110: Misurazione Di Tempi Brevi
Misurazione di tempi brevi Avviare il conto alla rovescia per la misurazione di tempi brevi. È possibile effettuare due misurazioni contemporaneamente. 1. Portare l’interruttore della modalità di funzionamento in posizione TIMER. 2. Premere il tasto TIMER 1 o TIMER 2. L’indicatore sul display lampeggerà... - Page 111 bip suonano per circa 1 minuto. Inoltre, sul display lampeggerà l'indicatore corrispondente e "TIME'S UP". 5. Premere START/STOP per interrompere i segnali acustici o attendere circa 1 minuto che questi terminino automaticamente. 6. Premere contemporaneamente i tasti HR/+ e MIN/- per riazzerare l’indicatore e interrompere il lampeggiamento.
-
Page 112: Altre Funzioni
timer è attivo (posizione CLOCK). Il conto alla rovescia continuerà in background. ‚ Per inserire la durata, l’indicatore deve trovarsi a zero (se necessario, premere contemporaneamente i tasti HR/+ e MIN/-). Altre funzioni Impostazione del volume 1. Portare l’interruttore della modalità di funzionamento in posizione TIMER. -
Page 113: Pulizia
1. Estrarre le batterie dall'apposito vano e attendere qualche istante. 2. Inserire nuovamente le batterie. Osservare la corretta polarità delle batterie (+/-). 3. Procedere come descritto nel capitolo “Impostazione dell’ora”. Pulizia ATTENZIONE a eventuali danni al prodotto Non immergere il timer in acqua o in altri liquidi. -
Page 114: Risoluzione Dei Problemi
Risoluzione dei problemi Il dispositivo non funziona. ‚ Le batterie sono scariche o sono state installate in modo errato? Il timer non risponde alla pressione dei tasti. ‚ L’interruttore della modalità di funzionamento situato sul retro si trova nella posizione corretta? Se si desidera utilizzare ad es. -
Page 115: Dati Tecnici
Batteria: 2 R03 (AAA) da 1,5 V Corrente nominale: 30 μA Distributore (nessun servizio di assistenza): ADE Germany GmbH Neuer Höltigbaum 15 22143 Hamburg, Germania I nostri prodotti sono costantemente sviluppati e perfezionati. Pertanto, modifiche tecniche e nel design sono possibili in qualsiasi momento. -
Page 116: Dichiarazione Di Conformità
Dichiarazione di conformità Con la presente, ADE Germany GmbH dichiara che il timer digitale da forno è conforme alle direttive 2014/30/UE e 2011/65/UE. La presente dichiarazione perde ogni sua validità qualora al dispositivo vengano apportate modifiche senza la nostra autorizzazione. -
Page 117: Smaltimento
Smaltimento Smaltimento dell'imballaggio Provvedere allo smaltimento dell'imballaggio in base al tipo. Conferire il cartone nella raccolta della carta e la pellicola in quella del materiale riciclabile. Smaltimento del prodotto Smaltire il prodotto secondo le norme vigenti nel proprio paese. Non smaltire il dispositivo con i normali rifiuti domestici. - Page 118 In tal modo si rende possibile il riutilizzo del materiale riciclabile contenuto nell’apparecchio limitando l’impatto sull’ambiente. Smaltire l’apparecchio usato presso un centro di raccolta per rifiuti elettrici o un centro di riciclaggio. Per ulteriori informazioni rivolgersi alla ditta di smaltimento locale o alla propria amministrazione comunale.
- Page 120 Szanowny Kliencie! Zakupiony wysokiej jakości produkt łączy w sobie inteligentne funkcje z wyjątkową stylistyką. Timer ten jest idealnie przystosowany do wymogów piekarni. Życzymy dużo przyjemności!
- Page 121 Informacje ogólne O niniejszej instrukcji Niniejsza instrukcja obsługi zawiera opis bezpiecznej obsługi i pielęgnacji artykułu. Instrukcję obsługi należy przechowywać w celu jej późniejszego wykorzystania. Jeżeli produkt będzie przekazywany innej osobie, należy przekazać również tę instrukcję. Nieprzestrzeganie instrukcji obsługi może spowodować obrażenia ciała lub uszkodzenie produktu.
- Page 122 Objaśnienie znaków Ten symbol w połączeniu ze słowem NIEBEZPIECZEŃSTWO ostrzega przed poważnymi obrażeniami ciała. Ten symbol w połączeniu ze słowem OSTRZEŻENIE ostrzega przed obrażeniami ciała średniego i lekkiego stopnia. Ten symbol w połączeniu ze słowem WSKAZÓWKA ostrzega przed stratami materialnymi. Ten symbol oznacza dodatkowe informacje i ogólne wskazówki.
- Page 123 Spis treści Informacje ogólne ..........121 Bezpieczeństwo ..........124 Użycie zgodne z przeznaczeniem ....127 Zakres dostawy ..........127 W skrócie ............128 Wkładanie/wymiana baterii ....... 130 Ustawianie godziny ........131 Ustawianie/mocowanie timera ....133 Uruchamianie odliczania (minutnik) ..134 Pozostałe funkcje ........... 136 Czyszczenie ............137 Usterki i ich usuwanie ........
-
Page 124: Bezpieczeństwo
Bezpieczeństwo ‚ Ten produkt może być używany przez dzieci od 8 roku życia oraz przez osoby z ograniczonymi zdolnościami fizycznymi, sensorycznymi lub umysłowymi bądź takie, którym brakuje doświadczenia i wiedzy, tylko wtedy, gdy są nadzorowane lub przeszły przeszkolenie z zakresu bezpiecznego użytkowania produktu i rozumieją... - Page 125 baterii należy natychmiast zwrócić się o pomoc medyczną. NIEBEZPIECZEŃSTWO dla dzieci ‚ Dzieci należy trzymać z dala od opakowania. W przypadku połknięcia istnieje niebezpieczeństwo uduszenia się. NIEBEZPIECZEŃSTWO pożaru/obrażeń i/ lub wybuchu ‚ Niebezpieczeństwo wybuchu w przypadku niewłaściwej wymiany baterii. Baterie należy wymieniać...
- Page 126 ‚ Unikać kontaktu kwasu z baterii ze skórą, oczami oraz śluzówką. W przypadku kontaktu z kwasem z baterii natychmiast przemyć wspomniane miejsca dużą ilością czystej wody oraz niezwłocznie skontaktować się z lekarzem. OSTROŻNIE — straty materialne ‚ Timer należy chronić przed silnymi uderzeniami, wstrząsami i wilgocią.
-
Page 127: Użycie Zgodne Z Przeznaczeniem
promieniowanie słoneczne. Podwyższone niebezpieczeństwo wycieku! ‚ W razie potrzeby wyczyścić styki urządzenia i baterii przed ich włożeniem. ‚ Nie dokonywać zmian w produkcie. Naprawy należy przeprowadzać w wykwalifikowanym serwisie. Nieprawidłowo wykonane naprawy mogą spowodować poważne zagrożenia dla użytkownika. Użycie zgodne z przeznaczeniem Ten timer do piekarni jest przeznaczony do stosowania w piekarniach i kuchniach. -
Page 128: W Skrócie
W skrócie 1 Wyświetlacz 2 Przycisk HR/+ 3 Przycisk START/STOP 4 Przycisk MIN/- 5 Przycisk TIMER 2 6 Przycisk TIMER 1... - Page 129 Głośnik Magnes do mocowania ściennego Rozkładana nóżka Komora na baterie 2x R03 (AAA) Przycisk do regulacji głośności Przełącznik trybu pracy CLOCKSET/ TIMER/CLOCK...
-
Page 130: Wkładanie/Wymiana Baterii
Wkładanie/wymiana baterii Do uruchomienia produktu niezbędne są dwie baterie typu R03 (AAA), 1,5 V. 1. Nacisnąć zatrzask blokujący i zdjąć pokrywę komory baterii. 2. Baterie ułożyć w taki sposób, jak jest to przedstawione na spodzie komory na baterie. Należy uważać na właściwe położenie biegunów (+/-). -
Page 131: Ustawianie Godziny
‚ Stare baterie należy utylizować zgodnie z zasadami ochrony środowiska, patrz „Utylizacja”. Ustawianie godziny Po podłączeniu zasilania do timera rozlegną się dwa sygnały dźwiękowe, a na wyświetlaczu pojawi się „12:00”. 1. Przesunąć przełącznik trybu pracy na CLOCKSET. 2. Nacisnąć START/STOP. Na wyświetlaczu miga „12”... - Page 132 4. Nacisnąć START/STOP, aby potwierdzić wybór. Na wyświetlaczu zacznie migać cyfra godzin. 5. Postępować dalej, jak opisano: − Nacisnąć przycisk HR/+ lub MIN/-, aby ustawić żądaną wartość. − Nacisnąć START/STOP, aby zapisać ustawienie. ‚ Jeżeli naciśniesz i przytrzymasz HR/+ lub MIN/-, przewijanie wyświetlanych wartości będzie szybsze.
-
Page 133: Ustawianie/Mocowanie Timera
− Dzień 7. Nacisnąć START/STOP, aby zakończyć operację. 8. Przesunąć przełącznik trybu pracy na CLOCK. Na wyświetlaczu pojawi się ustawiona godzina i data. Ustawianie/mocowanie timera WSKAZÓWKA dotycząca strat materialnych W przypadku zamocowania magnesami nie należy przesuwać timera po podłożu. Może to spowodować... -
Page 134: Uruchamianie Odliczania (Minutnik)
Uruchamianie odliczania (minutnik) Przy odmierzaniu krótkiego czasu rozpoczyna się jego odliczanie. Można wykonać dwa pomiary jednocześnie. 1. Przesunąć przełącznik trybu pracy na TIMER. 2. Nacisnąć przycisk TIMER 1 lub TIMER 2. Wskazanie na wyświetlaczu będzie odpowiednio migać. 3. Za pomocą HR/+ lub MIN/- ustawić żądany czas. - Page 135 sygnały dźwiękowe przez ok. 1 minutę. Ponadto na wyświetlaczu będą migać odpowiednie wskazanie oraz „TIME'S UP”. 5. Nacisnąć START/STOP, aby przerwać sygnały dźwiękowe albo odczekać około 1 minutę, aż sygnały dźwiękowe ustaną automatycznie. 6. Nacisnąć jednocześnie przyciski HR/+ oraz MIN/-, aby wyzerować wskazanie i zatrzymać...
-
Page 136: Pozostałe Funkcje
wyświetlić godzinę (pozycja CLOCK). Odliczanie przebiega nadal w tle. ‚ Wskazanie na wyświetlaczu musi być wyzerowane, aby można było wprowadzić czas (w razie potrzeby nacisnąć jednocześnie przyciski HR/+ oraz MIN/-). Pozostałe funkcje Ustawianie głośności 1. Ustawić przełącznik trybu pracy na TIMER. 2. -
Page 137: Czyszczenie
nietypowe lub niewątpliwie błędne wartości. 1. Wyjąć baterie z komory i zaczekać chwilę. 2. Włożyć ponownie baterie. Należy uważać na właściwe położenie biegunów (+/-). 3. Postępować zgodnie z opisem w rozdziale „Ustawianie godziny”. Czyszczenie WSKAZÓWKA dotycząca strat materialnych Nie zanurzać timera w wodzie ani w innych cieczach. -
Page 138: Usterki I Ich Usuwanie
Usterki i ich usuwanie Urządzenie nie działa. ‚ Baterie wyczerpane lub włożone nieprawidłowo? Timer nie reaguje na naciśnięcia przycisków. ‚ Czy przełącznik trybu pracy z tyłu urządzenia znajduje się we właściwej pozycji? Jeśli chcesz korzystać np. z funkcji timera, przełącznik musi być ustawiony w pozycji TIMER. -
Page 139: Dane Techniczne
Bateria: 2x R03 (AAA), 1,5 V Prąd znamionowy: 30 μA Dystrybutor (nie adres serwisu): ADE Germany GmbH Neuer Höltigbaum 15 22143 Hamburg, Niemcy Nasze produkty są stale rozwijane i usprawniane. Z tego powodu zawsze możliwe są zmiany w wyglądzie i zmiany techniczne. -
Page 140: Gwarancja
Hamburg, luty 2022 r. ADE Germany GmbH Gwarancja Firma ADE Germany GmbH udziela 2-letniej gwarancji od daty zakupu na bezpłatne usuwanie usterek spowodowanych błędami materiałowymi lub produkcyjnymi poprzez naprawę lub wymianę. W przypadku korzystania z gwarancji prosimy o zwrócenie sprzedawcy... -
Page 141: Utylizacja
Utylizacja Utylizacja opakowania Opakowanie należy utylizować zgodnie z jego rodzajem. Tektura i karton powinny trafić do pojemnika na papier, folia do pojemnika na surowce wtórne. Utylizacja produktu Produkt należy utylizować zgodnie z przepisami obowiązującymi w danym kraju. Urządzeń nie wolno wyrzucać razem ze zwykłymi odpadami domowymi. - Page 142 Surowce wtórne znajdujące się w urządzeniu zostaną przekazane do recyklingu, co zmniejszy zanieczyszczenie środowiska. Zużyte urządzenie należy oddać do punktu zbiórki odpadów elektrycznych lub do punktu zbiórki surowców wtórnych. Więcej informacji można uzyskać od lokalnego zakładu utylizacji lub administracji gminy. Baterii i akumulatorów nie wolno wyrzucać...
Need help?
Do you have a question about the KT102 and is the answer not in the manual?
Questions and answers