
Subscribe to Our Youtube Channel
Related Manuals for XK A300

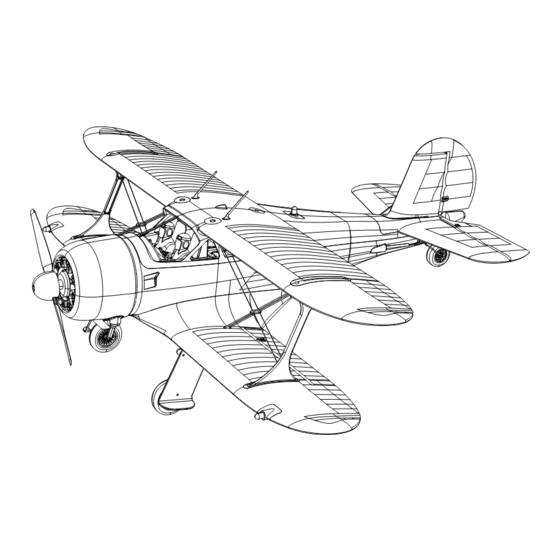
Summary of Contents for XK A300
- Page 2 1. EPP+engineering materials, World War II Deech D17S biplane high simulation camera. 2. 1806 strong magnetic brushless motor with super power. 2g high-precision digital steering gear, quick response and fast locking. 3. The remote control is controlled by an independent potentiometer, which makes the control feel more accurate and comfortable.
- Page 3 Open spanner Upper wing 上机翼 1.5*5PB螺丝 Decorative Lower wing pieces 下机翼 A model remote control aircraft is a dangerous commodity. It must be kept away from the crowd when flying. It must be improperly assembled or damaged by human beings. It must have poor electronic control equipment and be unskilled in handling, may lead to unexpected accidents such as flight out of control damage, please be aware of the flight safety of the pilot, and need to understand self-negligence caused by any accident responsibility.
- Page 5 1.Install the upper wing 1.安装上机翼 Align the upper wing with the three locating posts on the upper fuselage and install them in place, and then lock three 1.7 * 8PB screws with a cross screwdriver. 将上机翼对准上机身三个定位柱装到位, 然后用十字螺丝 刀锁上3颗1.7*8PB螺丝。...
- Page 6 2.Install the lower wing 2.安装下机翼 图1 ( Figure 1) 图2 ( Figure 2) 图3 ( Figure 3) 副翼Y线插座(Aileron Y-line socket) 机翼灯线插座, 任意插座都可以(Wing light cable socket, any socket can be used) Figure 1. First, arbitrarily connect the light line on the wing to the light board, and then plug the Y line of the aileron steering gear into the receiving board (socket beside the electric regulator).
- Page 7 4. Install the left and right wing trim 4.安装机翼左右装饰件 图2 ( Figure 2) 图1 ( Figure 1) Figure 1. Install the left trim in the middle of the left upper and lower wings as shown in thefigure, and align the upper and lower hole positions. The long column is installed upwards and towards the fuselage. Figure 2.
- Page 8 6. Assembly of flat tail and vertical tail 6.组装平尾、垂尾 图1 ( Figure 1) 图2 ( Figure 2) 图3 ( Figure 3) Figure 1. Thread the vertical-tailed steel wire out of the flat-tailed hole, align the flat-tailed wire with the fuselage positioning slot and install it in place. Figure 2.
- Page 9 图1 ( Figure 1) 图2 ( Figure 2) 图3 ( Figure 3) Figure 1. Open the battery cover to power up the aircraft first, and then open the remote control and its frequency alignment. The indicator light on the receiver and remote control is on for a long time, and the frequency alignment is completed.
- Page 10 , wind direction 风向 The picture shows the left hand throttle 图示为左手油门...
- Page 12 图1 ( Figure 1) 图2 ( Figure 2) Figure 1. Screw out the screws with a hexagon socket screwdriver and remove the accessories. 图1.用内六角螺丝刀拧出螺丝,取下配件。 Figure 2. Install the new fairing back to the Mada shaft and screw in the screws. 图2.将新整流罩装回马达轴,拧上螺丝。...
- Page 14 3d/advanced two modes, with the remote control indicator light flashing quickly, 6G mode long bright. Left-right hand switch, Left-right hand switch, left-right hand, right-left hand left-right hand, right-left hand 左右手转换开关, 左右手转换开关, 左边右手,右边左手 左边右手,右边左手 1 2 3 4 1 2 3 4 Fig.
- Page 17 Lamp board socket 灯板插座...
- Page 21 Slowly push the throttle to the 100% position, and then pull down the lift joystick according to the aircraft attitude. At this time, the aircraft will quickly forward until it leaves the ground and keeps its head up to climb. After the flight altitude is 10 meters, slowly release the elevator Rod.
Need help?
Do you have a question about the A300 and is the answer not in the manual?
Questions and answers