Table of Contents
Advertisement
Quick Links
Advertisement
Table of Contents

Summary of Contents for Bambi Belt System
- Page 1 Bambi Belt System Instructions for use Compatible with Bambi Interface...
- Page 2 Bambi Interface This document has all rights reserved by Bambi Belt B.V. Neither the whole nor any part of this document may be disclosed to any third party without the prior written consent of Bambi Belt B.V. The whole or...
-
Page 3: Table Of Contents
5� Cleaning the Bambi Belt solution ��������������������������������������������������������������������������������������������������� 24 6� Installation & maintenance ������������������������������������������������������������������������������������������������������������ 26 Installation: Bambi Bridge and Bambi Interface ......................26 Powering Bambi Interface and connect the ECG cable for monitoring ................ 27 Unpacking the Bambi Belt box ............................28 Maintenance & service ................................ 28 Test functionality of Bambi Interface indicators ...................... -
Page 4: Foreword
Note: For training and training materials, refer to the website or contact Bambi Medical. Refer to chapter 2 for an overview of the Bambi Belt System and the Bambi Belt solution. Bambi Belt System Instructions for use... -
Page 5: 1� Intended Use & Safety
Interfaces to a Third-Party Medical Device Monitor - see Patient Monitor Operator’s (e.g. Patient Monitors) for vitals monitoring. manual. The Bambi Belt System is intended to be used 1�2�2 Essential performance Bambi Interface for continuous monitoring of single lead ECG,... -
Page 6: Users
In case this occurs, carefully asses whether or Warning: A warning alerts you to a potential not to use or continue using the Bambi Belt. serious outcome, an adverse event or a safety hazard. Failure to observe a warning may result in death or serious injury to the 1.10... -
Page 7: General Warnings And Safety Notices
Warning: Do not use any part of the Bambi Warning: Operation in close proximity to a Belt solution if signs of damage are visible. shortwave or microwave therapy equipment... -
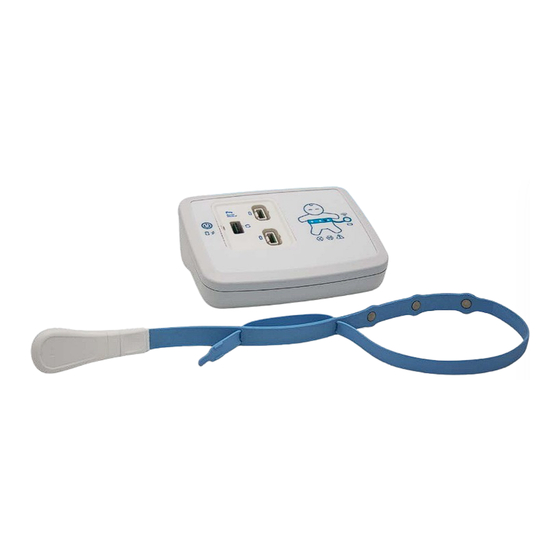
Page 8: 2� Device Description
2. Device description Bambi Belt solution The following is needed for monitoring with and the Bambi Interface (not part of the the Bambi Belt solution: Bambi Belt System), which consist of: • Main Unit Bambi Belt System, which consists of: •... - Page 9 Bambi Belt System Instructions for use...
-
Page 10: User Interface And Technical Alarms
User Interface and Technical Alarms The following technical alarms may be generated by the Bambi Belt solution by means of indications. 2�3�1 Bambi Bridge Charge indicators Battery > 90% charged Battery < 90% charged Charge error • Contact service department 2�3�2... - Page 11 Contact service department Active Bambi Bridge battery status Battery > 50% Battery < 50% Battery < 25% Battery < 5% (flashing) 2.3.4 Bambi Interface Lead-off indicators Lead-off : One or more electrodes of Bambi Belt is having poor or no contact with patient’s skin. Lead-off single electrode • Reposition Belt Lead-off multiple electrodes • Reposition Belt Good contact (when off) Bambi Belt System Instructions for use...
- Page 12 2�3�5 Bambi Belt Lifetime indicators and Generic Error indicator Belt 8 days in use • Belt used for at least 8 consecutive days. • Belt needs to be replaced before expiration Belt lifetime expired • Belt used for 10 consecutive days...
- Page 13 Note: Any serious incidents related to the use of the Bambi Belt System must be reported to Bambi Medical and the appropriate regional or national authority. Note: Follow local regulation for the disposal of the Belt and the packaging. Note: After operational lifetime of the Bambi...
-
Page 14: 3� Operating Principle
3. Operating principle diaphragmatic EMG (dEMG) The Bambi Belt System senses electrical The Bambi Belt System senses electrical activity signals of the heart muscle to activity produced by the patient’s diaphragm determine electrocardiogram (ECG) using electromyography (EMG, or dEMG for waveforms. -
Page 15: Data Transfer
Potential benefits The Bambi Interface receives ECG and dEMG The Bambi Belt solution is designed: data from the Bambi Belt System. The ECG • To promote Kangaroo Mother Care by data is transferred directly to the output of providing vital signs (ECG, HR) monitoring the Bambi Interface. -
Page 16: Workflow
(in • Bambi Belt solution must be available grams [g]) is indicated on the pouch label. and properly installed. • Connect the Bambi Interface to a compatible Expiry date (Y = Year, Patient Monitor available in the patient’s M = Month, room for central monitoring connection. -
Page 17: Linking The Bambi Belt To The Bambi Interface
• Unfold the Belt pouch, if applicable; • Partially open the Belt pouch, such that • Insert the Belt into the Bambi Belt Linking only the Belt connector is exposed. port and wait for the Bambi Belt Linking Indicator to light up solid blue. -
Page 18: Applying The Bambi Belt
• Take the Belt and hold it in both hands: left not to use the Bambi Belt System. hand next to the outer left electrode and right hand next to the outer right electrode. - Page 19 Caution: Always carefully reposition the patient and the Bambi Belt to limit unnecessary pressure points on the skin. • Insert the Belt through the second locking hole and pull until both parts fit together.
-
Page 20: Connecting The Bambi Belt And The Bambi Bridge
Bambi Bridge charge immediately on the Patient Monitor and indicator. the monitoring starts. • The Bambi Belt System can also be used during Kangaroo Mother care. In this case, place the Bambi Bridge such that it does not hamper patient and/or parent. -
Page 21: Replacing The Bambi Belt
Replacing the Bambi Belt Caution: Do not cover the Bambi Bridge A single Bambi Belt can be used for 10 with hands or other body parts during consecutive days. measurement. Covering the Bambi Bridge After 8 days of initial use, the 8 days in use... -
Page 22: Charging The Bambi Bridge
Bambi Bridge must the Bambi Bridge charge port. be replaced as the battery charge level of the Bambi Bridge in use is low / critical. Caution: Press the Bambi Bridge firmly into For low level charge level, it is advised to replace the Bambi Bridge. -
Page 23: Stopping The Measurement
The Bambi Interface can be used for vital Belt connector. signs measurement during intra-hospital transport. It is designed to support • Insert it into the Bambi Bridge charge port maximum of 30 minutes of operation for charging. with internal battery power when it is •... -
Page 24: 5� Cleaning The Bambi Belt Solution
Note: Washing the baby by using wipes Belt, daily, during the 10 days of usage. is allowed with Bambi Belt. For the frequency of cleaning of the Bambi Caution: Do not autoclave nor sterilize Bridge and Bambi Interface, follow your hospital policy. - Page 25 Notes Bambi Belt System Instructions for use...
-
Page 26: 6� Installation & Maintenance
6. Installation & maintenance Warning: The Installation and maintenance Open the boxes and check that all products of the Bambi Belt solution must be carried listed above are included. out by the service personnel of the hospital or • Remove the Bambi Monitor Plug-in by personnel authorized by Bambi Medical. -
Page 27: Powering Bambi Interface And Connect The Ecg Cable For Monitoring
Connect the one end of the power adapter to AC mains and the other end to the Bambi The algorithm of the respective patient Interface Power port. monitor interprets the human body model, as described in section 3.3, and not the dEMG... -
Page 28: Unpacking The Bambi Belt Box
• Size 2: 1000 - 2500 g • Size 3: 2500 – 3500 g • Size 4: > 3500 g Maintenance & service Note: The Bambi Belt System does not require daily testing. Note: Bambi Belt System is not repairable. Bambi Medical advices to maintain the device by: •... -
Page 29: Test Functionality Of Bambi Interface Indicators
Test functionality of Bambi Interface indicators To test the functionality of the Bambi Interface indicators, press shortly on the ON/ OFF button. All indicators will light up for a second. Software version and upgrading the software This manual is suited for the software... -
Page 30: 7� Technical Data
Note: Bluetooth (BLE) is a - occasionally registered trademark name. in contact with patient skin • Standard electronics (interior) Ingress protection IP54 IP54 is claimed when the Bambi Bridge is connected to the Belt. Estimated lifetime 3 years Bambi Belt System Instructions for use... - Page 31 • Elastomers (belt exterior & electrodes) - in contact with patient skin • PC / ABS (connector housing) - in contact with patient skin • Standard electronics (interior) Properties Bio compatible (ISO 10993-1,17,18) 10 days after being linked to the Bambi Interface Lifetime Bambi Belt System Instructions for use...
-
Page 32: Bambi Interface
Bambi Interface Power source specifications: ≥ 30 minutes Operating time (When the battery is fully charged) The Bambi Interface is provided with a power adapter. Power adapter details are Subjective to charge/ provided below. discharge cycles and ageing of the internal Manufacturer Dell battery. -
Page 33: Environmental Specifications
(20 - 40) Deg C Relative Humidity (30 - 95) % non-condensing Altitude (-500 - 3000 m) Transport and storage Temperature (-20 - 60) Deg C Relative Humidity (5 - 95)% Altitude (-500 – 4600 m) Bambi Belt System Instructions for use... -
Page 34: Electromagnetic Compatibility
225°, 270° and 315° • 0 % UT; 1 cycle • 70 % UT; 25 cycles • Single phase: at 0° Voltage interruptions • 0 % UT; 250/300 cycle EN-IEC 61000-4-11 (2004) + A1 (2017) Bambi Belt System Instructions for use... -
Page 35: Vitals Range And Resolution
Flicker This measurement is not applicable for medical equipment only used in a professional healthcare environment. Power frequency The Bambi Belt System does not contain components which magnetic fields are sensitive to magnetic fields (i.e. Hall sensors). Transient and surges in The Bambi Belt System is not used in vehicles. -
Page 36: 8� Trouble Shooting Guide
Bambi Medical. ORANGE indication Battery is empty Internal battery of the Bambi interface is empty. Connect the Bambi Interface to AC mains, if not already done. The battery is fully charged within 4 hours. If the indicator remains ORANGE, after charging for more than 4 hours, contact your service department or Bambi Medical. - Page 37 Bambi Interface is not turning on/off Bambi Interface is not Not connected to Connect the Bambi Interface to AC mains (see type turning on AC mains, with “A1”) and press the ON/OFF button to power the empty internal Bambi Interface on.
- Page 38 4.3 for instructions. If the problem persists, contact your service department or Bambi Medical. No status on Bambi Bridge Indicator - after connecting with a Belt No status on Bambi Bambi Bridge is Re-insert the Bambi Bridge into the Belt. Refer to...
- Page 39 Remedy/suggestions the screen possible cause No status on wireless Wireless signal is Ensure that the Bambi Bridge is not covered by communication indicator blocked by covering hands and/or body parts. This might for example the Bambi Bridge, occur during Kangaroo care. Check for the...
- Page 40 Patient Monitor measurement • powered on (see A to C), not completed • the Bambi Belt is successfully linked (see D), successfully • the Bambi Bridge is properly connected to the Belt (see E) • the wireless connection is successfully established (see F), •...
- Page 41 (see H1). ECG waveforms displayed in reverse ECG waveforms are Bambi Bridge Place the Belt such that the Bambi Bridge is on displayed in reverse on placed on RIGHT the LEFT side of the patient. Refer to section 4.4...
-
Page 42: 9� Meaning Of Symbols Used
IIb devices (Bambi Bridge, Bambi Monitor Plug-in, and Bambi Interface) Date of manufacturing CE mark for class I device (Bambi Belt) Refer to instruction Waste electrical and electronic equipment manual Non sterile Direct current Bambi Belt System Instructions for use... - Page 43 (MD) Keep dry Do not bend Humid limitation Do not fold Atmospheric pressure Do not press 107kPa limitation 57kPa Folding line Does not contain natural rubber latex LATEX Non-ionizing Unique Device electromagnetic Identification (UDI) radiation Bambi Belt System Instructions for use...
- Page 44 All rights reserved. www.bambi-medical.com...
Need help?
Do you have a question about the Belt System and is the answer not in the manual?
Questions and answers