Table of Contents
Advertisement
Quick Links
Advertisement
Table of Contents

Related Manuals for GREENGER SADDLEBACK 12 inch

Summary of Contents for GREENGER SADDLEBACK 12 inch
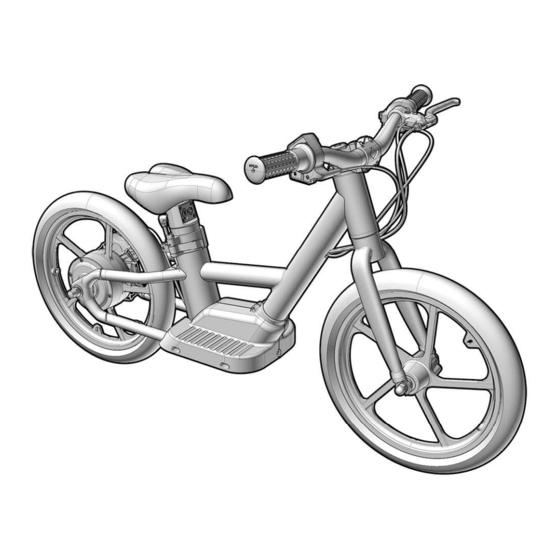
- Page 1 User’s Manual 12 inch & 16 inch Electric Balance Bike...
-
Page 2: Introduction
Introduction Thank you for choosing Saddleback, the electric balance bike. It is a fun way to develop fundamental riding skills for children. We wish you hours and years of fun to follow! Although it was designed to be fun and friendly for rst time riders, there are very speci c procedures that must be followed to ensure safety and enjoyment day after day. -
Page 3: Table Of Contents
Content Introduction Content Warnings Speci cation Controls Power button Speed level selector Push-start / Throttle-start toggle Safety lock Throttle Set Up Attach the front wheel Install the handlebar Secure connection Preparation Adjust seat height Inspect the brake Charging the battery Battery installation / removal Training / Riding Maintenance... -
Page 4: Warnings
3 are suited to ride the bike. It is the parent's sole decision to allow their children to use this product. There- by waiving all claims of fault or negligence to, of, and or by Greenger Elec- tric Technology, LLC. -
Page 5: Speci Cation
Specification Brake lever Speed level selector Push-start / Throttle-start toggle Throttle Safety lock Frame Seat Battery Power cable connector Rear wheel Rear brake Motor Controller Footrest Front wheel Tire Spec 12 inch 16 inch Tire / Tube 12 x 1.25” 16 x 2.125”... -
Page 6: Controls
Controls Power button This is the main switch for the bike. When it’s pressed down, it’s ON. The Power Indicator will light up if the bat- tery has been charged Turn it off anytime when connecting / disconnecting the battery Note: The bike should be turned off... -
Page 7: Safety Lock
Safety lock Safety lock. Press down to allow throttle inputs. This avoids accidental twist of the throttle to set the bike off. Usually it is pressed after the rider is properly positioned on the bike and ready to ride Throttle Twist the throttle and ride safely The battery is charged to operate The battery needs charging... -
Page 8: Set Up
Set Up Attach the front wheel Orient the front wheel and align it to the fork. While both bikes’ front wheels are non directional, the 16“ wheel has an asymmetrical design feature to take a brake rotor. The illustration is showing it on the same side of the rear brake Use a 15mm wrench to tighten the axle bolts to 12.5 ft lbs (IMPORTANT- DO... -
Page 9: Secure Connection
Secure connection The bike comes with the battery pre charged and installed. Please ensure the cable is securely connected before operation. A loose connection can result in faulty operation of bike WARNING An improperly built bike may cause accidents even injuries to the rider and others. -
Page 10: Preparation
Preparation Adjust seat height Remove the latch screw to open the latch. Make height adjustments. After adjustments, close the latch and tighten the screw back in. The latch nut might need to be adjusted to get the right clamping power. IMPORTANT When properly seated, both of the rider’s feet should atly touch the ground simultaneously. -
Page 11: Charging The Battery
/ seat assembly IMPORTANT Only use the supplied Greenger charger to charge your bikes battery. Using unapproved chargers may cause damage to the battery or even cause the battery to catch re or explode... -
Page 12: Training / Riding
Training / Riding For safety concerns, we strongly recommend a gradual approach for young and rst time riders to learn to ride this electric balance bike. Power off mode Coasting with the power OFF allows young or rst-time riders to use the bike as a balance bike. -
Page 13: Maintenance
Maintenance Rear wheel removal Normally, the tires will be worn during riding. Periodically check for tire wear and damage. Electrical systems (motor and controller) and the brake rotor can be hot after riding, allow sufficient time to cool before touching. Remove the brake caliper before remov- ing the rear wheel (5mm Allen wrench) Disassemble the footrest (6 screws,... -
Page 14: Front Wheels Removal
Front wheel removal Use a 15mm wrench to loosen the axle nuts. Pay attention to correct washer positions for reinstallation. When reinstalling, tighten the axle bolts to 12.5 ft lbs (IMPORTANT- DO NOT OVER-TIGHTEN) While both bikes’ front wheels are non directional, the 16“... -
Page 15: Warranty
Warranty The manufacturer warranties this product to be free from manufacturing and material defects for a period of One Year from date of delivery of the bike, or date of purchase from a dealer. This Limited Warranty does not cover any damage, failure or loss caused by improper assembly maintenance or storage. - Page 16 Thank you again for choosing the Greenger Saddleback. Enjoy the experience and share with us online: https://www.facebook.com/GreengerUSA/ https://www.instagram.com/GreengerUSA/ Greenger Powersports 1550 S Milliken Ave STE G Ontario CA 9161-2318 Tel: 909 408 8010...
Need help?
Do you have a question about the SADDLEBACK 12 inch and is the answer not in the manual?
Questions and answers