Table of Contents
Advertisement
Quick Links
Advertisement
Table of Contents

Summary of Contents for Iflight COMMANDO 8 Lite
- Page 1 COMMANDO 8 Lite 用户手册 USER MANUAL V1.0 231006...
- Page 2 目录 一、简介 二、开关机 三、电量显示 四、充电 五、天线切换 六、对频 七、固件刷写模式 八、有线模拟器 九、摇杆模式切换及校准 十、产品规格...
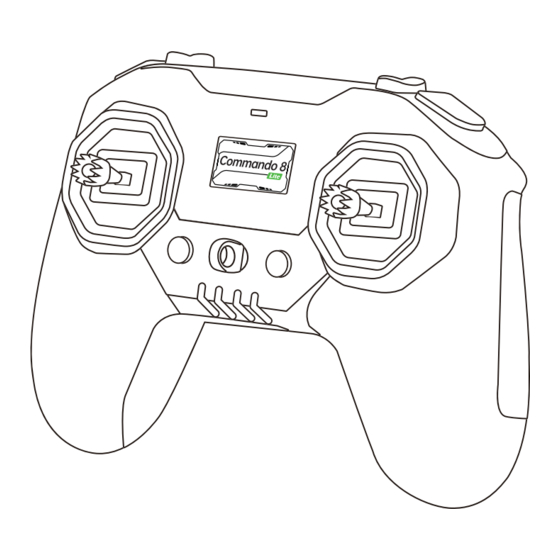
- Page 3 免责声明 1. 本产品配合多旋翼或者固定翼飞行器等模型使用,许多遥控模型都配备了动力强劲的电机和锋利的螺 旋桨, 操作时, 需要谨慎使用。 2. 本产品并非玩具, 需要有一定的基础知识才能控制, 所以要循序渐进, 在开始使用前 , 请特别留意其中的 注意与警告, 惠州市翼飞智能科技有限公司 (iFlight) 保留更新本 《免责声明与概要》 的权利。 3. 一旦开始使用本产品, 即视为您已理解、 认可和接受本文档的全部条款和内容, 使用者承诺对自己的行 为及因此而产生的所有后果负责,使用者承诺仅处于正当目的的使用本产品并且同意本文档全部条款和 内容及 iFlight 可能制定的任何相关政策或者准则。 一、简介 Commando 8 Lite 遥控器是一款采用自主研发系统的穿越机遥控器。简约便捷的设计,让用户能够快 速上手使用。标配的霍尔遥杆,能够提高飞行操作的流畅性和精准性,内置的 ELRS 2.4GHz 100mW 高 频头则为其稳定性和响应速度提供了有力支持。 除了标准配置外,该遥控器还拥有一定的拓展性,可通过加装外置天线实现更远的飞行距离,让玩家拥...
- Page 4 五维按键的定义 右摇杆微调 左摇杆微调 双击中间 双击中间 为微调回中 为微调回中 长按进入 摇杆校准模式 二、开关机 1、短按一次,可检查电量。 2、 短按一次,再长按3秒可开启、关闭遥控器。 Power电源键 三、电量显示 电量显示标识 电量为100%-80%,亮4颗灯。 电量为80%-60%,亮3颗灯。 电量为60%-40%,亮2颗灯。 电量为40%-20%,亮1颗灯。 电量为20%-5%,亮1颗灯,处于快速闪烁状态 电量低于5%,亮1颗灯,处于快速闪烁状态并有 持续的蜂鸣器提醒。 欠电状态下,无电源灯亮起,有持续的蜂鸣器 电量显示灯 提醒,2分钟后或低于2.8V后将强制自动关机。...
- Page 5 四、充电 推荐使用 10W 及以上的支持 5V2A 供电,标准的 USB 充电器。 Commando8 Lite 内置了 3.7V Li-ion 电池以及 Type-C 充电功能。标称电池电压为 3.7v,最大充电电 压为 4.2v。请使用者定期检查电池的电压和状况,切勿在无人看守的情况下为其充电。 请务必始终在远 离可燃材料的安全区域中充电。对于不按照安全规范使用或滥用本产品造成的一切不良后果,均由使用 者自行承担责任。 遥控器 交流电源 USB 充电器 USB 连接线 遥控器充电口 (100-240V) 五、天线切换 (外置天线需自行加装) 安装外置天线(自选) 1.拆开遥控器后壳,将天线置于展开 2.安装弹片,拧好两颗螺丝 状态,logo朝下安装到天线座。 3.将天线的ipex接口接到高频头上, 将高频头上的拨码开关拨至EXT,安 装遥控器后盖完成外置天线安装。...
- Page 6 六、对频(ELRS) 长按电源按键2秒 遥控器对频操作流程: 1. 接收机反复通电三次,蓝灯闪烁两次代表进入对频模式。 2. 遥控器在开机状态下, 长按电源按键2秒, 此时遥控器蜂鸣器发出“滴滴滴”连续三声, 代表进入对频模式。 3. 对频成功后,接收机和遥控器状态灯均为蓝灯常亮。 七、固件刷写模式 一、进入高频头固件刷写模式 二、进入遥控器主板固件刷写模式 1. 按住左五维按键的↑键,再长按电源键,直至 1. 按住左五维按键的↓键,再长按电源键,直至 电量显示灯两两左右闪烁,即可进入线刷高频头 电量显示灯滚动闪烁即可进入线刷遥控器主板 模式,长按电源键可退出刷写模式 模式, 长按电源键可退出刷写模式 按住五维按键↑键 按住五维按键↓键 长按开机键 长按开机键 *详细刷写过程见iFlight官方视频教程...
- Page 7 八、有线模拟器 开机后使用数据线连接电脑自动进入模拟器模式 连接USB-C 数据线 开机 九、摇杆模式切换及校准 阻力螺丝 1、摇杆左右手切换: 拧紧阻力变大,松开变小 左手油门切换右手油门: -拧松左手摇杆的回中切换螺丝,直至左手摇杆回中。 -调节左手摇杆阻力螺丝。 -拧紧右手回中切换螺丝,直至右手不回中,再旋回一圈。 -调节右手摇杆阻力螺丝。 回中切换螺丝 拧紧不回中,松开回中 2、Commando8 Lite默认出厂摇杆模式为Mode2,用户可根据自己的使用习惯进行模 式切换,摇杆模式切换方法如下: -拆卸高频头盖板, 可以看到一个2位拨码开关, 按照下图将开关拨至指定位置, 即可切换摇杆模式。 摇杆模式 ON KE 切换开关 Mode 1 Mode 2 Mode 3 Mode 4...
- Page 8 3、摇杆校准 开机状态长按右侧的五维按键两秒,第一颗LED灯将开始 闪烁这表明已经进入了摇杆校准过程。 短按右侧的五维按键,第二颗LED灯将开始闪烁同时将摇 杆放至物理中位 再次短按右侧的五维按键,第三颗LED灯将开始闪烁此时 开始移动摇杆,并确保两个摇杆都达到最大与最小行程。 再次短按右侧的五维按键,第四颗LED灯将开始闪烁遥控 器已记录摇杆行程大小,长按两秒退出摇杆校准。 校准摇杆时请勿打圈 十、产品规格 重量:275g±10 规格尺寸:118*165*72mm 传输频率:2.400GHz-2.480GHz 发射功率:100mW 发射器模块:ELRS 2.4GHz 支持的协议:ELRS 通道数:8通道 (4摇杆+4开关) 摇杆:高精度霍尔摇杆 工作环境温度:0℃至40℃ 充电环境温度:5℃至40℃ 电池类型:锂离子电池 容量:3.7V 2000mAh 7.4Wh*2 能量:14.8Wh...
-
Page 9: Table Of Contents
CONTENT l. Introduction II. Power On/Off III. Battery Level Indicator IV. Charging Instructions V. Antenna Switching VI. Binding Instructions VII. Firmware Flashing Mode VIII. Wired Simulator IX. Gimbal Mode and Calibration X. Product Specifications... -
Page 10: Introduction
Built-in antenna and removable stick ends make it easier to carry. The Commando 8 Lite remote control is not only suitable for beginners but also provides a more efficient and convenient flying experience for senior FPV users. -
Page 11: Power On/Off
5-Axis Menu Button Definition Right Trim Left Trim Press twice the Press twice the button to trim button to trim back to the center back to the center Press and hold to enter gimbal calibration mode II. Power On/Off 1. Short Press for the LED battery status indicator. 2. -
Page 12: Charging Instructions
It is recommended to use a standard USB charger of 10W or above that supports a 5V 2A power supply. Commando 8 Lite has a built-in 3.7V Li-ion battery and supports Type-C charging. The nomi- nal battery voltage is 3.7V and the maximum voltage is 4.2V. -
Page 13: Firmware Flashing Mode
Press the ↑ key of the 5-Axis menu button Press the ↓ key of the 5-Axis menu button Press and hold the power button Press and hold the power button *For more specific flashing process please refer to iFlight tutorial on the official website. -
Page 14: Wired Simulator
Centering switch screws your preference. Tighten for throttle use,Loosen for self centering 2. The default MODE for the Commando 8 Lite is Mode2, users can switch the mode according to their own habits, the throttle stick mode switching method is as follows -Disassemble the RF module cover, you can see a 2-digit DIP switch, set the switch to the specified position according to the diagram below to switch the stick mode. -
Page 15: Product Specifications
3. Gimbal Calibration Press and hold the right 5-Axis menu button for two seconds when the remote is powered on, the first LED will start flashing, this indicates entering the gimbal stick calibration process. Press the right 5-Axis menu button and the second LED will start flashing while placing the stick in the physical center position. - Page 16 Follow iFlight on social media to get updates HuiZhou iFlight Intelligent Technology Ltd. Floor5 NO.3, Shenghua Road,Zhongkai Hi-tech Area,Huizhou,CN 0752-3866695...
Need help?
Do you have a question about the COMMANDO 8 Lite and is the answer not in the manual?
Questions and answers