Table of Contents
Advertisement
Advertisement
Table of Contents

Related Manuals for Continental Refrigerator Perma-Crimp PC200M Series


Summary of Contents for Continental Refrigerator Perma-Crimp PC200M Series
- Page 1 PC125 and PC125M Operators Manual C125 125M O perators Manual Perma-Crimp™ Hydraulic Hose Crimpers Hydraulic Hose Crimpers PC125 and PC125M Operators Manual PC200M Series Operators Manual Including PC200M-1P and PC200M-3P www.contitech.us www.continental-industry.com...
-
Page 2: Safety Precautions
Safety Precautions SAFETY PRECAUTIONS • READ INSTRUCTIONS AND IDENTIFY ALL COMPONENT PARTS BEFORE USING CRIMPER. • CRIMPER CAN PRODUCE 340 TONS OF FORCE. KEEP BOTH HANDS AWAY FROM PINCH POINTS. • CONSULT THE CONTINENTAL CONTITECH CRIMP SPECIFICATION MANUAL FOR CORRECT CRIMPER SETTINGS AND CRIMP MEASUREMENTS. -
Page 3: Table Of Contents
Table of Contents SAFETY PRECAUTIONS----------------------------------------------------------------------------------------------------------------2 EQUIPMENT WARNING-------------------------------------------------------------------------------------------------------------------2 COMPONENT IDENTIFICATION---------------------------------------------------------------------------------------------------------------------4 FOOT SWITCH OPEN / CLOSE FUNCTION-----------------------------------------------------------------------------------------------------5 CRIMPER SPECIFICATIONS-------------------------------------------------------------------------------------------------------------------------6 CRIMPER SPECIFICATIONS-------------------------------------------------------------------------------------------------------------------------5 DIE PART IDENTIFICATION---------------------------------------------------------------------------------------------------------------------------7 INITIAL CRIMPER SETUP-------------------------------------------------------------------------------------------------------8 INTERMEDIATE DIE INSTALLATION----------------------------------------------------------------------------------------------------9 HYDRAULIC DIE INSTALLATION-----------------------------------------------------------------------------------------------------10 MANUAL BACK STOP SETUP------------------------------------------------------------------------------------------------------11 CALIBRATION CHECK--------------------------------------------------------------------------------------------------------------12 LUBRICATION PROCEDURE & MAINTENANCE-------------------------------------------------------------------------------------------13 TROUBLESHOOTING-------------------------------------------------------------------------------------------------------------14 WARRANTY INFORMATION-------------------------------------------------------------------------------------------------------------15... -
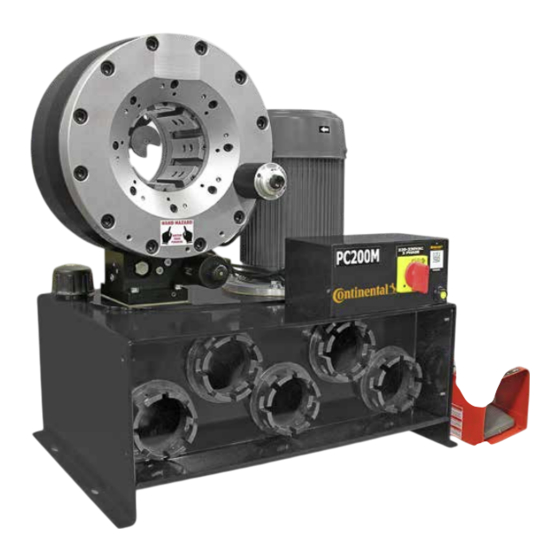
Page 4: Component Identification
Component Identification Crimper Head Notch for clearance of 90° fittings Manual Back Stop The 5 HP motor delivers the power needed to get the job done quickly Dial Micrometer Continental QR code Power Switch Foot Switch Plug-in Port Oil Filler Cap Foot switch to close/open Reservoir crimper head... -
Page 5: Foot Switch Open / Close Function
Foot Switch Open / Close Function Foot Switch Close Function: Foot Switch Open Function: The foot switch permits dies to be Allows the user to open the crimper “jogged” into position and accurately head the amount needed to remove position the fitting prior to crimping. the crimped assembly. -
Page 6: Crimper Specifications
Crimper Specifications Crimping Force............340 Tons Hydraulic Hose Capacity......... ¼" through 2" ID, 2-braid hose 2" 6-spiral hose Crimper Dimensions..........L: 20" x W: 29" x H: 32" Crimper Weight............635 lbs. Electrical Requirements.......... 230V - 1PH (Standard) 230V - 3PH (Optional) 480V - 3PH (Optional) Hydraulic Die Series.......... -
Page 7: Die Part Identification
Die Part Identification A) Master Die B) 130mm O.D to 99mm I.D Adapter Die C) 99mm Hydraulic Die... -
Page 8: Initial Crimper Setup
Initial Crimper Setup Follow these steps before using the crimper for the first time › Review instructions and identify all component parts before using crimper. › Crimper can produce 340 tons of force. › Keep both hands away from pinch points. ›... -
Page 9: Intermediate Die Installation
Intermediate Die Installation Both industrial and hydraulic dies are available for this crimper. Industrial dies are inserted directly into the master dies and hydraulic dies require an intermediate die. When using only hydraulic dies, removal of the in- termediate dies should not be required. The ID of the intermediate die must match the OD of the hydraulic die, or accurate crimps are not possible. -
Page 10: Hydraulic Die Installation
Hydraulic Die Installation › Install Intermediate Adapter Dies as shown previously making certain that the Intermediate Adapter Die I.D. matches the Hydraulic Die O.D. › Bring the crimper head to fully opened position as shown in photo #1. › Install the Hydraulic Dies with the quick change tool as shown in photo #2. -
Page 11: Manual Back Stop Setup
Manual Back Stop Setup The Manual Back Stop eliminates guesswork, allowing the Coupling Stop operator to visually observe exactly where the crimp will be positioned on the fitting without the need for trial and error and Coupling Stop product scrap due to poor crimp positioning. Clamp With the Manual Back Stop retracted, load the appropriate set of dies and set crimp diameters as required. -
Page 12: Calibration Check
Calibration Check The PC200M Crimper is calibrated at factory using the correct hose, fitting, and die set outlined in the Continental ContiTech Crimp Specifications Manual. Note: All settings are approximate, for minor adjustment adjust the dial as needed. Due to variations in hose and fitting tolerances, some “offset” may required to achieve the correct crimp diameter for specific hose and fitting combinations across the range of hose and fittings being crimped. -
Page 13: Lubrication Procedure & Maintenance
Lubrication Procedure & Maintenance Notes: › Use the mini grease gun with flush fitting adapter with grease (supplied with the crimper) as shown in photo #1 or a high-pressure moly grade grease can be used as well. › Failure to lubricate the crimper can cause premature failure, loss of accuracy and may result in damage to the crimper. -
Page 14: Troubleshooting
Troubleshooting PROBLEM: CRIMPER RUNS BUT IS SLOW OR NON-FUNCTIONAL • Check supply voltage to see that it matches the voltage specified on the tag attached to the crimper. • If the crimper is connected to a three phase circuit, check all three legs of the circuit to be certain that all legs are hot. -
Page 15: Warranty Information
Warranty For technical assistance, call customer service at 1-800-235-4632. The Continental ContiTech branded crimper is covered under the warranty below. CustomCrimp® “No Nonsense” warranty All CustomCrimp® products are warranted to be free of defects in workmanship and materials for one year from the date of invoice. - Page 16 Contact As a division of the Continental Group, ContiTech ContiTech AG is a recognized innovation and technology leader in NAFTA Headquarters natural rubber and plastics. As an industry partner 703 S. Cleveland Massillon Road with a firm future ahead of us, we engineer solutions Fairlawn, OH 44333-3023 U.S.A.
Need help?
Do you have a question about the Perma-Crimp PC200M Series and is the answer not in the manual?
Questions and answers