Table of Contents
Advertisement
Quick Links
MasterGage/Classic
Owner's Manual
"Master Your Machinery"™
Getting control of all of your woodworking machinery with the
powerful features of the MasterGage/Classic
MasterGage
Corporation, 1534 N. Moorpark Rd # 505, Thousand Oaks, California 91360
TOLL FREE: 1-888-893-8300
www.mastergage.com
2012 Edition
Advertisement
Table of Contents

Related Manuals for MasterGage Classic

Summary of Contents for MasterGage Classic
- Page 1 MasterGage/Classic Owner’s Manual “Master Your Machinery”™ Getting control of all of your woodworking machinery with the powerful features of the MasterGage/Classic MasterGage Corporation, 1534 N. Moorpark Rd # 505, Thousand Oaks, California 91360 TOLL FREE: 1-888-893-8300 www.mastergage.com 2012 Edition...
- Page 2 Award We are proud to announce that the MasterGage/Classic won the distinguished Wood Magazine “TOP TOOL” Award in August, 2003 MasterGage.com...
- Page 3 No rights are extended to any entity to reproduce these patented features at any time or place. Product Improvement We at MasterGage Corporation are constantly striving to improve our products. We reserve the right to change specifications, modify products and/or prices at any time, and without notice.
- Page 4 Classic of your machinery for any operation you desire. Machine set up that took hours, will now only take minutes. With the user-friendly MasterGage/Classic, you can to get to the fun/business of woodworking fast! For even more versatility, I’ve developed many optional Accessories that allow you to “customize”...
- Page 5 9. Magnetic Miter Slot Cradle Bar – Attaches to the bottom [and top] of the Classic. It is used with the Classic to align the tablesaw blade and rip fence easily. (Page A7) 10. Hex wrench is used to secure the Magnetic Miter Slot Cradle Bar in the desired position.(Page A7)
-
Page 6: Table Of Contents
MasterGage/Classic System SECTION TABLE OF CONTENTS A Getting Acquainted with your MasterGage/Classic A1 MasterGage/Classic Features A2 Illustrated Features A3 Measuring and Reference Surfaces Defined A4 Description of the Three Measuring Scales A5 Fraction – Decimal – Millimeter Conversion Chart A6 Using the Depth Gauge Rod... -
Page 7: Mastergage/Classic System
SECTION A Getting Acquainted with your MasterGage/Classic MasterGage.com... -
Page 8: A1 Mastergage/Classic Features
Since all parts are so precisely made and interchangeable, a part made last year will fit a Classic made today, next year and years to come! If a part is lost or damaged, it can be quickly replaced by our factory. -
Page 9: A2 Illustrated Features
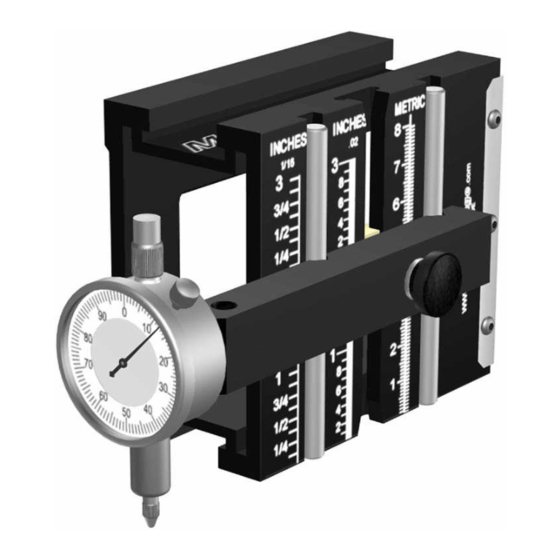
90 degree settings. Perfect for setting table saw, radial arm saw and chop saws square to the table and miter fence HARD ANODIZE SURFACE STAINLESS STEEL GUIDE RODS ALL SCALES ARE LASER ETCHED MasterGage.com... - Page 10 REFERENCE SURFACES SHOWN BELOW. ALL REFERENCE SURFACES ARE GROUND FLAT TO LESS THAN 0.001 INCHES (1/1000”) TOP OF LEVEL ARM #5 TOP #2 BACK #3 90 degree “Knife Edge” #4 BASE #1 BOTTOM OF LEVEL ARM #6 DIAL INDICATOR TIP #7 MasterGage.com...
-
Page 11: A4 Description Of The Three Measuring Scales
*Horizontal Mortiser All scales on the MasterGage/Classic are precision laser etched into an anti-glare black surface. Notice that both the Fractional and Millimeter scales are specially designed, with each having a vertical line to distinguish the coarse readings from the fine readings. - Page 12 25.400 For dimensions greater than 1.000 inch [25.400 mm] Example: 1 9/32 inches is 1.000 inch + .281 inches [9/32] = 1.281 inches 1 9/32 in millimeters is 25.400 mm [1.000 inch] + 7.143 mm [9/32] = 32.543 mm MasterGage.com...
-
Page 13: A6 Using The Depth Gauge Rod
Using the Depth Gauge Rod The following illustrations show how the Depth Gauge Rod adds additional capabilities to your MasterGage/Classic. Keep in mind that this feature can be used in all X, Y and Z axis. A typical use in the Z axis would be checking/setting the infeed/outfeed offset on a split fence for a Shaper or Router Table system. - Page 14 Move the Depth Gauge Rod over the groove-slot-hole and allow it to bottom out. Tighten the Lock Screw Reposition the Classic to a flat surface. Raise the Level Arm and bottom out the Depth Gauge Rod on the flat surface. Then simply read...
- Page 15 The Patented, Magnetic Miter Slot Cradle Bar attaches to either the top or bottom “T” slot, anywhere along the full length of the MasterGage/Classic. Two powerful rare earth magnets are embedded into one side of the Cradle Bar, which is fabricated from Delrin, a special “space age”...
-
Page 16: A8 Attaching The Dial Indicator
Your customized brass nameplate location ATTACH DIAL INDICATOR WITH THE STEM IN EITHER DOWN POSITION [SHOWN] OR UP POSITION WITH THIS LOCK KNOB ATTACH DIAL INDICATOR IN THE HORIZONTAL POSITION [SHOWN] USING THE DIAL INDICATOR ADAPTER HARDWARE AS ILLUSTRATED MasterGage.com... -
Page 17: A9 Using The Dial Indicator
LOOSEN THE BEZEL LOCK SCREW AND ROTATE THE BEZEL SO THAT THE “0” ON THE DIAL LINES UP WITH THE INDICATOR ARM - LOCK THE BEZEL KNOB. YOU ARE NOW CALIBRATED TO MEASURE FROM THE DESIRED SURFACE. MasterGage.com... - Page 18 How many different people use the equipment, etc. My feeling is to consider your shop like an airplane. Before you “take off” on your business day, all machines should be checked for running condition and accuracy. After all, your business and livelihood rely on these machines. MasterGage.com...
- Page 19 SECTION B TABLESAW ADD-ON SLIDING TABLE KIT SLIDING TABLE PANEL SAW MasterGage.com...
- Page 20 TIP #2: Use feeler gauges with the straight edge. Use the 2.0 inch dial indicator extension with ¼ inch dial indicator flat tip. Contact arbor shaft on smooth surface [not threads]. Rotate arbor by hand. Readings should be in the 0.001 inch range. MasterGage.com...
- Page 21 Rock the blade gently side to side to check bearing wear. Check with the saw manufacturer for bearing wear allowances. Square the rip fence with the MasterGage/Classic knife edge. MasterGage.com...
- Page 22 TABLE SAW FENCE ALIGNMENT: Attach the Miter Slot Cradle Bar to the MasterGage/Classic. Traverse the length of the fence and adjust parallel to the miter slot. Check for any fence distortion or warpage. Also, use a straight edge for checking for any fence warpage...
- Page 23 MasterPlate perpendicularity to the table top Once perpendicularity is established, set the pointer to zero on the bevel (tilt) protractor. Next, set and lock the stop screw. Align the splitter unit both parallel and center to the saw blade MasterGage...
- Page 24 This is due to the fact that the scoring blade may be located lower and behind the insert plate opening. 2. Using the MasterGage/Classic, with the Magnetic Miter Slot Cradle Bar, you can now set the scoring blade parallel to the miter slot and the MasterPlate.
- Page 25 Level Arm. 3. Carefully rotate the blade toward the back of the saw [this keeps the cutting edge of the blade from damaging the level Arm]. Allow the blade tip to glance the Level Arm to establish height desired. MasterGage.com...
- Page 26 Fold a crisp dollar bill once [approx .010 inches thick] and use it as a feeler gauge and adjust the sliding table so that it is approximately .010 inches higher than the tablesaw table surface, along its total travel distance. MasterGage.com...
- Page 27 Cross Cut Fence The MasterGage/Classic can also set up and align special equipment such as the Incra fence system and the Saw Train fence system very easily. The Incra fence system is a registered trademark of the Taylor Design Company.
- Page 28 MDF (medium density fiberboard) and melamine for the fabrication of case goods. Many of the MasterGage/Classic calibration techniques used on the tablesaw can be performed on the sliding table saw. See the Tablesaw section for the following procedures.
- Page 29 Once your saw is aligned, repeat this procedure occasionally to verify your saws squareness. STEP 1 Make a clean full cut along edge “A” STEP 2 Rotate stock counterclockwise, with edge “A” against cross cut fence and make a clean cut, full length. MasterGage.com...
- Page 30 ½ inch (13mm) STEP 6 Lastly, measure the width of each end of cut strip, subtract the difference and divide by 4. This is the required adjustment needed on the cross cut fence to bring it in square. MasterGage.com...
- Page 31 First, replace the saw blade with the Euro-MasterPlate. Position the Classic with its back on the tabletop and the top against the Euro-MasterPlate, with the dial indicator indexed against the rip fence. Slide the Classic fore and aft to set rip fence parallel or to any toe out dimension desired.
- Page 32 SECTION C RADIAL ARM SAW CHOP SAW SLIDING COMPOUND MITER SAW MasterGage.com...
- Page 33 CHOP SAW PLUS SLIDING COMPOUND MITER SAW All pictures and illustrations are showing the MasterGage/Classic with the Radial Arm Saw. These techniques and methods are also applicable to Radial Arm Saws, Chop Saws and Sliding Compound Miter Saws. Square saw blade to table top...
- Page 34 CHOP SAW PLUS SLIDING COMPOUND MITER SAW All pictures and illustrations are showing the MasterGage/Classic with the Radial Arm Saw. These techniques and methods are also applicable to Chop Saws and Sliding Compound Miter Saws. Set saw blade square to fence.
- Page 35 CHOP SAW PLUS SLIDING COMPOUND MITER SAW All pictures and illustrations are showing the MasterGage/Classic with the Radial Arm Saw. These techniques and methods are also applicable to Chop Saws and Sliding Compound Miter Saws. Rotate blade by hand and...
- Page 36 KICK BACK – Pinching of wood between the blade and rip fence – SOLUTION: Align fence and saw blade [MasterPlate] with the MasterGage/Classic as shown on pages B2 and B3. SAWDUST THROWN TOWARD OPERATOR – Often comes from the fence being too loose or too tight.
- Page 37 SECTION D ROUTER ROUTER TABLE SHAPER MasterGage.com...
- Page 38 ROUTER TABLE SHAPER PLUS PLUS All pictures and illustrations are showing the MasterGage/Classic with the Shaper. These techniques and methods are also applicable to the hand held Router and the Router Table systems. Checking spindle run out by rotating spindle by hand.
- Page 39 [rail and stile also] quickly – - with no down time! The MasterGage/Classic is extremely versatile and can also be used on machines such as single end and double end tenoners for setting cutter height. Machines such as CNC router systems experience difficulty when new and resharpened router bits are used in the same router bit magazine.
-
Page 40: Drill Press
SECTION E DRILL PRESS MasterGage.com... - Page 41 TIP: Utilize the ½” diameter Precision Rod that offers a polished smooth and straight surface to get accurate results. Check spindle run out by rotating the check by hand and reading the dial indicator at the tip if the Precision Rod MasterGage.com...
- Page 42 Measure/set any drill bit height accurately. Establish depth of drilled hole quickly Check and measure drill bit diameters very accurately with the dial indicator and flat tip dial indicator tip. TIP: Always measure the smooth end of the bit – not the flutes. MasterGage.com...
-
Page 43: Bandsaw
SECTION F BANDSAW MasterGage.com... - Page 44 1. Duplicate notes 1 & 2 above. 2. Mount [clamp] the Level arm with dial indicator so that tip of the dial indicator is in contact with the side surface of the wheel [top or bottom]. 3. Duplicate note 4 above. MasterGage.com...
-
Page 45: Jointer
SECTION G JOINTER MasterGage.com... - Page 46 Outfeed Table With the Dial Indicator tip touching the Infeed Table, sweep the Classic back and forth across the width of the Infeed Table to verify that the Infeed Table is parallel to the Outfeed Table. Adjust to bring it in parallel MasterGage.com...
- Page 47 “zero out” the dial indicator on the outfeed table surface. [This establishes the maximum height of the blade] 3. Using the Classic, rotate the cutter until the blade is at Top Dead Center [TDC]. Secure the cutter head at that position...
-
Page 48: Planer
SECTION H PLANER MasterGage.com... - Page 49 CUTTER HEAD INFEED CHIP PRESSURE ROLLER BREAKER OUTFEED ROLLER Rotate the MasterGage/Classic so that the Dial Indicator is facing up and check all the labeled elements in the illustration for correct height and parallelism MasterGage.com...
- Page 50 Be aware that the CUTTER HEAD bearings must be in good condition. If you can feel movement when you try to lift the cutter head at each end or if you hear a clunk noise when the planer is turned on - it is a sign of bad bearings. MasterGage.com...
- Page 51 FINAL NOTE – All of these measurements can be made with the MasterGage/Classic as illustrated. The one measurement that cannot be made with the Classic is setting the planer blades to the CUTTER HEAD. However, we have designed a special tool for that purpose called the Planer Blade Setting Gauge.
- Page 52 SOLUTION: 1. The planed material waste is being forced back into the planed surface. Check the vacuum exhaust system for clogged material. The material waste is not being evacuated adequately. 2. The chip breaker is set too low and is affecting the board surface. MasterGage.com...
- Page 53 PROBLEM: Vertical cut lines across the width of the board SOLUTION: 1. Check the serrated INFEED ROLLER for both depth [height] and proper spring tension PROBLEM: Wave marks on the board. SOLUTION: One or more of the knives are improperly set. ___________________________________________________________________________ MasterGage.com...
- Page 54 SECTION I DISK SANDER DRUM ROLLER SANDER MasterGage.com...
- Page 55 DISK SANDER Checking and adjusting the sanding disk face plate parallel to the miter slot is easily accomplished with the MasterGage/Classic DRUM SANDER Check and set roller[s] parallel to base table top. Also check and set bottom feed rollers for...
- Page 56 SECTION J HORIZONTAL MORTISER DOWELER MasterGage.com...
-
Page 57: Horizontal Mortiser + Doweler
[X, Y and Z]. As such it becomes difficult to align the table to the cutter head and mortise cutter for a correct mortise cut on the wooden part. The MasterGage/Classic handles this problem easily. - Page 58 TIP: When using the Precision Rod, simply subtract ¼ inch to find the center of the mortise required. Set the length required for the mortise length and lock table stops. TIP: Use the actual cutter intended for the mortise slot MasterGage.com...
- Page 59 Machines similar to horizontal mortisers, such as the Multi-Router and the MATCHMAKER can be aligned, set up and reset up quick and easy with the MasterGage/Classic The Multi-Router is a registered trademark of the JDS Company. * The MATCHMAKER is a registered trademark of the Woodworkers Supply Company.
-
Page 60: Care And Maintenance
SECTION K CARE AND MAINTENANCE MasterGage.com... - Page 61 Applying Magic Mending Tape or Scotch tape [not masking tape] to the working surfaces adds great protection and can be easily replaced when worn. The .002 inch thick tape allows the Classic to glide over the machine table tops with ease without scratching the black anodize coating.
- Page 62 SECTION L USEFUL TIPS & TECHNIQUES MasterGage.com...
-
Page 63: Useful Tips And Techniques
The latest edition will be visible on the lower front page also. You will have to enlarge the front page on your monitor to see this information We encourage you to contact us with any tips you may have discovered using your Classic. MasterGage.com... - Page 64 USEFUL TIPS & TECHNIQUES Very precise settings can be attained using dial calipers with the MasterGage/Classic. This illustration shows how you can select any height required to within one thousandth of an inch (.001 inches/.025mm). This technique is great for measuring/setting the height of a cutting tool that comes up from BELOW and registers against the BOTTOM of the Level Arm.
- Page 65 USEFUL TIPS & TECHNIQUES Using the MasterGage/Classic as a “Story Stick” for machine set up. Many of us know of the “Story Stick” concept, where the cabinetmaker uses a vertical and horizontal stick to layout the wall where the cabinet is to reside. He marks the sticks for window clearings, plumbing, electrical outlets and other elements that he has to contend with on the wall.
- Page 66 Level Arm. Level Arm Note that the top of the scale [or other item] taped to the Level Arm – is actually the bottom of the Level Arm where you selected the height dimension you desired MasterGage.com...
- Page 67 The solution is to simply slide the Level Arm off of the MasterGage/Classic body and slip it into the center cavity of the body extrusion. Doing this will give you an extra ¾ inches of height in the container, making it easer to close the lid.
- Page 68 Getting the MAXIMUM use of your dial indicator Detach the Level Arm along with the dial indicator attached from the Classic. This gives you a small package with a lot of capabilities for checking the precision of your machinery. Simply clamp the Level Arm assembly in any confined area to take measurements.
- Page 69 To keep the MasterPlate positioned correctly and prevent it from rotating on the arbor shaft, tape the ends or edges as shown This will keep the MasterPlate stable while you are measuring/setting with your MasterGage/Classic. With the MasterPlate in the vertical position, it becomes more difficult to keep it in position.
-
Page 70: Frequently Asked Questions "Faq
SECTION M FREQUENTLY ASKED QUESTIONS ” “FAQ MasterGage.com... - Page 71 My feeling is to consider your shop like an airplane. Before you “take off” on your business day, like the plane, all machines are checked for running condition and accuracy. After all, your business relies on the accuracy and output of these machines. They are your bread and butter. MasterGage .com...
-
Page 72: Accessories
SECTION N ACCESSORIES MasterGage.com... - Page 73 ACCESSORIES Our list of Tooling Accessories for the MasterGage/Classic and MasterGage/Professional is constantly growing. All pictures and information on existing and new Accessories are posted on our web site, making it easy for you to keep up with the latest developments.
-
Page 74: Ordering Information
SECTION O ORDERING INFORMATION MasterGage.com... - Page 75 ORDERING INFORMATION You may order any MasterGage product by any of the following methods - 24 hours a day, 7 days a week, All payment must be in US dollars PHONE or FAX: -TOLL FREE 888/893-8300 WEB SITE: - PRINT OUT THE ORDER FORM FROM ...
-
Page 76: One Year Guarantee
SECTION P ONE YEAR GUARANTEE REFUND POLICY MasterGage.com... - Page 77 We have registered your name in our database as the owner of this MasterGage/Classic. REFUND POLICY If this MasterGage/Classic is not satisfactory for any reason, return it within 30 days of purchase in the condition you purchased it, postage paid. We will refund you the full purchase price.
Need help?
Do you have a question about the Classic and is the answer not in the manual?
Questions and answers