Table of Contents
Advertisement
Advertisement
Chapters
Table of Contents

Summary of Contents for OSIM uCheck Smart
- Page 1 Smart OS-571 Operation Manual...
- Page 2 1) English 2) Simplified Chinese 简体中文 3) Traditional Chinese 繁體中文...
-
Page 3: Table Of Contents
OS-571 uCheck Smart Thank you for purchasing the OSIM uCheck Smart. Please read the operation manual thoroughly for the correct methods of usage and take special notice of the safety section before you start. This manual should be kept on hand for easy reference. It is your guide to a safe and efficient operation. -
Page 4: Safety
• Do not disassemble the product. Touching the internal components may result in malfunction. • Do not attempt to repair the product. Users are to contact OSIM Service Centre for further assistance and information. - Page 5 X-ray or other devices with strong electrical fields. • Use only attachments recommended by OSIM if any. • Children should be supervised by an adult to ensure that they do not play with the product as there are some parts small enough to be swallowed.
-
Page 6: Features
• Automatic one-touch button to take measurement. • Low battery indicator. • Irregular heartbeat detection. • Pairs with OSIM Well-Being App to allow users to understand and monitor their blood pressure as well as to track trends and view history. -
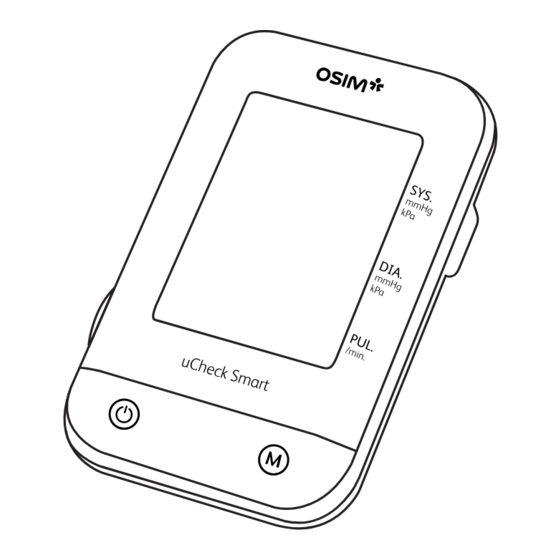
Page 7: Names Of Parts And Functions
Names of parts and functions Main unit 1. LCD display 5. [ ] ‘Memory’ button 2. Air socket 6. Cuff 3. [ ] ‘Time’ button 7. Air hose 4. [ ] ‘ON/OFF’ button 8. Bag *Product images are for illustrative purposes only and are not drawn to scale. - Page 8 Names of parts and functions Display 1. Date & Time 5. Pulse symbol 2. Systolic value 6. Memory 3. Diastolic value 7. Battery level indicator 4. Pulse arrhythmia 8. Pulse rate/ Memory code...
-
Page 9: Preparation Before Use
Note: • Remove batteries from the battery compartment when the uCheck Smart will not be used for a long period of time so as to prevent any battery leakage. • Exhausted batteries are to be safely disposed. - Page 10 Preparation before use Setting year Press and hold the [ ] ‘Time’ button until ‘Year’ display starts blinking. 1) Press the [ ] ‘Memory’ button to adjust. 2) To confirm selection, press the [ ] ‘Time’ button. Setting month, day and time Once you finished setting the year, the ‘Month-day’...
- Page 11 Preparation before use Connecting the air hose • Insert the air connector plug into the air socket firmly. Air socket connector plug Air hose...
- Page 12 Preparation before use Wrapping the cuff • With the air hose of the cuff positioned in the direction of the fingertips, place the cuff on your left arm. • Ensure that the “ARTERY MARK” [ ] is in 2 - 3 cm line with the middle finger.
- Page 13 Preparation before use • When the cuff is secure, check it is not too loose or too tight. You should be able to place two/three fingers between the cuff and arm. • If the cuff is wrapped tightly or loosely, inaccurate blood pressure readings may result.
- Page 14 Preparation before use Correct measuring posture • Sit at a table and rest your arm on the table as you take the blood pressure measurement. Make sure that the cuff on the upper arm is at approximately the same height as the heart, and that the forearm is extended naturally on the table and does not move.
-
Page 15: Manual Operation
Manual operation Measuring blood pressure with pulse rate • Press the [ ] ‘ON/OFF’ button once. A ‘beep’ sound will be heard and the cuff will start to inflate. It is normal for the cuff to feel very tight. • When inflation is completed, deflation starts automatically and the ‘... - Page 16 At the end of a measurement, uCheck Smart automatically stores each result. Viewing stored values • When the uCheck Smart is switched off, press and release the [ ] ‘Memory’ button to view the stored values in the uCheck Smart.
- Page 17 Manual operation Deleting stored values from memory • Ensure that you no longer need any of the measurements stored in the uCheck Smart’s memory before you delete them. • To delete entire stored memory readings, press and hold the ] ‘Memory’ button till the screen shows ‘CL’ and the ‘...
-
Page 18: Pairing Ucheck Smart With Smart Device
4. Go to Devices Tab and select the [ ] button to add and register the device to your account by scanning the QR Code/ Barcode or by manual input. 5. When registration has succeeded, select uCheck Smart on the Device tab and tap to pair. 6. Follow onscreen instructions. - Page 19 Pairing uCheck Smart with smart device 7. The uCheck Smart icon image will appear on the pairing list when the product is detected. Tap on it to connect. 8. You may now start measuring by tapping on ‘uCheck Smart’ on the Device tab.
-
Page 20: Compatibility Of Osim Well-Being App
Troubleshooting If you encounter problems with the operation of the uCheck Smart, please check the following points to see if they can be rectified. If the uCheck Smart still malfunctions or does not work, please turn off the uCheck Smart and remove the batteries from the battery compartment. - Page 21 Troubleshooting Problem Possible causes / actions • Check and replace with new The uCheck Smart batteries if power is weak. will not start. • Ensure the polarities of batteries are correct and batteries are firmly affixed in the battery compartment.
- Page 22 Fluctuations in blood pressure results in different are normal. values although • However, it is vital that uCheck Smart measurements are taken functions normally during similar conditions and and the values are at the same time each day. displayed in the LCD.
- Page 23 Ensure that the pairing distance Smart with your is within the signal coverage smart device. range of 5 meters. • Ensure that no other smart device remains connected to the uCheck Smart before pairing. • If problem persists, unpair and reattempt pairing.
-
Page 24: Specifications
Specifications Product name Digital Blood Pressure Monitor Model number OSIM uCheck Smart Model number OSIM uCheck Smart Power supply 4x ‘AA’ 1.5V alkaline batteries Battery lifetime Approx. 920 measurements (based on provided batteries) Expected service life Approx. 10,000 measurements Accessories lifespan Approx. - Page 25 Specifications Accuracy +/- 3 mmHg / +/- 0.4 kPa (cuff pressure) +/- 5% of reading (pulse rate) Inflation Automatic (air pump) Deflation Automatic quick exhaust valve Cuff M size : 22 to 32 cm Operating condition 10 to 40˚C / 50 to 104˚F Storage condition -20 to 55˚C / -4 to 131˚F (15 to 90% relative humidity)
- Page 26 Specifications Device standards: Device corresponds to the requirements of the standards for non-invasive blood pressure monitor EN 1060-1 EN 1060-3 EN 1060-4 IEC 60601-1 IEC 60601-1-2 IEC 60601-1-11 Electromagnetic compatibility: Device fulfills stipulations of standard IEC60601-1-2 The stipulations of the EU Directive 93/42/EEC for Medical Devices.
- Page 27 OS-571 uCheck Smart 感谢您购买 OSIM uCheck Smart 傲胜智能血压计。 使用 前请仔细阅读操作手册,并特别注意安全事项,以便正确 操作和使用本产品。 本手册提供使用者安全及有效的操作方式,请在阅毕后妥 为收藏,以便日后参考查询。 目录 安全事项 产品特性 配件名称与功能 使用前准备 操作方式 uCheck Smart 配对 OSIM Well-Being App 兼容性 兼容性 故障排除 规格说明...
-
Page 28: 安全事项
安全事项 使用环境 • 请勿在室温超过摄氏40度或是湿度过高的环境中使用 本产品。 • 本产品的机件结构使用高精密零组件。温度、湿度的 极端变化,振动、灰尘或是阳光直射处都应避免。 • 本产品设计为家用,不可移作商业用途。 使用者安全 • 当手臂潮湿时,请勿使用或操作产品。 • 若产品有任何裂缝,请勿使用。 • 请勿塞入任何物品于产品内,以防机件故障。 • 请勿将重物置于产品之上。 • 请勿将产品掉落或与水接触。 • 本产品是高精密性测量器,请勿让产品受到冲击或 震动。 • 请勿拆卸本产品,并避触碰内部组件以免造成产品 故障。 • 请勿试图修理产品。用户应该联系OSIM服务中心获取 咨询服务。... - Page 29 安全事项 • 本产品非作为自我诊断或治疗之用;如需要诊断或治 疗时,应由专业医疗人员处理。 • 请注意,自我测量血压的目的在于保健,不可当作诊 断结果或是治疗依据。任何不正常的测量数据都必须 咨询专业医生。 • 如果您配戴心律调整器、呼吸器、心电图计、义肢、 避孕器、金属植入物等,请勿使用产品。若有任何 疑问,请咨询医生建议。 • 在电视机、微波炉、烤箱 、X光机或是其它强力电场 的仪器附近使用本产品,测量结果可能会失真。 • 请使用 OSIM 所推荐的附件。 • 因有足以让孩童吞噬的小零件,请务必督导及确认孩 童未将产品视为游乐器材使用。 本产品也配备管子, 请谨防孩童被管子勒到风险。...
-
Page 30: 产品特性
产品特性 • 同时测量血压及脉搏。 • 具记忆功能,可储存60笔测量结果。 • 自动单触式按钮进行测量。 • 低电量指标。 • 能侦测心率不规则。 • 能与 OSIM Well-Being App 配对,让使用者得知本身 的血压并查看趋势和历史。... -
Page 31: 配件名称与功能
配件名称与功能 主体 5. [ ] 「记忆」按钮 1. 液晶显示幕 6. 压脉带 2. 输气孔 7. 空气软管 3. [ ] 「时间」按钮 8. 收纳袋 4. [ ] 「开启/关闭」按钮 *产品图片仅供说明用途,并不按比例绘制。... - Page 32 配件名称与功能 萤幕显示 1. 日期/时间 5. 脉搏符号 2. 收缩压数值 6. 记忆 3. 舒张压数值 7. 电池寿命显示 4. 心率不规则侦测 8. 心率/ 记忆代号...
-
Page 33: 使用前准备
使用前准备 电池安装 • 将4节1.5V「 AA 」碱性电池置入电池盒,确保电池的 (+)和( - )极正确安装。 注意: • 若长时间不使用本产品,请将电池从电池储存格中 取出以防任何电池泄漏。 • 请取出耗尽的电池并妥善处理抛弃。 • 不同类型的电池,或新与使用过的电池不可被混合。 • 请勿使用充电电池。... - Page 34 使用前准备 设定年份 持续按下 [ ]「时间」按钮直到‘年份’显示开始闪烁。 1)使用 [ ]「记忆」按钮进行调整。 2)按下 [ ]「时间」按钮确认选择。 设定月份,日期,时间 一旦调整年份完毕,‘月-日’显示将开始闪烁。 • 重复步骤1和2以调整月份,日期和时间。 注意: • ‘小时’ 值是24H格式。 • 若需重置年、月、日和时间,持续按下[ ]「时间」 按钮。 设定测量单位 原始单位被设定为mmHg。 1) 若想切换mmHg至kPa,持续按下 [ ]「开启/ 关闭」按钮直至代表着kPa的‘0.0’数字在显示幕 上, 然后松开按钮。 2) 若想切换kPa至mmHg,持续按下 [ ]「开启/关 闭」按钮直至代表着mmHg的‘0’数字在显示幕上, 然后松开按钮。...
- Page 35 使用前准备 连接空气软管 • 将空气软管连接头紧紧插入输气孔。 输气孔 空气软管 连接头 空气软管...
- Page 36 使用前准备 包覆压脉带 • 将压脉带的空气软管顺 势朝向手指方向,然后 将压脉带套在左臂上。 • 确保 ‘ARTERY MARK’ 2 - 3 厘米 ] 标记与中指对齐。 将压脉带包覆于上臂;压 脉带边缘距手肘约2至3厘 米。 • 轻压压脉带表面, 确认压脉带稳固附着 于手臂。...
- Page 37 使用前准备 • 确认压脉带稳固后,以 2-3指头置于压脉带和 手臂之间,检查包覆是 否松紧适中。 • 压脉带包覆过松或过紧 皆会导致错误的测量 结果。 • 若是使用者穿着易阻碍上 臂血液流通的上衣,将袖 子卷至上臂处以避免造成 测量结果失误。...
- Page 38 使用前准备 正确测量血压姿势 • 坐在桌前把测血压的手臂搁在 桌子上。请确认上臂之压脉带 位置约与心脏呈水平状态,并 且前臂以自然轻松的姿势置于 桌上,保持静止不动状态。 • 错误姿势 测量所得数值可能因姿势不同 而产生些微差异。压脉带高于 或低于心脏位置,亦会造成血 压数值相对的偏高或偏低。...
-
Page 39: 操作方式
操作方式 测量血压与脉搏 • 按下 [ ]「开启/关闭」按钮。血压计发出「哔」声, 压脉带便开始充气。若是感到压脉带异常紧绷,为 正常现象。 • 充气完成后,随即开始泄气,同时‘ ’ 「 脉搏 符号」开始闪烁,表示测量进行中。当测量到脉搏 之后, 脉搏符号会随着脉搏跳动节奏而闪烁。 • 测量完成后,血压计会发出「哔」声。萤幕会显示 收缩压、舒张压,和脉搏等数值。压脉带会将剩余空 气完全排出。 • 再按一次 [ ]「开启/关闭」按钮关闭电源。 注意 • 再按一次 [ ]「开启/关闭」按钮,即可随时停止 充气。... - Page 40 产品操作 记忆功能 每次血压测量完毕后,uCheck Smart 会自动储存测量结果。 查看储存数值 • uCheck Smart 电源关闭之后,按下再松开 [ 「记忆」按钮,便可查看所储存的数值。 例如: ‘ ’表示在本产品的记忆体中共存有 10笔测量数值。 • 再一次按下 [ ]「记忆」按钮则会显示上一笔数值。 重覆按下 [ ]「记忆」按钮可显示每一笔测量纪录。 记忆容量 uCheck Smart 最多可储存60笔血压纪录。一旦内存已满 时,最新记录的测量将覆盖旧的测量。...
- Page 41 产品操作 删除记忆体中的纪录 • 删除纪录前,请先确认不会再使用记忆体中所储存的 所有的数值。 • 欲删除记忆体中的读数,长按 [ ] 「记忆」按钮直到 显示幕出现「CL」字样和「 」符号。 • 松开 [ ] 「记忆」按钮,显示幕上的「CL」字样将 会闪烁。立即再次按下 [ ]「记忆」按钮, 所有储存 的数值将已被删除。 注意:您无法删除某笔特定纪录。 不须储存测量结果 • 测量完毕后,当测量数值仍停留在显示幕上时,立即 按下 [ ]「开启/关闭」按钮直到「 」符号在LCD 显示幕上闪烁,然后松开按钮。 • 按下 [ ]「记忆」按钮,「CL」符号将出现在 LCD 显示幕上(符号仅会闪烁一次,接着立即消失)。 • 最后一次的测量结果不会被储存。...
-
Page 42: Ucheck Smart 配对
Smart 配对 启动智能装置的蓝牙。 下载与启动 OSIM Well-Being App。 OSIM Well-Being 如果您是新用户请设定新的账号。或如 果您是一个现有的用户请定登录。 去到设备选项页面,然后选择 [ ] 按钮,通过扫描 QR 代码/条形码或手动输入将设备添加到您的帐户并注 册。 注册成功后,请在设备选项页面上选择 uCheck Smart,然后点击进行配对。 按照屏幕上的说明操作。... - Page 43 Smart 配对 检测到产品时,uCheck Smart 图标图像将显示在配对 列表中。点击它进行连接 。 现在,您可以开始通过点击设备选项面上的 uCheck Smart 进行测量。 按照屏幕中的指示进行测量。 若要重新查看指导,请点击「设备」>「uCheck Smart」>「更多选项」>「指导」。 注意:一旦与 OSIM Well-Being App 配对,所有的测量数据将不会储 在 uCheck Smart 内。...
-
Page 44: Osim Well-Being App 兼容性
• 适用于具备 iOS 系统 12 版本以上及安卓系统 5.0 版 本以上的指定智能装置。 • 使用者的智能装置需具备 Wi-Fi 或蜂窝移动数据网络以 及 4.0 BLE 或以上的蓝牙版本配备功能。 • 要获取 OSIM Well-Being App 最新信息,请浏览应用 程序商店。 故障排除 若在使用 uCheck Smart 时遇到问题,请参考下列几点提示 及可能解决方式。若 uCheck Smart 仍处于故障状态或无法 使用,请关掉电源,将电池从电池储存格取出,并和 OSIM 维修服务中心* 联络。 使用者请勿自行拆卸或修理 uCheck Smart。自行拆卸或维... - Page 45 故障排除 • 在帮浦正常充气的 请检查输气孔、空气软管 状况下,血压值未 连接头,以及空气软管是否 上升。 连接妥当。 • uCheck Smart 请将压脉带正确的包覆于 无法测量血压值。 手臂上。 • 进行测量前,请确认压脉带 的包覆并未过紧或未过松, 或被太厚的衣物所阻隔。 所测量到的数值过 • 请在心情平静且无压力的 高或过低。 环境中进行血压测量。 uCheck Smart • 血压波动乃正常。 正常运作且液晶显 • 请注意并且维持同样的测量 示幕上的数值正常 状况与时间。 显示,但每一次 的测量结果皆不相 同。 • 血压测量结果与医 请保持每日血压测量纪录并 护人员测量结果不 咨询医护人员。...
- Page 46 故障排除 • 屏幕显示「Err 1」 压脉带所侦测到的脉搏过于 微弱。请于调整压脉带包覆 位置后,重新进行测量。 • 检查空气软管是否连接 妥当。 • 在测量过程中,由于移动或 屏幕显示「Err 2」 是肌肉紧张导致压脉带侦测 到错误讯号。 • 请重新进行测量并勿移动 手臂。 屏幕显示「Err 3」 • 可能由于泄漏,压脉带无法 正常加压。 • 请检查压脉带是否有破损, 是否正确连接及包覆并未 过松。...
- Page 47 请参阅准备检查表以进行可靠 的测量,然后重新进行测量。 • 压脉带内压力或脉搏过高。 屏幕显示「HI」 • 休息5分钟之后再重新进行 测量。 • 脉搏过低(低于每分钟40 次) 。 屏幕显示「LO」 • 重新进行测量。 • 请确认蓝牙已启动而且蓝牙 版本是 BLE4.0 以上。 • 请确认 uCheck Smart 与智能 uCheck Smart 无法 设备之间的配对距离保持在5 与智能设备连接。 米以内。 • 请确认 uCheck Smart 已没和 其他智能设备连接。 • 若产品仍处于无法连接状态, 请停止连接并重新配对。...
-
Page 48: 规格说明
规格说明 产品名称 电子血压计 型号名称 OSIM uCheck Smart 傲胜智能血压计 型号 OS-571 电源 4颗「AA」1.5伏特碱性电池 电池寿命 约920次测量(根据所提供的电池) 预期使用寿命 约10,000次测量 饰品使用寿命 约2年 操作原理 示波振荡法,与柯氏音法相符 一 第一音为收缩压,第五音为舒张压 测量单位选择 mmHg 或 kPa 测量范围 血压 30至280毫米汞柱(mmHg)/ (收缩/舒张) 4至37.2千帕(kPa) 脉搏 每分钟40至200次 压脉带压力 0至299毫米汞柱(mmHg)/ 0至39.8千帕(kPa) 量测解析度 1毫米汞柱(mmHg)/ 0.133千帕(kPa)... - Page 49 规格说明 精准度 +/- 3毫米汞柱(mmHg) / +/- 0.4千帕(kPa) (压脉带气压) +/- 5%读数(脉搏) 充气 自动(空气帮浦) 泄气 自动快速泄气阀 压脉带 中号:臂围22厘米至32厘米 操作条件 摄氏10至40度/华氏50至104度 收纳条件 摄氏-20至55度/华氏- 4至131度 (15至90%相对湿度) IP等级 IP20(防止直径超过12.5毫米的固体 异物,不防水 ) 尺寸 约150 (长) x 92 (宽) x 38 (高) 毫米 净重 约490克(含电池及压脉带) 毛重 约612克...
- Page 50 规格说明 安规标准: 仪器符合非侵入性血压监测设备的安规标准 EN 1060-1 EN 1060-3 EN 1060-4 IEC 60601-1 IEC 60601-1-11 电磁兼容性: 产品符合IEC60601-1-2标准的规定 产品符合EU-Directive 93/42/EEC 第IIa 类医疗器 械规定。 丢弃电池或电器时需遵照当地的相关法规, 不能与家 居废物一同丢弃。 按照使用说明进行操作。本说明书提供有关此血 压计的重要产品操作和安全信息。 请在使用前仔 细阅读本说明书,以备将来参考。 BF型应用部分。 保持产品干燥。 鸿邦电子(深圳)有限公司 深圳市宝安区大浪街道大浪南路497号...
- Page 51 BP3NW1-3B (OS-571) uCheck Smart 感謝您購買 OSIM uCheck Smart。使用前請仔細閱讀操 作手冊,並特別注意安全事項,以便正確操作和使用本 產品。 本手冊提供使用者安全及有效的操作方式,請在閱畢後妥 為收藏,以便日後參考查詢。 目錄 安全事項 產品特性 配件名稱與功能 使用前準備 操作方式 uCheck Smart 配對 OSIM Well-Being App 兼容性 故障排除 規格說明...
-
Page 52: 安全事項
安全事項 使用環境 請勿在室溫超過攝氏40度或是濕度過高的環境中使用 • 本產品。 本產品的部份機件使用高精密零組件。應避免溫度、 • 濕度的 極端變化,振動、灰塵或是陽光直射處。 本產品設計為家用,不可移作商業用途。 • 使用者安全 當手臂潮濕時,請勿使用或操作產品。 • 若產品有任何裂縫,請勿使用。 • 請勿塞入任何物品於產品內,以防機件故障。 • 請勿將重物置於產品之上。 • 請勿將產品掉落或與水接觸。 • 本產品是高精密性測量器,請勿使產品受到衝擊或 • 震動。 請勿拆卸本產品,並避觸碰內部組件以免造成產品 • 故障。 請勿試圖修理產品。用戶應該聯繫原廠服務中心獲取 • 諮詢服務。... - Page 53 安全事項 本產品非作為自我診斷或治療之用;如需要診斷或 • 治療時,應由專業醫療人員處理。 請注意,自我測量血壓的目的在於保健,不可當作 • 診斷結果或是治療依據。任何不正常的測量數據都 必須諮詢專業醫生。 如果您配戴心律調整器、呼吸器、心電圖計、義肢、 • 避孕器、金屬植入物等,請勿使用本產品。若有任何 疑問,請諮詢醫生建議。 在電視機、微波爐、烤箱、X光機或是其它強力電場 • 的儀器附近使用本產品,測量結果可能會失真。 請使用原廠所推薦的附件。 • 因有足以讓孩童吞噬的小零件,請務必督導及確認孩 • 童未將產品視為遊樂器材使用。本產品也配備管子, 請謹防於孩童被管子勒到風險。 經型式認證合格之低功率射頻電機,非經許可,公 • 司、商號或使用者均不得擅自變更頻率、加大功率或 變更原設計之特性及功能。 低功率射頻電機之使用不得影響飛航安全及干擾合法 • 通信;經發現有干擾現象時,應立即停用,並改善至 無干擾時方得繼續使用。 前項合法通信,指依電信法規定作業之無線電通信。 低功率射頻電機須忍受合法通信或工業、科學及醫療 用電波輻射性電機設備之干擾。...
-
Page 54: 產品特性
產品特性 同時測量血壓及脈搏。 • 具記憶功能,可儲存60筆個測量結果。 • 自動單觸式按鈕進行測量。 • 低電量指標。 • 能偵測心率不規則。 • 能與 OSIM Well-Being App 配對,讓使用者得知本身 • 的血壓並查看趨勢和歷史。... -
Page 55: 配件名稱與功能
配件名稱與功能 主體 5. [ ] 「記憶」按鈕 1. 液晶顯示幕 6. 壓脈帶 2. 輸氣孔 7. 空氣軟管 3. [ ] 「時間」按鈕 8. 收納袋 4. [ ] 「開啟/關閉」按鈕 *產品圖片僅供說明用途,並不按比例繪製。... - Page 56 配件名稱與功能 螢幕顯示 1. 日期/時間 5. 脈博符號 2. 收縮壓數值 6. 記憶 3. 舒張壓數值 7. 電池壽命顯示 4. 心跳不規律偵測 8. 心率/記憶代號...
-
Page 57: 使用前準備
使用前準備 電池安裝 將4節1.5V「 AA 」鹼性電池插入電池盒,確保電池的 • (+)和( - )極正確安裝。 注意: 若長時間不使用本產品,請將電池從電池儲存格中取出 • 以防任何電池洩漏。 請取出耗盡的電池並妥善處理拋棄。 • 不同類型的電池,或新與使用過的電池不可被混合。 • 請勿使用充電電池。 •... - Page 58 使用前準備 設定年份 持續按下 [ ]「時間」按鈕直到‘年份’顯示開始閃爍。 1) 使用 [ ]「記憶」按鈕進行調整。 2) 按下 [ ]「時間」按鈕確認選擇。 設定月份,日期,時間 一旦調整年份完畢,‘月-日’顯示將開始閃爍。 重複步驟1和2以調整月份,日期和時間。 • 注意: •‘小時’值是24H格式。 若需重置年、月、日和時間,持續按下 [ ]「時間」 • 按鈕。 設定測量單位 原始單位被設定為mmHg。 1) 若想切換mmHg至kPa,持續按下 [ ]「開啟/關閉」 按鈕直至代表著kPa的‘0.0’數字在顯示幕上, 然後 鬆開按鈕。 2) 若想切換kPa至mmHg,持續按下 [ ]「開啟/關閉」 按鈕直至代表著mmHg的‘0’數字在顯示幕上, 然後 鬆開按鈕 。...
- Page 59 使用前準備 連接空氣軟管 將空氣軟管連接頭緊緊插入輸氣孔。 • 輸氣孔 空氣軟管 連接頭 空氣軟管...
- Page 60 使用前準備 包覆壓脈帶 將壓脈帶的空氣軟管順 • 勢朝向手指方向,然後 將壓脈帶套在左臂上。 確保‘ARTERY MARK’ • 2 - 3 公分 ] 標記與中指對齊。 將壓脈帶包覆於上臂;壓 脈帶邊緣距手肘約2至3公 分。 輕壓壓脈帶表面,確認 • 壓脈帶穩固附著於 手臂。...
- Page 61 使用前準備 確認壓脈帶穩固後,以 • 2-3指頭置於壓脈帶和 手臂之間,檢查包覆 是否鬆緊適中。 壓脈帶包覆過鬆或過緊 • 皆會導致錯誤的測量 結果。 若是使用者穿著易阻礙上 • 臂血液流通的上衣,將袖 子卷至上臂處,以避免造 成測量結果失誤。...
- Page 62 使用前準備 正確測量血壓姿勢 坐在桌前把測血壓的手臂擱在 • 桌子上。請確認上臂之壓脈帶 位置約與心臟呈水平狀態,並 且前臂以自然輕鬆的姿勢置於 桌上,保持靜止不動狀態。 測量所得數值可能因姿勢不同 錯誤姿勢 • 而產生些微差異。壓脈帶高於 或低於心臟位置,亦會造成血 壓數值相對的偏高或偏低。...
-
Page 63: 操作方式
操作方式 測量血壓與脈搏 按下 [ ]「開啟/關閉」按鈕。血壓計發出「嗶」聲, • 壓脈帶便開始充氣。若是感到壓脈帶異常緊繃,為 正常現象。 充氣完成後,隨即開始洩氣,同時‘ ’ (脈博 • 符號)開始閃爍,表示測量進行中。當測量到脈搏 之後,脈博符號會隨著脈搏跳動節奏而閃爍。 測量完成後, 血壓機會發出「嗶」聲。螢幕會顯示 • 收縮壓、舒張壓,和脈搏等數值。壓脈帶會將剩餘 空氣完全排出。 再按一次 [ ]「開啟/關閉」按鈕關閉電源。 • 注意 再按一次[ ]「開啟/關閉」按鈕,即可隨時停止 • 充氣。... - Page 64 產品操作 記憶功能 每次血壓測量完畢後,uCheck Smart 會自動儲存測量 結果。 查看儲存數值 uCheck Smart 電源關閉之後,按下再鬆開 [ • 「記憶」按鈕,便可查看所儲存的數值。 例如: ‘ ’ 表示在本產品的記憶體中共存 有10筆測量數值。 再一次按下 [ ]「記憶」按鈕則會顯示上一筆數值。 • 重覆按下 [ ]「記憶」按鈕可顯示每一筆測量紀錄。 記憶容量 uCheck Smart 最多可儲存60筆血壓紀錄。一旦內存已滿 時,最新記錄的測量將覆蓋舊的測量。...
- Page 65 產品操作 刪除記憶體中的紀錄 刪除紀錄前,請先確認不會再使用記憶體中所儲存的 • 所有的數值。 欲刪除記憶體中的讀數,長按 [ ] 「記憶」按鈕直到 • 顯示幕出現「CL」字樣和「 」符號。 鬆開 [ ] 「記憶」按鈕,顯示幕上的「CL」字樣將 • 會閃爍。立即再次按下 [ ]「記憶」按鈕所有儲存的 數值將已被刪除。 注意:您無法刪除某筆特定紀錄。 不須儲存測量結果 測量完畢後,當測量數值仍停留在顯示幕上時,立即 • 按下 [ ]「開啟/關閉」按鈕直到「 」符號在LCD 顯示幕上閃爍,然後鬆開按鈕。 按下 [ ]「記憶」按鈕,「CL」符號將出現在 LCD • 顯示幕上(符號僅會閃爍一次,接著立即消失) 。 最後一次的測量結果不會被儲存。 •...
-
Page 66: Ucheck Smart 配對
1. 啟動智慧裝置的藍牙。 2. 下載與啟動 OSIM Well-Being App。 OSIM Well-Being 3. 如果您是新使用者請設定新的帳號。 或如果您是一個現有的使用者請登 錄。 4. 開啟到設備選項頁面,然後選擇 [ ] 按鈕,通過掃描 QR 代碼/條碼或手動輸入將設備添加到您的帳戶並註 冊。 註冊成功后,請在設備選項頁面上選擇 uCheck Smart,然後點擊進行配對。 按照螢幕上的說明操作。... - Page 67 7. 檢測到產品時,uCheck Smart 圖示圖像將顯示在配對 清單中。 點擊它進行連接。 8. 現在,您可以通過點擊裝置選項面上的 uCheck Smart 進行測量。 9. 按照螢幕中的指示進行測量。 若要重新查看指導,請點擊「設備」>「uCheck Smart」>「更多選項」>「指導」。 注意:一旦與 OSIM Well-Being App 配對,所有的測量數據將不會 儲存在 uCheck Smart 內。...
-
Page 68: Osim Well-Being App 兼容性
OSIM Well-Being App 兼容性 適用於具備 iOS 系統 12 版本以上及安卓系統 5.0 版本 • 以上的指定智能裝置。 消費者的智慧裝置需具備 Wi-Fi 或蜂窩行動數據網路以 • 及 4.0 BLE 或以上的藍牙版本配備功能。 要獲取 OSIM Well-Being App 最新資訊,請瀏覽應用 • 程式商店。 故障排除 若在使用 uCheck Smart 時遇到問題,請參考下列幾點提示 及可能解決方式。若 uCheck Smart 仍處於故障狀態或無法 使用,請關掉電源,將電池從電池儲存格取出,並和 OSIM 維修服務中心* 聯絡。 使用者請勿自行拆卸或修理 uCheck Smart。自行拆卸或維 修而導致產品損壞將造成產品保證失效,OSIM 亦無責任擔... -
Page 69: 故障排除
故障排除 在幫浦正常充氣的 檢查輸氣孔、空氣軟管連接 • 狀況下,血壓值未 頭,以及空氣軟管是否連接 上升。 妥當。 請將壓脈帶正確的包覆於 • uCheck Smart 無 手臂上。 法測量血壓值。 進行測量前,請確認壓脈帶 • 的包覆並未過緊或未過鬆, 或被太厚的衣物所阻隔。 所測量到的數值過 請在心情平靜且無壓力的 • 高或過低。 環境中進行血壓測量。 uCheck Smart 正 血壓波動乃正常。 • 常運作且液晶顯示 請注意並且維持同樣的測量 • 幕上的數值正常顯 狀況與時間。 示,但每一次的測 量結果皆不相同。 血壓測量結果與醫 請保持每日血壓測量紀錄並 • 護人員測量結果不... - Page 70 故障排除 屏幕顯示「Err 1」 壓脈帶所偵測到的脈搏過於 • 微弱。請於調整壓脈帶包覆 位置後,重新進行測量。 檢查空氣軟管是否連接妥 • 當。 在測量過程中,由於移動或 • 屏幕顯示「Err 2」 是肌肉緊張導致壓脈帶偵測 到錯誤訊號。 請重新進行測量並勿移動 • 手臂。 屏幕顯示「Err 3」 可能由於洩漏,壓脈帶無法 • 正常加壓 。 請檢查壓脈帶是否有破損, • 是否正確連接及包覆並未過 鬆。...
- Page 71 壓脈帶內壓力或脈搏過高。 • 屏幕顯示「HI」 休息 5 分鐘之後再重新進行 • 測量。 脈搏過低 (低於每分鐘 40 次) 。 • 屏幕顯示「LO」 重新進行測量。 • 請確認藍牙已啟動而且藍牙版 • 本是BLE 4.0以上。 uCheckSmart 請確認 uCheck Smart 與智能 • 無法與智能設備連 設備之間的配對距離保持在5米 接。 以內。 請確認 uCheck Smart 已沒有 • 和其他智能設備連接。 若產品仍處於無法連接狀態, • 請停止連接並重新配對。...
-
Page 72: 規格說明
規格說明 產品名稱 “傲勝”電子血壓計 型號 BP3NW1-3B (OS-571) 電源 4顆「AA」1.5伏特鹼性電池 電池壽命 約920次測量(根據所提供的電池) 預期使用壽命 約10,000次測量 產品使用壽命 約2年 操作原理 示波振盪法,與柯氏音法相符 一 第一音為收縮壓,第五音為舒張壓 測量單位選擇 mmHg 或 kPa 測量範圍 血壓 30至280毫米汞柱(mmHg)/ (收縮/舒張) 4至37.2千帕(kPa) 脈搏 每分鐘40至200次 壓脈帶壓力 0至299毫米汞柱(mmHg)/ 0至39.8千帕(kPa) 量測解析度 1毫米汞柱(mmHg)/ 0.133千帕(kPa)... - Page 73 規格說明 精準度 +/- 3毫米汞柱(mmHg) / +/- 0.4千帕(kPa)(壓脈帶氣壓) +/- 5%讀數(脈搏) 充氣 自動(空氣幫浦) 洩氣 自動快速洩氣閥 壓脈帶 中號:臂圍22公分至32公分 操作條件 攝氏10至40度/華氏50至104度 收納條件 攝氏-20至55度/華氏- 4至131度 (15至90%相對濕度) IP等級 IP20(防止直徑超過12.5毫米的固體 異物,不防水) 尺寸 約150 (長) x 92 (寬) x 38 (高) 公厘 淨重 約490公克(含電池及壓脈帶) 毛重 約612克...
- Page 74 規格說明 安規標準: 儀器符合非侵入性血壓監測設備的安規標準 EN 1060-1 EN 1060-3 EN 1060-4 IEC 60601-1 IEC 60601-1-11 電磁兼容性: 產品符合IEC60601-1-2標準的規定 產品符合 EU-Directive 93/42/EEC 第 IIa 類醫療器械 規定。 丟棄電池或電器時需遵照當地的相關法規, 不能與家居廢 物一同丟棄。 按照使用說明進行操作。本說明書提供有關此血壓計的重 要產品操作和安全信息。請在使用前仔細閱讀本說明書, 以備將來參考。 BF型應用部分。 保持產品乾燥。 製造商名稱/地址: Manufactured by ONBO Electronic (Shenzhen) Co., Ltd.(地址:No.138, Huasheng Road, Langkou Community, Dalang Street, Longhua District, Shenzhen, China)for 新加坡商傲勝全球股份有限公司台...
- Page 75 Designed & Developed in Singapore by OSIM International Pte. Ltd. (A subsidiary of V3 Group) © 2021 All rights reserved. www.OSIM.com Rev D...
Need help?
Do you have a question about the uCheck Smart and is the answer not in the manual?
Questions and answers