Advertisement
Quick Links
INSTALLATION MANUAL
Manufacturer:
Dunster House Ltd.
Caxton Road
Bedford
Bedfordshire
England
MK41 0LF
Utopia Diamond Pergola
H4-GS4X3CORPRG
Unique Product Reference Number:
__________________________________
Customer Service Department:
cs@dunsterhouse.co.uk
www.dunsterhouse.co.uk
Advertisement

Summary of Contents for Dunster House Utopia H4-GS4X3CORPRG
- Page 1 INSTALLATION MANUAL Utopia Diamond Pergola H4-GS4X3CORPRG Unique Product Reference Number: Manufacturer: Dunster House Ltd. Caxton Road __________________________________ Bedford Customer Service Department: Bedfordshire cs@dunsterhouse.co.uk England www.dunsterhouse.co.uk MK41 0LF...
- Page 2 In the unlikely event that you need to contact us, please do so in writing to: Email: cs@dunsterhouse.co.uk Post: Dunster House Ltd, Caxton Road, Elms Farm Industrial Estate, Bedford, MK41 0LF, England. Our Customer Service department is open 9 a.m. to 5 p.m. Monday to Friday. Please include your Sales Order (SO) number or post code in any correspondence with Customer Service to enable them to locate your file.
- Page 3 Components required for Utopia Diamond Pergola Installation Manual POST Fix x1 Dunster House Logo to x1 70X70X1965 THK_mm LNG_mm PART NUMBER THK_mm WIDTH_mm DESCRIPTION LNG_mm Post 70x70x1965 1965 BEAM WIDTH_mm LNG_mm PART NUMBER DESCRIPTION THK_mm WIDTH_mm LNG_mm 86x43x1650 Beam 1650...
- Page 4 70x35x650.C Post Trim POST TRIM LNG_mm WIDTH_mm PART NUMBER DESCRIPTION THK_mm WIDTH_mm LNG_mm ANG_deg 70x35x350.C Post Trim ACCESSORIES AND FIXINGS Description Dunster House Logo Customer Instructions SCREW 95 mm SCREW 120 mm SCREW 50 mm SCREW 70 mm Page 4...
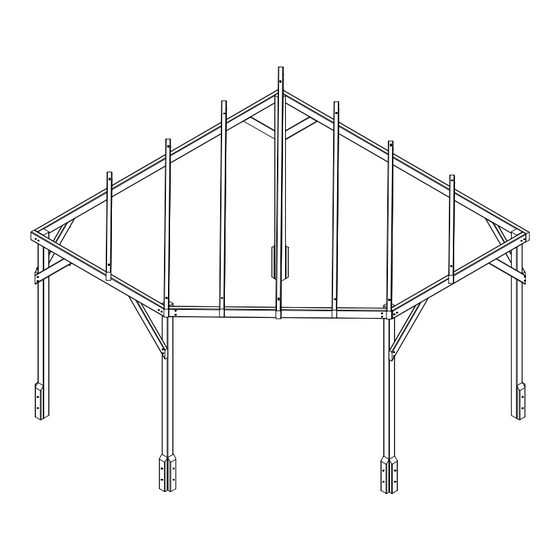
- Page 5 Assembly Steps for Utopia Diamond Pergola **Avoid splitting timber parts by pre-drilling all screw holes** Step 1 COMPONENTS REQUIRED PART NUMBER 86x43x3043 86x43x1650 70x70x1965 SCREW 70 mm • Prepare the Assembly 1 and Assembly 2 of Beams and Posts as shown in the diagrams below using 1x 86x43x3043 and 1x 86x43x1650.
- Page 6 Assembly Steps for Utopia Diamond Pergola **Avoid splitting timber parts by pre-drilling all screw holes** Step 1 (Continued) Assembly 2 86x43x1650 Assembly 1 86x43x3043 70x70x1965 86x43x3043 Join Assembly 1 and Assembly 2 together using 1x 86x43x3043 beam as shown. • Secure with 4x screws.
- Page 7 Assembly Steps for Utopia Diamond Pergola **Avoid splitting timber parts by pre-drilling all screw holes** Step 2 COMPONENTS REQUIRED PART NUMBER 86x43x2000.A 86x43x1650 70x70x1965 SCREW 95 mm SCREW 70 mm • Prepare Assembly 3 using image below for reference. • Attach Assembly 3 to the post attached to the end of Assembly 1 with 2x screws.
- Page 8 Assembly Steps for Utopia Diamond Pergola **Avoid splitting timber parts by pre-drilling all screw holes** Posts and Beams Layout Please note that this layout is to assist you with step 2. 86x43x3043 View F SCREW 70 mm 86x43x2000.A View F 86x43x2000.A View G View G...
- Page 9 Assembly Steps for Utopia Diamond Pergola **Avoid splitting timber parts by pre-drilling all screw holes** Step 3 COMPONENTS REQUIRED PART NUMBER 70x35x650.C SCREW 95 mm SCREW 70 mm • Once the frame is assembled, fix the braces in positions shown using 4x screws provided per brace. Use the diagram below for reference.
- Page 10 Assembly Steps for Utopia Diamond Pergola **Avoid splitting timber parts by pre-drilling all screw holes** Step 4 COMPONENTS REQUIRED PART NUMBER 86x43x3700 86x43x1520 86x43x2580 86x43x3160 120mm Screw 86x43x3700 86x43x3160 86x43x3160 86x43x2580 86x43x1520 120mm Screw 120mm Screw • Using the diagram above as reference, fix the beams into place. Use 1x screw at each end of the beam.
- Page 11 Assembly Steps for Utopia Diamond Pergola **Avoid splitting timber parts by pre-drilling all screw holes** Step 4 COMPONENTS REQUIRED PART NUMBER 70x35x350.C SCREW 50 mm • On the base of the posts, fix 2x Post Fascia to each post. • Use 2x screws per component to fix into position.
- Page 12 Installation Manual Utopia Diamond Pergola (Additional Wall Panel Pack) Unique product reference number ................. http://www.dunsterhouse.co.uk Dunster House Ltd.
- Page 13 Utopia Diamond Pergola - Pack May Contain : 2m Solid Wall Panel Pressure Treated 1860 Solid Wall Panel Pressure Treated 2860 Glass Wall Panel Pressure Treated 1860 LOOSE COMPONENTS Horizontal Beading Timber - Per Window Pressure Treated Vertical Beading Timber - Per Window Pressure Treated Page 13...
- Page 14 Utopia Diamond Pergola - Pack May Contain : Glass Wall Panel Pressure Treated 2860 LOOSE COMPONENTS Horizontal Beading Trim - Per Window Pressure Treated Vertical Beading Trim - Per Window Pressure Treated ACCESSORIES PART NUMBER Solid Wall Panel 3m Varies 70mm Screws Varies Page 14...
- Page 15 Utopia Diamond Pergola - Pack May Contain : 3m Wall Panel Pressure Treated 2860 Page 15...
- Page 16 Utopia Diamond Pergola - Additional Panel Assembly Full Height Wall Panel Assembly **Quantity of components will vary, depending on your purchase PART NUMBER Varies 3m Solid Wall Panel 70mm Screws Varies • Position the solid wall panels between posts as shown in the diagram below. •...
- Page 17 Utopia Diamond Pergola - Additional Panel Assembly Full Height Wall Panel Assembly **Quantity of components will vary, depending on your purchase PART NUMBER 3m Slatted Panel Varies 70mm screws Varies Varies 20mm screws U metal Bracket 70x38x1mm Varies • Position the solid wall panels between posts as shown in the diagram below. •...
- Page 18 Utopia Diamond Pergola - Additional Panel Assembly Half Height Wall Panel Assembly **Quantity of components will vary, depending on your purchase PART NUMBER 3m Solid Wall Panel Varies 3m Glass Wall Panel Varies 70mm Screws Varies • See Previous page for Solid Wall Panel Installation. Glass Wall Panel Assembly SKIP STEP IF CUSTOMER HAS NOT PURCHASED ADDITIONAL GLASS WALL PANELS •...
Need help?
Do you have a question about the Utopia H4-GS4X3CORPRG and is the answer not in the manual?
Questions and answers