Table of Contents
Advertisement
Quick Links
Advertisement
Table of Contents

Summary of Contents for Artize QUADRO
- Page 1 Steam Shower Cabin Manual for Installation...
- Page 2 * Images shown are for illustration purpose only. Actual product may vary due to product enhancements.
-
Page 3: Table Of Contents
Safety Instruction & Precaution 01 & 02 • Tools • Overall Dimensions • Site Preparation & Installation Requirement • Part Identification Reference • The Cabin Base / Shower Tray Setting on Finished Floor Step 1 • Shower Wall Fixing on Base Tray Step 2 •... - Page 4 Safety Instruction & Precaution Caution Product must be installed by the qualified person. The manufacturer declines all liability for events arising from incorrect installation or operation of the tub. The product is designed for indoor use in bathrooms, and must not be installed in the open. Always power off the product (Omnipolar switch in the OFF position) when maintenance is to be performed on electrical components.
- Page 5 Safety Instruction & Precaution Precautions The material used for the construction of the shower booth is extremely tough and durable, which is demonstrated by the widespread use of this material in many industries. However, this material may be damaged by certain chemical substances such as acetones and solvents in general and stained by alcohol-based liquids if these are not removed immediately.
-
Page 6: Tools
Tools Ø6 Ø3 * Recommendation : Two person & standard tool kit required for product installation. -
Page 7: Overall Dimensions
Overall Dimensions Technical specification for 120 x 100 Gross weight 240 KG Electrical & plumbing requirements Required socket dimensions for drainage flex pipe (inner dia) ø50mm Required length for flex pipe for drainage 400-800mm Socket dimensions for water inlet (hot / cold) 1 / 2”... -
Page 8: Site Preparation & Installation Requirement
Site Preparation & Installation Requirement Front wall * All dimensions in mm. C.P : Electrical connection points (1.5mtr open wire). C1 / F1 : Hot / cold water connection. O1 : Drain point connection. -
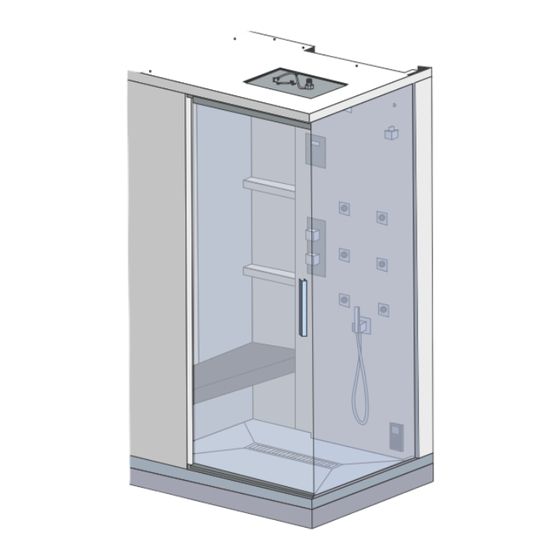
Page 9: Part Identification Reference
1. Part Identification Reference Roof Over head shower D’Scale Display / Keypad Body jets Diverter mixer Glass door Wall outlet with hand shower Sitting bench Steam dispenser Drain waste Shower tray... -
Page 10: The Cabin Base / Shower Tray Setting On Finished Floor Step
2. The Cabin Base / Shower Tray Setting on Finished Floor Step 1... -
Page 11: Shower Wall Fixing On Base Tray Step
3. Shower Wall Fixing on Base Tray Step 2 * Use L clamp & screws to fix the cabin walls. -
Page 12: Fixing The Drain Connection
4. Fixing the Drain Connection * The drain connection pipe is not a part of product kit. -
Page 13: Side Wall Fixing Step
5. Side Wall Fixing Step 3 * Front wall installation & fixing. -
Page 14: Side Wall Fixing Step
6. Side Wall Fixing Step 4 * Fix adjoining side walls using nut & bolt. -
Page 15: Roof Panel Fixing Step
7. Roof Panel Fixing Step 5 * Fix the shower roof using metal L clamps. * Two persons are required to install cabin/door roof. -
Page 16: Installing Glass Walls & Fixing Cabin Door Step
8. Installing Glass Walls & Fixing Cabin Door Step 6 * Cover the shower tray from front / side using ACP slit cover. -
Page 17: Electric & Plumbing Connections
Electric & Plumbing Connections Audio Display Water * Make a proper earth connection for body grounding, is an efficient way of protecting the appliances from electrical hazard. -
Page 18: Main Power Connections
Main Power Connections 230Vac 50Hz 230Vac 50Hz Ø1/2” Ø1/2” * Check water the water supply before plumbing connection & water supply should be clean / debris free. -
Page 19: Faucet Mixer Features & Maintenance
Faucet Mixer Features & Maintenance Water temperature regulation Thermatik mixer controls the temperature of the outlet irrespective of the temperature of the water coming in the hot inlet from boilers / geyser. For Example: If the temperature of hot inlet varies from 40°C to 60°C or vice-versa the temperature of the outlet water will still remain the same as set by the end user. -
Page 20: Steam Keypad
Steam Keypad Features : The keypad feature “Touch screen” technology to control 6 functions : • ON / OFF • Alarm • Steam bath • Chromotherapy • Stereo FM radio • Bluetooth Display Illuminated ring increase and decrease Confirmation Chromotherapy On / Off Alarm Radio... -
Page 21: Keyboard
Keyboard ON / OFF When the Steam cabin is not in operation, the display and function symbols on the keypad are turned off. The keypad does however keep a proximity sensor active to detect if a hand is approaching. • Wait status (WAIT) : When a hand approaches the keypad, only the ON / OFF symbol is turned on. - Page 22 Steam Bath Touch this “Symbol”. The program starts immediately, using the last duration and temperature settings made. The display shows : 1. An image of the “Steam bath” 2. The time left until the left of the program 0:40 19,5ºc 3.
-
Page 23: Steam Bath Choromotherapy
Steam Bath Delayed Start setting : You can set a “Delay” for the automatic start of the Turkish bath program. Once it has been set, a countdown begins until the start of the program WATER LEVEL 0h:54m at the programmed temperature and for the programmed duration. -
Page 24: Music Function
Music Function FM Radio Touch this “Symbol”. The first time you see the radio, it tunes in to the first frequency. Frequency storage : In tuning mode, hold your finger over (OK) for 2 seconds.The display shows a menu: Use the “Illuminated ring” to browse through the programs and select the one on which you wish to store the frequency. -
Page 25: Functions
Functions Alarm Touch this symbol to enter alarm mode : 1. The display shows the alarm 2. All outputs are inhibited 3. The radio is switched off 4. The Steam bath program stops 5. The white light comes in To disable alarm mode, touch the symbol for 2 seconds. The device returns to wait-for mode (WAIT). -
Page 26: Boiler Maintenance
Boiler Maintenance Cleaning the boiler vaporiser To benefit fully from maximum performance during your Turkish bath, it is highly recommended to clean the steam-generating boiler once a year (or every 30 hours or so of operation). To clean the boiler, the following is necessary : •... -
Page 27: Warranty
Warranty Please note that the manufacturer cannot be held accountable for defects caused by external conditions and / or events such as (by way of non-exhaustive example) : • Insufficient capacity of electrical or plumbing systems • Incorrect installation and / or maintenance carried out by the unauthorized staff •... -
Page 28: Standard Packing Information
Standard Packing Information Top & bottom Folder Item : Shower cabin 120 ×100 Box Type Description Length (A) Width (B) Height (H) Box 1 of 7 Top & bottom Front panel 2080 Box 2 of 7 Top & bottom Base 1240 1040 Box 3 of 7... - Page 29 Notes...
- Page 30 Notes...
Need help?
Do you have a question about the QUADRO and is the answer not in the manual?
Questions and answers