Advertisement
Quick Links
Advertisement

Related Manuals for Coziwow CW12F0507


Summary of Contents for Coziwow CW12F0507
- Page 1 User Manual Model Number: CW12F0507...
-
Page 2: Dear Customer
8PCS 8PCS e.g., CW91S0320, and the TRACKING NUMBER). Our COZIWOW team with factory direct after-sales service will reply within 24 hours and will do our best to resolve the problem for you. Our services are available at any time. 4PCS... -
Page 3: Product Assembly
PRODUCT ASSEMBLY PRODUCT ASSEMBLY STEP 2 Check the package contents before getting started ! STEP 1 Resin plate 350*350mm 10PCS Resin plate 350*350mm 32PCS 8PCS ×8 ×2 Splice the resin plates(A) as shown Clip the buckles into the four corners of the resin plate (A) - Page 4 PRODUCT ASSEMBLY PRODUCT ASSEMBLY STEP 3 STEP 4 Resin plate Mesh 450*350mm Iron frame 350*350mm Door 450*350mm 450*350mm 3PCS 2PCS 10PCS 14PCS 3PCS Assemble the door(B), mesh (C)and Assemble the resin plate(A) terrace as shown iron frame(D) as shown in the picture...
- Page 5 PRODUCT ASSEMBLY PRODUCT ASSEMBLY STEP 5 STEP 6 Door 450*350mm Mesh 450*350mm Iron frame Resin plate 350*350mm 450*350mm 11PCS 3PCS 14PCS 2PCS Same as step 3,assemble the door(B), mesh(C) Same as step 4,assemble the resin plate(A) and iron frame(D) as shown in the picture terrace as shown...
- Page 6 PRODUCT ASSEMBLY PRODUCT ASSEMBLY STEP 7 STEP 8 Iron frame Mesh 450*350mm Iron frame Door 450*350mm 450*350mm Resin plate 350*350mm 450*350mm 11PCS 2PCS 14PCS 2PCS Assemble the resin plate(A) terrace and iron Same as step5 frame(D) as shown...
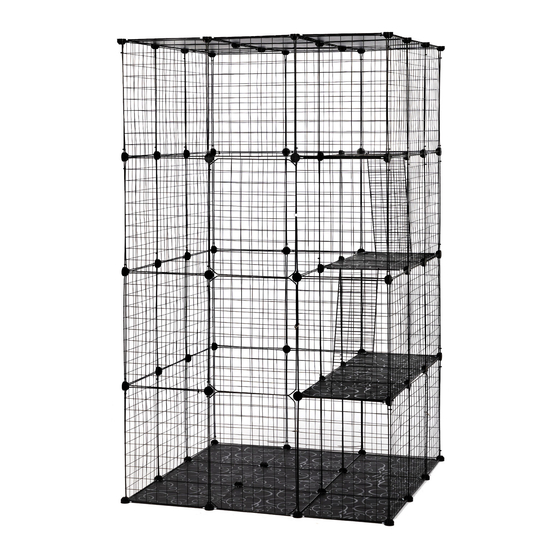
- Page 7 PRODUCT ASSEMBLY PRODUCT ASSEMBLY STEP 10 STEP 9 Mesh 450*350mm 12PCS Assemble the top layer of the pet cage as shown Assemble the top layer of the pet cage...
- Page 8 PRODUCT ASSEMBLY PRODUCT ASSEMBLY STEP 12 STEP 11 250PCS 4PCS Fix the adjacent meshes with cable ties② to The buckle③ is used to fix the door make all the meshes more firm. to the adjacent mesh Cut off the ends after tightening the cable tie.
- Page 9 PRODUCT ASSEMBLY PRODUCT ASSEMBLY STEP 13 STEP 14 M3x35mm 4PCS 8PCS 8PCS 3PCS 4PCS wall Use the plastic buckles⑨, U-shaped fasteners⑥ and expansion screws⑦ to fix the cage to the wall.
Need help?
Do you have a question about the CW12F0507 and is the answer not in the manual?
Questions and answers