Advertisement
Quick Links
Quick start 2-Wire v3.2
1
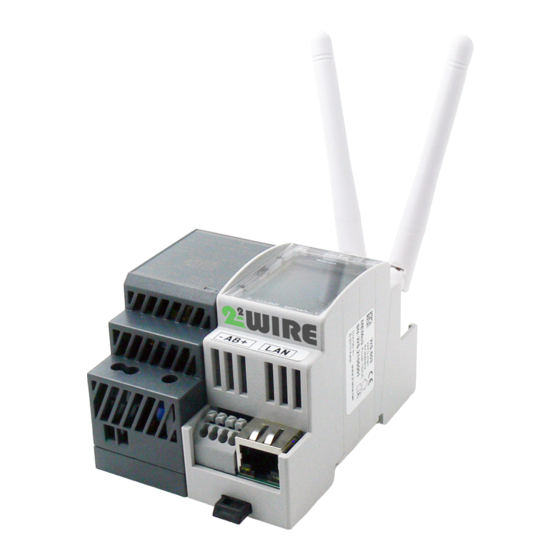
WS.503b (MEMo3) web server
The "MEMo3" webserver is a Modbus master module.
All I/O modules are either connected to the RS485 bus
or wirelessly connected via LoRa or FSK at 868MHz.
From the Memo web server, these I/O modules are
then powered, configured, read, logged and logically
switched. Configuration and reading is done via the
web browser on your tablet or PC without the need
for software. The web server also includes http client functionality so that
data can be uploaded to a central server for central management or
backup. With MQTT token, web servers can be linked to each other or one
can get remote access via the APP HTML.
1. Connect:
Power supply MEMo:
(1)Top left of the module, 15 Volts DC via
the included MeanWell HDR-15-30 power
supply. PAY ATTENTION TO POLARITY !!Use
wire with section 0.5mm² and with solid
core to fit in the terminals (2)Fuse this
power supply SEPARATELY 2P/6A
RS485 Modbus:
(3) Data cable: use type EIB bus cable (max.
80m) with section 0.5mm² and with fixed
core to fit into the bus clamps, or use special
Modbus cable for longer distances. Topology Modbus: only in line so no
branches, both bus ends close between A and B terminal with supplied
end resistor 120 Ohm. Memo3 is located at a terminus of the bus.
(3)Connection: depending on the type of module, only make the
necessary connections: Ground(-)black, A yellow, B white, + red (+ is
power supply to module RG.016 and REL.44).
Network:
MEMo3 has both (8)WiFi 2.4 GHz and (4)LAN linking. By default, WiFi is
disabled and LAN is set to DHCP. When you connect to a router, Memo
gets an IP address and this is displayed on the (7) display.
Note: MEMo3 (and PC) MUST always be connected to the internet (load
graphs into PC, upgrade, equalize clock,...)
With a working MEMo3: Short press on the (5) reset button will reboot
the MEMo3, long press on the menu button (6) until the running bar is
finished you will enter the (7) display menu: Here you can upgrade or
clear the MEMo3 completely. Short press (6) to cycle through menu and
long press (6) to activate the selected function.
2. Configuration via tablet or PC:
When the power supply is switched on, the display (7) lights up and after
about 30 seconds* the LAN IP address and port number can be read.
After typing in the IP address+":"+ port number ( e.g. 192.168.0.20:8080)
in the web browser on PC or Tablet (e.g. Google Chrome, Edge, Safari,... )
you will be taken to the web page of the MEMo3 web server.
turned on, the display will show 'WiFi connect' and it will take a little longer, about
120 seconds before the LAN address appears. For more information, see 'Activating
WiFi via the REDIRECT method'.
At CONFIGURATION/SETUP you can change this LAN IP address by typing
it in the IP address fields or by checking DHCP to give a new IP address by
the router. After modification, press "SEND IP CONFIG" and then press a
2nd time, after which the web server will reboot and after which you can
load the web page with the new IP settings.
Note: If you unplug the RJ45 during rebooting, the MEMo3 will remain in
DHCP mode, which is useful if you go to a new installation to
automatically connect to the network.
To read or change this LAN IP address and network settings or to make
the WiFi connection with your network, you can also use the 2-Wire IP
server scanner:
https://www.2-wire.net/product/ip-serverscanner/
this Windows tool you can find all web servers within your network. Place
the cursor on the MEMo3 LAN IP address and click on "Set IP and
REDIRECT method:
By briefly pressing the RESET button (5) of MEMo3, it will reboot. During
this reboot, keep pressing the MENU button (6) until first 'Connect WiFi'
and then 'Start WiFi portal' appears, then release. MEMo3 is now an
'access point', called '2WIRE-MEMo'. Choose 'networking' on your laptop
and if it works properly, the list should now read: '2WIRE-MEMO'. Select
this network. If you are asked for a key: 'adminMEMO'. Automatically
your web browser will open and after a maximum of 1 minute you will be
redirected to a REDIRECT screen where you can enter the IP settings.
the webpage below:
Settings: enter general settings
Channels: set resolution graphs and overview
page
2.1. Firmware Upgrade:
*If WiFi is
Go to "CONFIGURATION/SETTINGS" section 5, click on the "FIRMWARE
VERSIONS" button and if your web server has an internet connection, it
will display available version and installed version.
To test the connection, first press "DOWNLOAD" and wait until all the
firmware of the different modules have been downloaded and get a green
tick before upgrading the MEMo3: To do this, press the "INSTALL" button
and the web server will be upgraded.
IMPORTANT:
During the upgrade process, DO NOT interrupt the power or
the internet connection or risk damaging the MEMo!! Wait at least a few
minutes for the web server to REBOOT itself and return to the login page.
TIP: You can also upgrade via the (7) display, see detailed manual.
2.2. MODULES, adding energy meters
from the homepage.
Set Level3: Click on 'EDIT GROUP-CHANNELS'. Enter 'Level3' and click
'CANCEL'. At the top left you can now read the current level status.
From
SSID/Key" to change LAN IP settings, or configure
the WiFi connection from there.
To activate WiFi via the 2-Wire IP server scanner:
Activate WLAN by entering SSID and KEY and then
tick DHCP and press OK. Automatically, the
MEMo3 now gets a free and FIX IP address set
which then appears on the MEMo3 display after
the auto reboot.
Then from this network
WLAN IP address+":"+
port number ( e.g.
192.168.0.21:8080) in
the web browser on PC
or Tablet and then you
will be taken to the web
page of the MEMo3 via
WiFi.
To activate WiFi via the
REDIRECT page:
Fill in the SSID and password of your network and
if you enter your own IP addresses, they must be
adjusted according to the settings of your own
WiFi network. It is easier to enter '0.0.0.0' for the
4 IP addresses and a port number e.g. '8085', and
in this way the web server itself ensures that a
free and fix IP address is set which appears on the
display. Now press "SAVE" and then go back to
default network. Then the WLAN IP address+":"+
port number ( e.g. 192.168.0.21:8080) in the web
browser on PC or Tablet and you will be taken to
the web page of the MEMo3 via WiFi.
The "CONFIGURATION" button will take you to
Logged in as 'Level3'=installer or
'VRM'=expert, you can enter
Modbus meters, MQTT meters or
meters coming from the RF gateway
(RG.016) or Relay interface (REL.44)
Qonnex
Advertisement

Summary of Contents for 2-Wire WS.503b
- Page 1 'CANCEL'. At the top left you can now read the current level status. To read or change this LAN IP address and network settings or to make the WiFi connection with your network, you can also use the 2-Wire IP server scanner: https://www.2-wire.net/product/ip-serverscanner/...
- Page 2 It is important to work with the latest firmware in the web server or damage due to overvoltage. The mandatory provisions in national and the 2-Wire modules so upgrade! (see tutorial). legislation on the sale of consumer goods and the protection of ...
Need help?
Do you have a question about the WS.503b and is the answer not in the manual?
Questions and answers