
Related Manuals for Soundmachines arches

Summary of Contents for Soundmachines arches
- Page 1 (arches) Universal Tactile Interface OWNER'S MANUAL Version 2.1.0 Tinkered, designed and developed in Italy...
-
Page 3: Table Of Contents
General configuration and function buttons .................. 21 trans(pose) button:..........................22 arp button: ............................22 play button: ............................23 config/MIDI button: ..........................24 bpm button: ............................25 KEYBOARDS ..............................26 SEQUENCERS .............................. 28 STEP SEQUENCER .......................... 28 TRIGGER SEQUENCER ........................31 owner's manual (arches) - Page 4 UPDATING THE FIRMWARE ........................36 ORIGINAL PRESETS: ............................ 38 PATTERN EDITOR ............................42 KICKSTARTER CAMPAIGN CONTRIBUTORS ....................44 CONTACTS ..............................45 REGULATORY: ..........................45 Be sure to check our website's (arches) page for the latest version of this manual! www.sound-machines.it/product/arches owner's manual (arches)
-
Page 5: Introduction
(arches). (arches) is not the first (and won’t be the last!) of this kind of interfaces, but has many unique features that builds up a definitive tool for the performer or the electronic studio musician. -
Page 6: Box Content
Don’t push the encoders and the buttons too much, and avoid this happening during transport. Just put the (arches) in a soft bag with added padding while you are traveling with it. The OLED screen is protected by a plastic screen. This one can be scratched if misused, but not more than any other kind of plastic lenses. -
Page 7: Description
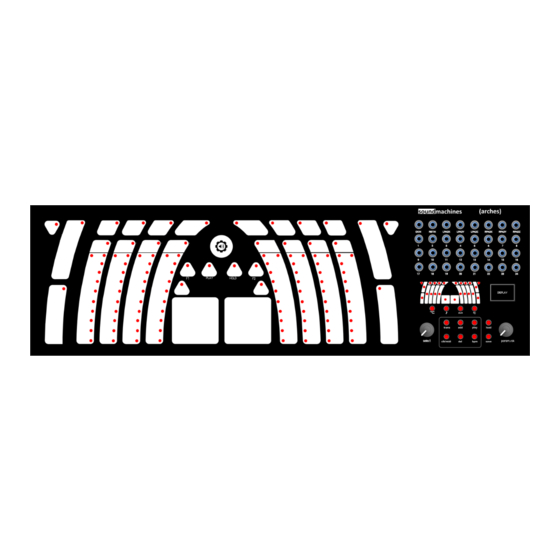
DESCRIPTION The panel of (arches) is divided in three main functional parts: the tactile surface, the user interface and the patch-bay. The rest of the connectors (MIDI, power, etc..) are on the back of the case. The Tactile Surface: The tactile surface, highlighted in the picture above, comprises many elements and buttons to be used in your performance. -
Page 8: The User Interface
The User Interface: (arches) includes a complete user interface based on the (arches) mini map, two encoders, a graphical OLED display and pushbuttons. You will have to get familiar with the user-friendly interface as this is the center to quickly configure and navigating the setup. -
Page 9: The Back Panel
The Back Panel Looking at the rear panel of (arches) you find, from left to right, the following ports: Expansion panel. USB device port for MIDI MIDI IN MIDI OUT Power Supply jack The MIDI ports are MIDI IN and MIDI OUT from left to right... -
Page 10: Quickstart
This small chapter tells you how to quickly configure a playing/performance environment with your (arches). The example configuration is built around a pretty common scenario: your (arches) will control two voices of an eurorack system (here, for simplicity, indicated with our MODULӦR114) and a MIDI synth connected through standard MIDI cable. - Page 11 In general, you have concurrent MIDI and CV/GATE outputs on the (arches). In the case above, you could actually use the jack outputs 9, 10 and 11 as the outputs of KB4. In this case you can drive to unison (or not!) another analog voice with the same notes that you send to the Proteus via MIDI. This is...
-
Page 12: The Elements
The upper buttons are 8 pressure sensitive touch buttons that can generate pitch, gates and expression by moving your finger around the center of the button. As every other element of (arches) there is a LED associated with every button: this indicates the detected touch and the arpeggiator activity on that particular button. -
Page 13: Sliders
Thumb pads: At the very center of the (arches) there are two small square sensitive areas. Those are just under your thumbs and you can use them to output signal relative to X, Y and Z (pressure). Their behavior is mirrored, so, while the left pad origin (0 Volts, 0 Volts) is at the bottom left, the right pad has the origin at bottom right. - Page 14 CCs, you have to enter the NOTE Menu to cycle between them, to see and edit them. The thumb pads have also their individual HOLD buttons that are the triangular surfaces on top of them. owner's manual (arches)
-
Page 15: User Interface
USER INTERFACE: You will have to get familiar with the user-friendly interface of (arches) as this is the center for quickly configuring and navigating the setup. The user interface is clearly divided in few elements that we will describe in the next paragraph:... -
Page 16: The Button Group
Eurorack to Buchla. By pushing at the same time both encoders the (arches) will output an ‘all notes off’ on every MIDI channel. An important function of every MIDI controller is the ‘panic’ button. When something is going wrong in the connection or the MIDI device miss some messages, some notes could remain active (or ‘STUCK’). -
Page 17: Oled Display And Function Navigation
The splash screen will show the firmware version. You will be contacted, as a user, (arches) about any new firmware release. Be sure, anyway, to check the product page on FW v. -
Page 18: Changing Elements Configuration
The following picture explains the meaning of each information block: Now, let’s go a little bit deeper into the functionalities of the (arches), just to be able to understand the main page of the display. -
Page 19: Trigger Button
Note: If you want to disable the Gate output, set the “output” parameter to ‘- -‘. NOTE button: In a keyboard: MIDI CHANNEL NOTE STANDARD MIDI AFT. G1#-32 EURO In a FREE slider (standalone element): MIDI CHANNEL VOLTAGE owner's manual (arches) -
Page 20: Aux Button
VOLTAGE RANGE of the CV output. A small note about the V/Hertz output. (arches) will output about four octaves and a half in this standard. As the output will top at 10V we are limited to this range. -
Page 21: General Configuration And Function Buttons
FREEQ mode is selected. This is because now this slider sends out MIDI Notes on the selected MIDI Channel, a setting that you can find in the same page. General configuration and function buttons Between the two encoders there are important buttons that are responsible for many functions and shortcuts. owner's manual (arches) -
Page 22: Trans(Pose) Button
This is one of the most interesting performance (arches) objects. All the arpeggiator functions can be configured and modified from this menu. We already introduced that, as with other UI functions, you can repeatedly push the button and ‘cycle’ through the available arpeggiators. -
Page 23: Play Button
(READ: it’s up to you to sync different clock divisions to the measure, if needed. This is to avoid having to wait a long time when high clock division is chosen. As (arches) is a performance machine, the musician is responsible for this type of behavior). -
Page 24: Config/Midi Button
MIDI The first screen will define which will be the MIDI medium that (arches) is going to use. You can choose one at a time, for several reasons, one of the first being not to create too much chaos in your setup! You can choose between the following ‘medium’... -
Page 25: Bpm Button
Finally, the third screen will allow you to choose whether to send or not the MIDI clock out when (arches) is in INTERNAL mode or USB. You cannot turn the MIDI CLK OUT function on if the MIDI I/F is set to BLE because Bluetooth transmission, while good enough and quick for MIDI Messages, is not very reliable and stable for clock signals. -
Page 26: Keyboards
KEYBOARDS (arches) introduces the concept of virtual keyboard by grouping single elements and integrating the output information on a keyboard concept. The keyboards can be configured to suit your harmonic and melodic needs and to use any of the possible standard to interface with your systems. - Page 27 KB3: Left-hand keyboard KB4: Right-hand keyboard KB5: Central keyboard Please note: via MIDI, ALL KEYBOARDS are polyphonic. owner's manual (arches)
-
Page 28: Sequencers
SEQUENCERS (arches) implements two different types of sequencers. Both have a maximum of 8 step and can be used together with the rest of the functionalities, like arpeggiators, free keyboards and single elements. These layered functionalities make the (arches) unique in its class, reaching a level of performance power unlike any other controller. - Page 29 From 1 to 8 step Mode: o Free (output is 0-5V in CV and 0-127 in MIDI CC) o Note (output is a CV and a MIDI note, can be quantized to chromatic or to a melodic scale) owner's manual (arches)
- Page 30 ‘PLAY’ touch button on the tactile surface. Now you can move your fingers on the strips and see what’s happening! Playing with track length, muting steps, scales, octaves and sequence type can be very inspiring for your music. owner's manual (arches)
-
Page 31: Trigger Sequencer
Enabled (this is for ‘arming’ the step sequencers, OCCUPYING the relevant outputs 20 to 24) o True o False Type (The sequencer have many sequence modes, opening up lots of possibilities) o Up o Down o UpDown o Pend owner's manual (arches) - Page 32 Only relevant for midi output. Note for the polyrhytmists out there. One of the most interesting feature of the (arches) trigger seq is that any track can have its clock divider and step length. If you have to re-sync or to start everything in sync again, just stop the sequencer and restart it with the ‘PLAY’...
-
Page 33: Replacing The Overlay
Easy peasy! INSTALLING (ARCHES) IN A EURORACK SYSTEM Please read carefully the instructions and observe the following pictures. The procedure is very easy but you will have to open the product so take your time and don’t rush! Tools required: ... - Page 34 2. Gently open the (arches) by tilting the panel toward the front. Picture 2. FYI: circled in green there’s the SD card memory slot. Use it to make a backup of your patterns or to update the firmware! See following paragraph to learn how to update the (arches) 3.
- Page 35 4. Take the eurorack ribbon cable and connect with the correct orientation: Picture 4. Done! owner's manual (arches)
-
Page 36: Updating The Firmware
SD card. Now, put the SD card back in the (arches). Put the (arches) back in the metal enclosure or your rack. Now, while keeping both encoders pressed, turn on the (arches), a crazy light show should start! Wait around... - Page 37 (arches) FW v. x.yy.zz Check that the version of the firmware you just flashed is shown on the screen and you are all set! PLEASE NOTE: DUE TO HEAVY CHANGES IN THE FILE SAVING ENVIRONMENT AND THE SUBSEQUENT COMPATIBILITY WITH THE WEB EDITOR, UPDATING FROM 1.00.10 TO 1.02.00 FW...
-
Page 38: Original Presets
ORIGINAL PRESETS: The presets included are just examples of what you can do with your (arches): To store and recall presets you can use the dedicated buttons. The OS will tell you if the preset is already existent or not. - Page 39 Output jacks: Expression: 17, Pitch: 18, Gate: 19 MIDI channel: 3 Right hand 6-element keyboard (KB4): Notes: D2, D2#, F2, A2#, C3, D3 Output jacks: Expression: 9, Pitch: 10, Gate: 11 MIDI channel: 5 owner's manual (arches)
- Page 40 **NEW IN (arches) 1.02.00** 005pat.ajs Maximum Expression V2 Every output is populated with GATE/CV combos and with every function for sliders! CENTER SLIDERS (numbered from left to right): SLIDER N° FUNC GATE LOOP RST TYPE OUTPUT OUTPUT FREE DISABLE FREE...
- Page 41 KB1. CV Output set to 6 and 7, from left to right accordingly. - Bottom left and right side slider are set to FREE sliders, set to MIDI CH 2, meaning they are associated with KB5. CV Output set to 8 and 9, from left to right accordingly. owner's manual (arches)
-
Page 42: Pattern Editor
TIP: The new pattern editor is especially useful to visualize and edit the notes for the keyboards and the step sequencer! TIP 2: Keyboards and free elements can be grouped and ungrouped like on the (arches). Use the drop down menus on the right hand side of the screen to see how you can edit the selected element. - Page 43 Currently you cannot create a new pattern from scratch using the Pattern Editor. You can both create different new patterns using the (arches) (even while connected to your pc!) and by connecting the SD card to your PC or Mac, with some copy-pasting action.
-
Page 44: Kickstarter Campaign Contributors
KICKSTARTER CAMPAIGN CONTRIBUTORS Without the involvement, the risk-taking stance and, the passion of the following people, this wouldn’t have been possible… We deeply thank one by one the persons that contributed to make (arches) a reality!!! Alessandro Bonino Tony La Batte... -
Page 45: Contacts
Website: www.sound-machines.it Email: info@artinoise.com REGULATORY: Product: soundmachines/artinoise (arches) Power consumption: 1000mA @ 12V This equipment has been tested and found to comply with the limits for a Class B digital device, pursuant to part 15 of the FCC Rules. These limits are designed to provide reasonable protection against harmful interference in a residential installation. This equipment generates, uses and can radiate radio frequency energy and, if not installed and used in accordance with the instructions, may cause harmful interference to radio communications.
Need help?
Do you have a question about the arches and is the answer not in the manual?
Questions and answers