Table of Contents
Advertisement
Quick Links
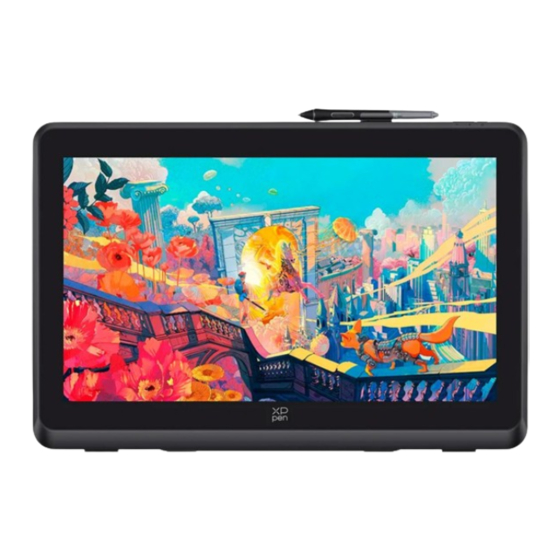
Artist 22 Plus Drawing Display
Product Overview
1. Display/Work Area
2. Pen Clip
3. Brightness Down
4. Brightness Up
5. Power Key
6. Power Indicator Light
a. Blue: When the drawing display is connected to the computer and the power supply is
switched on, the indicator will be on.
b. Orange: When the power supply of the drawing display is turned on, but no signal is
received from the computer.
c. Off: When the power supply of the drawing display is turned off.
7. Power Jack
8. USB-C Port
9. HDMI Port
10. Headphone Port
Package Includes
Drawing display
X3 Pro Smart Chip Stylus
Pen clip
Pen nibs
Nib removal tool
Power adapter and cable
1
Advertisement
Table of Contents

Summary of Contents for ARTIST 22 Plus
- Page 1 Artist 22 Plus Drawing Display Product Overview 1. Display/Work Area 2. Pen Clip 3. Brightness Down 4. Brightness Up 5. Power Key 6. Power Indicator Light a. Blue: When the drawing display is connected to the computer and the power supply is switched on, the indicator will be on.
-
Page 2: Connecting The Product
HDMI cable USB-C to USB-C cable USB-C to USB-A cable Cleaning cloth Glove Connecting the Product 1. HDMI Connection Connect the drawing display to your computer's HDMI and USB ports using the HDMI and "USB-C to USB-A" or "USB-C to USB-C" cables. Then connect the power cable to a power outlet. -
Page 3: Product Settings
Compatibility Windows 7 or later macOS 10.10 or later Chrome OS 88 or later Android(USB3.1 DP1.2) Linux Product Settings Driver Installation To ensure the device works properly, please install the driver before using. Please download the driver suitable for your product model from XPPen website (https://www.xp-pen.com). - Page 4 If there is no PenTablet_Driver on the list, go to Library -> Application Support -> PenDriver to add manually. Linux: Deb: Enter command sudo dpkg -i. Drag the installation file to the window and execute the command; Rpm: Enter command sudo rpm -i. Drag the installation file to the window and execute the command;...
- Page 5 Introduction to Driver If the device is not connected or the connection fails, you can see the following prompt. In this case, try to restart your computer or the driver, or contact our service staff for support. If the device is connected to your computer successfully, the device image and name will be displayed in the upper left corner of the driver.
-
Page 6: Device Settings
Device Settings You can set the drawing tablet functions, including: Work Area Pen Settings Work Area Go to Work Area and define the mapping between the device's work area and the screen display area. - Page 7 Screen You can set the mapping between the display area of the monitor and the device. If multiple monitors are used in copy mode, the work area of the device will be mapped to all monitors. When the pen moves in the work area, the cursor on all monitors will move at the same time.
- Page 8 Drag to select an area: Drag the cursor from one point to another within the red area. Use the cursor to select an area: Select "Click to set screen area", then click the upper left corner position and lower right corner position to select on the screen. Coordinates: Manually enter coordinates in the corresponding input boxes for X, Y, W and H.
- Page 9 Full area: The whole work area of the device. Customize active area: Three ways; within the red 1) Drag to select an area: Drag the cursor from one point to another area . 2) Use the pen to select an area: Select "Click to set active area", then use stylus to click the upper left corner position and lower right corner position on your device.
- Page 10 3) Coordinates: Manually enter coordinates in the corresponding input boxes for X, Y, W and H. Proportion: Scale your device's work area and selected display area proportionately. For example: After selecting proportion, if you draw a circle on the device, a circle will appear on the screen, but some part of the work area may not be used.
- Page 11 This product has preset three color modes: sRGB, Adobe RGB and DCI-P3. And all modes have been completed accurate and strict color gamut limits and calibration. So you can use it directly without the ICC limit again. If you want to configure ICC manually, you can select User mode in the display setting option under the driver interface, and configure it under native color.
-
Page 12: Pen Settings
Add an application to the application list, select an application, and then customize the function of the pen keys for that application. For example, if you select an application and change its configuration in the driver, the change is valid only when you use the application. When you switch to another application, the driver will recognize it automatically. - Page 13 Click "Customize" in the drop-down menu to go to shortcut key settings and customize pen key functions. Before setting, tick to select any of the options under Keyboard, Mouse Control, Others, and Run Application. Keyboard: You can set keyboard shortcut, for example, set it as “Alt+A” in 3D MAX, so the alignment tool...
- Page 14 can be used. You can set a combination of multiple keys such as Ctrl+Z and Ctrl+S. When you press the key, the set shortcut keys will all run once. Windows (Command): You can add a combination key containing system key, for example: to enter Win(Cmd)+Shift+3, you can press Shift+3 and the driver will bring the system key automatically.
-
Page 15: Driver Settings
Windows Ink (for Windows only): Windows supports handwriting input, if you need to use handwriting in software such as Microsoft Office/Whiteboard, please do not turn it off. Driver Settings Disable shortcut key: Disable the functions of all keys of the device. Disable message: When you press a key, no key message will be displayed at the bottom of the screen. - Page 16 "Unload" as per prompts. Mac: Go to Go -> Applications, find XP-PenPentabletPro and then click "UninstallPenTablet" as per prompts. Linux: Deb: Enter command sudo dpkg -r XPPenLinux and execute the command; Rpm: Enter command sudo rpm -e XPPenLinux and execute the command; Tag.gz: Unzip file.
- Page 17 If you need any further assistance, please contact us at: Website: www.xp-pen.com Email: service@xp-pen.com...
Need help?
Do you have a question about the 22 Plus and is the answer not in the manual?
Questions and answers