Advertisement
Available languages
Available languages
Quick Links
READ AND FOLLOW ALL SAFETY INSTRUCTIONS!
SAVE THESE INSTRUCTIONS AND DELIVER TO OWNER AFTER INSTALLATION
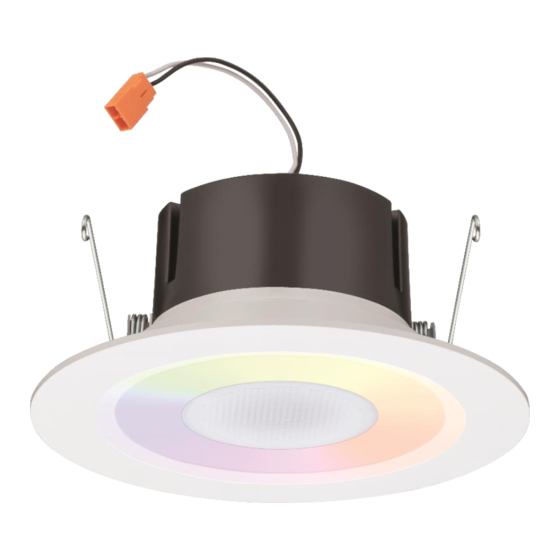
Product Information: Juno Smart LED RGBW Speaker Downlight Retrofit may be used for incandescent housings
already installed in application or with dedicated quick connect housings by Juno
Product Contents: Each unit carton contains the following: 1ea LED speaker light module, 1ea E26 adapter. Check
for all contents prior to installation
Required Tools (not included): Safety glasses, ladder, and gloves.
Product Listings: ETL certified to US and Canadian safety standards; wet location listed; and WSEC ASTEM E283
for Air-Tight rated with IC housings. 6SL minimum lamp compartment 6 inches (152 mm) in diameter by 5.75 inches
( 146 mm) tall or minimum lamp compartment 163 in³ (2649 cm³). Use only in open luminaires. Suitable for Type IC
or Type Non-IC luminaires. The retrofit kit is accepted as a component of a luminaries where the suitability of the
combination shall be determined by ETL or authorities having jurisdiction.
The retrofit kit is accepted as a component of a luminaire where the suitability of the combination shall be determined by authorities
having jurisdiction. Product must be installed by a qualified electrician in accordance with the applicable and appropriate electrical
codes. The installation guide does not supersede local or national regulations for electrical installation.
Do not make or alter any open holes in an enclosure of wiring or electrical components during kit installation.
This device is not intended for use with emergency exits or emergency lighting.
Failure to follow any of these instructions could void product warranties. Changes or modifications to this unit not expressly approved
by the party responsible for compliance could void the user's authority to operate the equipment. For a complete listing of product
Terms and Conditions, please visit www.acuitybrands.com. Acuity Brands Lighting, Inc. assumes no responsibility for claims arising
out of improper or careless installation or handling of its products.
One Lithonia Way · Conyers, GA 30012 · Phone 1-(800)705-7378
Visit us at
© 2023 Acuity Brands Lighting, Inc
INSTALLATION INSTRUCTIONS
J6SLC RGBW MW
.
www.acuitybrands.com/juno-recessed
.
Juno Smart LED RGBW Speaker LED Trim Kit
.
912-00386-001 REV F
DATE 10/2023
1
PAGE |
Advertisement

Subscribe to Our Youtube Channel
Summary of Contents for JUNO J6SLC RGBW MW
- Page 1 READ AND FOLLOW ALL SAFETY INSTRUCTIONS! SAVE THESE INSTRUCTIONS AND DELIVER TO OWNER AFTER INSTALLATION Product Information: Juno Smart LED RGBW Speaker Downlight Retrofit may be used for incandescent housings already installed in application or with dedicated quick connect housings by Juno Product Contents: Each unit carton contains the following: 1ea LED speaker light module, 1ea E26 adapter.
-
Page 2: Installation Instructions
INSTALLATION INSTRUCTIONS Juno Smart LED RGBW Speaker LED Trim Kit LED IMPORTANT SAFETY INSTRUCTIONS • To reduce the risk of death, personal injury, or property household detergent, rinsed with clean water and wiped damage from fire, electric shock, falling parts, dry. - Page 3 INSTALLATION INSTRUCTIONS Juno Smart LED RGBW Speaker LED Trim Kit • Unless individual product specifications deem otherwise: Never mount in places where fixture will be exposed to rain, high humidity, extreme temperature changes or restricted ventilation. • LED products are Polarity Sensitive. Ensure proper Polarity before installation.
-
Page 4: Installation Steps
Juno Smart LED RGBW Speaker LED Trim Kit Juno Retrofit LED Trim Compatibility in Recessed Cans Juno Retrofit LED trims are designed to work with most standard UL listed recessed incandescent housings. When used with standard medium base incandescent housings, the medium base socket adaptor must be used. Housing compatibility can be determined by measuring the recessed housing diameter and height as shown in the diagram. - Page 5 INSTALLATION INSTRUCTIONS Juno Smart LED RGBW Speaker LED Trim Kit Step 2: DETERMINE WIRING METHOD (SELECT ONE WIRING METHOD) A. E26 Socket Adapter: 1. Screw adapter into the base socket inside housing. (Figure 1) 2. Plug orange connector of adapter into the fixture’s mating orange connector.
- Page 6 INSTALLATION INSTRUCTIONS Juno Smart LED RGBW Speaker LED Trim Kit Step 4: SET UP EACH INSTALLED FIXTURE FOR SMART LIGHTING CONNECTIVITY 4.1 Ensure each unit installed is connected properly. Then, connect power back to fixtures by returning the circuit breaker to ON or by setting the appropriate fuse at the fuse box.
- Page 7 INSTALLATION INSTRUCTIONS Juno Smart LED RGBW Speaker LED Trim Kit B. SmartThings Hub Using an iOS or Android phone, add Speaker Light with SmartThings app. Click “+” then “Scan for New Devices”, as seen in Figure 5. Follow the prompts to connect each fixture.
- Page 8 INSTALLATION INSTRUCTIONS Juno Smart LED RGBW Speaker LED Trim Kit Step 5: SET UP SPEAKER GROUPING For this section, either watch the video by scanning the QR Code below or read the step-by-step instructions in this guide. https://qrco.de/bdzmIV Steps 5.1-5.6 Note: Every fixture installed can be set as a “MASTER”...
- Page 9 Note: This step must be completed if the Speaker Light is set up as a single device or as a Speaker Group. 6.2 Once connected to Juno Speaker (XXXX), audio will now cast from your device of choice to the Speaker Light(s).
-
Page 10: Troubleshooting Guide
INSTALLATION INSTRUCTIONS Juno Smart LED RGBW Speaker LED Trim Kit TROUBLESHOOTING GUIDE: Problem: Corrective Action: Fixture will not illuminate 1. Verify line voltage is correct. 2. Check wiring and connections 3. Verify power supply is on at breaker Circuit breaker trips when Check wire connections. - Page 11 INSTALLATION INSTRUCTIONS Juno Smart LED RGBW Speaker LED Trim Kit UPDATE SPEAKER LIGHT FIRMWARE: For this section, either watch the videos by scanning the QR Codes below or read the step-by-step instructions in this guide. https://qrco.de/bdzmFL https://qrco.de/bdzmHw Steps 1-4 Step 5-8 1.
- Page 12 INSTALLATION INSTRUCTIONS Juno Smart LED RGBW Speaker LED Trim Kit B. Scan for nearby devices Select the “Juno Connect” device. Figure 8 4. Proceed with steps prompted by SmartThings app to complete device set-up. 5. Select the unit on the SmartThings app. (Figure 9) Figure 9 One Lithonia Way ·...
- Page 13 INSTALLATION INSTRUCTIONS Juno Smart LED RGBW Speaker LED Trim Kit 6. Select the product tile icon in the upper right-hand corner of the device settings. (Figure 10) Figure 10 7. Select “Software Update” in the drop-down menu. (Figure 11) Figure 11 Note: If the fixture’s software is already up to date, the “Software Update”...
- Page 14 Then, the user can connect to Amazon Alexa or Google Home hub (the hub must be Zigbee compatible). Best Practices: Video #1. Add the Juno Speaker Light to SmartThings. https://qrco.de/bdzmFL Video # 2. Update the firmware on the Juno Speaker Light. https://qrco.de/bdzmHw Video # 3 Create a Speaker Group. https://qrco.de/bdzmIV One Lithonia Way ·...
-
Page 15: Notice D'installation
CONSERVER CES INSTRUCTIONS ET LES REMETTRE AU PROPRIÉTAIRE APRÈS L’INSTALLATION Informations sur le produit : La mise à niveau du plafonnier intensif avec haut-parleur RGBW DEL intelligent Juno peut être utilisée pour les boîtiers à incandescence déjà installés dans l’application ou avec les boîtiers à connexion rapide dédiés de Juno. - Page 16 NOTICE D’INSTALLATION Kit de garniture à DEL pour haut-parleur RGBW DEL intelligent Juno conditions d’utilisation du produit, veuillez visiter le site www.acuitybrands.com. Acuity Brands Lighting, Inc. décline toute responsabilité pour les réclamations résultant d’installation ou de manipulation incorrecte ou imprudente de ses produits.
- Page 17 NOTICE D’INSTALLATION Kit de garniture à DEL pour haut-parleur RGBW DEL intelligent Juno • À moins que des spécifications particulières applicables au produit ne l’exigent : Laisser un espace libre suffisant autour du luminaire. Éviter de couvrir les luminaires à DEL avec un isolant, de la mousse ou tout autre matériau pouvant limiter le refroidissement par conduction ou par convection.
-
Page 18: Étapes De L'installation
Compatibilité des garnitures à DEL de mise à niveau Juno dans les boîtiers encastrés Les garnitures à DEL de mise à niveau Juno fonctionnent avec la plupart des boîtiers à incandescence encastrés standard homologués UL. Si les boîtiers à incandescence sont à... - Page 19 NOTICE D’INSTALLATION Kit de garniture à DEL pour haut-parleur RGBW DEL intelligent Juno Étape 2 : DÉTERMINER LA MÉTHODE DE CÂBLAGE (SÉLECTIONNER UNE MÉTHODE DE CÂBLAGE) A. Adaptateur de douille E26 : 1. Visser l’adaptateur dans la douille de la base du boîtier. (Figure 1) 2.
- Page 20 NOTICE D’INSTALLATION Kit de garniture à DEL pour haut-parleur RGBW DEL intelligent Juno Étape 4 : CONFIGURER CHAQUE LUMINAIRE INSTALLÉ POUR LA CONNECTIVITÉ DE L’ÉCLAIRAGE INTELLIGENT 4.1 S’assurer que chaque unité installée est correctement connectée. Ensuite, rétablir l’alimentation des luminaires en remettant le disjoncteur sur ON ou en réactivant le fusible approprié...
- Page 21 NOTICE D’INSTALLATION Kit de garniture à DEL pour haut-parleur RGBW DEL intelligent Juno B. Concentrateur SmartThings À l’aide d’un téléphone iOS ou Android, ajouter l’enceinte lumineuse avec l’application SmartThings. Cliquer sur « + » puis « Rechercher de nouveaux appareils » comme indiqué à la figure 5.
- Page 22 NOTICE D’INSTALLATION Kit de garniture à DEL pour haut-parleur RGBW DEL intelligent Juno Étape 5 : CONFIGURATION DU REGROUPEMENT DES ENCEINTES Pour cette section, vous pouvez soit regarder la vidéo en balayant le code QR ci-dessous, soit lire les instructions étape par étape dans ce guide.
- Page 23 Remarque : Cette étape est obligatoire si l’enceinte lumineuse est configurée comme appareil unique ou en tant qu’un groupe d’enceintes. 6.2 Une fois connecté à Juno Speaker (XXXX), l’audio sera désormais diffusé à partir de l’appareil de votre choix vers la ou les enceintes.
-
Page 24: Guide De Dépannage
NOTICE D’INSTALLATION Kit de garniture à DEL pour haut-parleur RGBW DEL intelligent Juno Remarque : L’appareil intelligent (téléphone intelligent, tablette, etc.) est nécessaire pour contrôler le volume et l’audio de l’enceinte. Utiliser votre appareil intelligent pour contrôler l’audio. Le concentrateur SmartThings, Amazon Alexa et Google Home peuvent contrôler uniquement l’éclairage. - Page 25 NOTICE D’INSTALLATION Kit de garniture à DEL pour haut-parleur RGBW DEL intelligent Juno METTRE À JOUR LE MICROLOGICIEL DE L’ENCEINTE LUMINEUSE : Pour cette section, vous pouvez soit regarder les vidéos en balayant les codes QR ci-dessous, soit lire les instructions étape par étape dans ce guide.
- Page 26 NOTICE D’INSTALLATION Kit de garniture à DEL pour haut-parleur RGBW DEL intelligent Juno Balayer un code QR Utiliser l’appareil photo de votre appareil intelligent pour balayer le code QR de SmartThings sur le côté de l’appareil (figure 7). Remarque : S’assurer de ne pas balayer le code QR des instructions d’installation également présent sur l’habillage de l’appareil.
- Page 27 NOTICE D’INSTALLATION Kit de garniture à DEL pour haut-parleur RGBW DEL intelligent Juno 5. Sélectionner l’unité dans l’application SmartThings. (Figure 9) Figure 9 6. Sélectionner l’icône de la vignette du produit dans le coin supérieur droit des configurations de l’appareil. (Figure 10) Figure 10 One Lithonia Way ·...
- Page 28 NOTICE D’INSTALLATION Kit de garniture à DEL pour haut-parleur RGBW DEL intelligent Juno 7. Sélectionner « Software Update » (mise à jour du logiciel) dans le menu déroulant. (Figure 11) Figure 11 Remarque : Si le logiciel du luminaire est déjà à jour, le bouton « Software Update » (mise à jour du logiciel) sera grisé et le sélectionner n’entraînera pas de mise à...
- Page 29 Kit de garniture à DEL pour haut-parleur RGBW DEL intelligent Juno Meilleures pratiques : Vidéo n° 1. Ajouter l’enceinte lumineuse Juno à SmartThings. ME SCANNER https://qrco.de/bdzmFL Vidéo n° 2. Mettre à jour le micrologiciel de l’enceinte lumineuse Juno. ME SCANNER https://qrco.de/bdzmHw Vidéo n° 3. Créer un groupe d’enceintes. ME SCANNER https://qrco.de/bdzmIV...
-
Page 30: Instrucciones De Instalación
GUARDE ESTAS INSTRUCCIONES Y ENTRÉGUESELAS AL PROPIETARIO DESPUÉS DE LA INSTALACIÓN. Información del producto: Juno Smart LED RGBW Speaker Downlight Retrofit se puede utilizar para carcasas incandescentes ya instaladas en la aplicación o carcasas de conexión rápida específicas de Juno. - Page 31 INSTRUCCIONES DE INSTALACIÓN Juno Smart LED RGBW Speaker LED Trim Kit INSTRUCCIONES DE SEGURIDAD IMPORTANTES PARA PRODUCTOS DE LED • Para reducir el riesgo de muerte, lesiones personales o daño a detergente de uso doméstico, suave y no abrasivo; luego, la propiedad que pueda surgir de incendios, descargas enjuáguelos con agua limpia y séquelos.
- Page 32 INSTRUCCIONES DE INSTALACIÓN Juno Smart LED RGBW Speaker LED Trim Kit • A menos que las especificaciones particulares del producto indiquen lo contrario, la temperatura ambiente máxima debe ser de 90 °C. No haga funcionar la luminaria a temperaturas más elevadas que esta.
- Page 33 2) L’appareil doit accepter tout brouillage radioélectrique subi, même si le brouillage est susceptible d’en compromettre le fonctionnement. Compatibilidad de Juno Retrofit LED Trim en carcasas empotradas Las molduras Juno Retrofit LED están diseñadas para funcionar con la mayoría de las carcasas incandescentes empotradas de 6 in con certificación UL. Cuando se usa con carcasas incandescentes de base mediana estándar, se debe usar el adaptador de base...
- Page 34 INSTRUCCIONES DE INSTALACIÓN Juno Smart LED RGBW Speaker LED Trim Kit Paso 2: DETERMINE EL MÉTODO DE CABLEADO (SELECCIONE UN MÉTODO DE CABLEADO) A. Adaptador de enchufe E26: 1. Enrosque el adaptador en el enchufe de la base en el interior del alojamiento.
- Page 35 INSTRUCCIONES DE INSTALACIÓN Juno Smart LED RGBW Speaker LED Trim Kit Paso 4: CONFIGURE LAS LUMINARIAS INSTALADAS PARA LA CONECTIVIDAD DE ILUMINACIÓN INTELIGENTE Luego, vuelva a conectar la corriente a las luminarias ENCENDIENDO el disyuntor o colocando el fusible correspondiente en la caja de fusibles.
- Page 36 INSTRUCCIONES DE INSTALACIÓN Juno Smart LED RGBW Speaker LED Trim Kit B. Concentrador SmartThings Con un teléfono iOS o Android, agregue la luz con altavoz con la aplicación SmartThings. Haga clic en "+" y luego en "Scan for New Devices" (Buscar nuevos dispositivos), como se ve en la figura 5.
- Page 37 INSTRUCCIONES DE INSTALACIÓN Juno Smart LED RGBW Speaker LED Trim Kit Paso 5: CONFIGURE LOS GRUPOS DE ALTAVOCES Para esta sección, puede ver el video escaneando el código QR a continuación o leer las instrucciones paso a paso en esta guía.
- Page 38 Nota: Este paso debe completarse si la luz con altavoz está configurada como un único dispositivo o como un grupo de altavoces. 6.2 Una vez conectado a Juno Speaker (XXXX), el audio se emitirá desde el dispositivo de su elección a las luces con altavoz.
-
Page 39: Guía Para La Solución De Problemas
INSTRUCCIONES DE INSTALACIÓN Juno Smart LED RGBW Speaker LED Trim Kit GUÍA PARA LA SOLUCIÓN DE PROBLEMAS: Problema: Acción correctiva: La luminaria no se enciende 1. Verifique que la tensión de la línea sea correcta. 2. Revise el cableado y las conexiones. - Page 40 INSTRUCCIONES DE INSTALACIÓN Juno Smart LED RGBW Speaker LED Trim Kit ACTUALICE EL FIRWARE DE LA LUZ CON ALTAVOZ: Para esta sección, puede ver los videos escaneando los códigos QR a continuación o leer las instrucciones paso a paso en esta guía.
- Page 41 INSTRUCCIONES DE INSTALACIÓN Juno Smart LED RGBW Speaker LED Trim Kit B. Busque dispositivos cercanos Seleccione el dispositivo "Juno Connect". Figura 8 4. Siga los pasos indicados por la aplicación SmartThings para completar la configuración del dispositivo. 5. Seleccione la unidad en la aplicación SmartThings (Figura 9) Figura 9 One Lithonia Way ·...
- Page 42 INSTRUCCIONES DE INSTALACIÓN Juno Smart LED RGBW Speaker LED Trim Kit 6. Seleccione el ícono de tres puntos del producto en la esquina superior derecha de la configuración del dispositivo. (Figura 10) Figura 10 7. Seleccione "Software Update" (Actualización de software) en el menú desplegable. (Figura 11) Figura 11 Nota: Si el software de la luminaria ya está...
- Page 43 Alexa o Google Home (el concentrador debe ser compatible con Zigbee). Buenas prácticas: Video n.º 1: agregue la luz con altavoz Juno a SmartThings. ESCANÉAME https://qrco.de/bdzmFL Video n.º 2: actualice el firmware de la luz con altavoz Juno. ESCANÉAME https://qrco.de/bdzmHw Video n.º 3: cree un grupo de altavoces. ESCANÉAME https://qrco.de/bdzmIV...
Need help?
Do you have a question about the J6SLC RGBW MW and is the answer not in the manual?
Questions and answers