Advertisement
WTA
Installation Guide
Sprinter Side Ladder
It is crucial to ensure that all WTA products are assembled
and securely attached to your vehicle. Failure to do so may
result in automobile accidents, posing a significant risk of
bodily injury or even death to yourself and others. As the
owner, it is your responsibility to properly assemble and
secure WTA products, diligently inspecting the mounting
points and attachments before use, and regularly checking
for any signs of wear or damage.
To guarantee optimal safety, we strongly advise engaging
the services of a professional installer for the installation of
any aftermarket accessories to your vehicle. If you lack
mechanical experience or are unfamiliar with the installation
procedures, it is imperative to have the product installed by
a qualified professional or individuals who possess the
necessary expertise. Remember, the responsibility lies with
you, and it must be taken seriously to ensure the safety of all
individuals involved.
Advertisement
Table of Contents

Summary of Contents for WTA QTY-1
- Page 1 Installation Guide Sprinter Side Ladder It is crucial to ensure that all WTA products are assembled and securely attached to your vehicle. Failure to do so may result in automobile accidents, posing a significant risk of bodily injury or even death to yourself and others. As the owner, it is your responsibility to properly assemble and secure WTA products, diligently inspecting the mounting points and attachments before use, and regularly checking for any signs of wear or damage. To guarantee optimal safety, we strongly advise engaging the services of a professional installer for the installation of any aftermarket accessories to your vehicle. If you lack mechanical experience or are unfamiliar with the installation procedures, it is imperative to have the product installed by a qualified professional or individuals who possess the necessary expertise. Remember, the responsibility lies with you, and it must be taken seriously to ensure the safety of all individuals involved. ...
- Page 2 M10-30 HEXGON HEAD SCREW M6-30 HEXGON HEAD M10-22 HEXGON HEAD SCREW LADDER BOTTOM LADDER TOP QTY-2 SCREW QTY-4 QTY-2 QTY-1 QTY-1 M6 FLAT WASHER M10 SPRING LOCK WASHER M10 NYLOCK NUT MOUNT PLATE M6-16 BUTTON HEAD SCREW QTY-2 QTY-2...
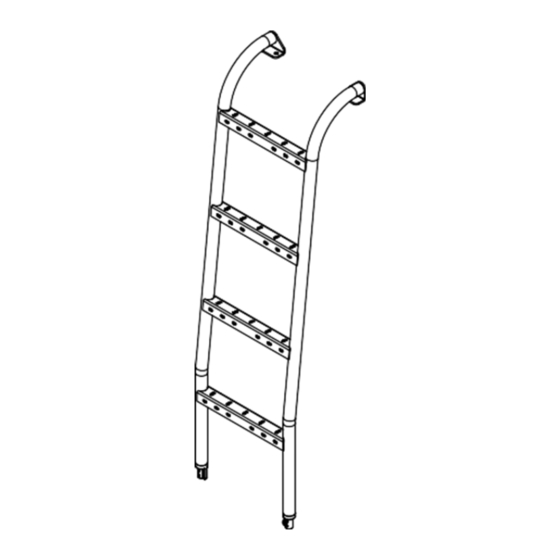
- Page 3 FIGURE 1 LET’S GET STARTED! PLACE THE LADDER HALVES FRONT SIDE DOWN, INSERT THE COUPLERS INTO ONE HALF (SEE FIGURE 1), AND TIGHTEN DOWN USING THE M6‐16 SCREWS. SLIDE THE OTHER LADDER HALF ONTO THE COUPLERS AND TIGHTEN DOWN. NOTE‐ IF DESIRED YOU CAN USE BLUE LOCTITE ON THE SCREWS. FIGURE 2 ...
- Page 4 RAIL NUT NEXT, SLIDE THE TWO (2) RAIL NUTS INTO THE ROOF RAIL ON YOUR VAN. NOTE- IF YOU’VE ALREADY INSTALLED A ROOF RACK, THIS MAY BE TIME CONSUMING. NOW POSITION THE LADDER ON THE VAN, HANGING IT ON THE ROOF RAIL. LOOSELY SCREW THE TOP OF THE LADDER DOWN TO THE ROOF RAIL USING THE M10-22 SCREWS AND THE M10 SPRING LOCK WASHERS AND M10 FLAT WASHERS JUST ENOUGH ...
- Page 5 TAKE THE MOUNT PLATE (SEE RIGHT) AND LOOSELY ATTACH THEM TO THE BOTTOM OF THE LADDER USING THE M10‐30 SCREWS, MOUNT PLATE M10 FLAT WASHERS, AND M10 NYLOCK NUTS. NOTE‐ MAKE SURE THAT THE LADDER IS STRAIGHT UP AND DOWN. Line up the support plate with the ladder and drill 5 holes with ¼ inches drill bit. Support the plate on to the pinch weld with M6 bolt and nuts. Support the ladder to the support plate using M10‐30 bolts and nuts.
Need help?
Do you have a question about the QTY-1 and is the answer not in the manual?
Questions and answers