Table of Contents
Advertisement
Quick Links
Advertisement
Table of Contents

Summary of Contents for FirstLook FL360
- Page 1 FL360 Camera User Manual v.1.0 SEE MORE. ACHIEVE MORE. www.firstlook.net...
-
Page 2: Table Of Contents
TABLE OF CONTENTS TABLE OF CONTENTS ............................. 1 OVERVIEW ..............................2 GENERAL PRECAUTIONS ..........................3 FL360 CAMERA OVERVIEW ........................... 6 FL360 MULTIFUNCTION LED ......................... 7 BATTERY LIDS ..............................8 CHARGING PROCEDURES ..........................10 PREPARING THE CONTROL TABLET ......................11 CONNECTING THE CAMERA ........................12 FIRSTLOOK APP OVERVIEW ......................... -
Page 3: Overview
The complete spherical image taken by FL360 allows the rescue technician to quickly view any space in its entirety. FL360 Camera has the capability to record 360° images or videos and communicate via two-way audio. All recorded media is digitally overlaid on a map, and is time, date, and GPS-stamped (GPS coordinates are mobile device dependent and uses control tablet’s position). -
Page 4: General Precautions
GENERAL PRECAUTIONS Read me first! • Please read this manual before using FL360 Camera to ensure safe and proper usage of the device. Note that images may differ in appearance from the actual product, and that content is subject to change without prior notice. - Page 5 Heat Precautions The FL360 heatsink will become warm or hot to touch when operated for long durations or in areas with limited airflow. This is normal as the on-board processor within the camera uses the heatsink to dissipate heat to ensure smooth and uninterrupted operation of FL360.
- Page 6 • Do not mix and match old, new, used, and unused batteries. • Never leave batteries unattended while charging. • Always take the batteries out of the camera body when the FL360 Camera is not in use. • Do not expose batteries to extreme heat or moisture.
-
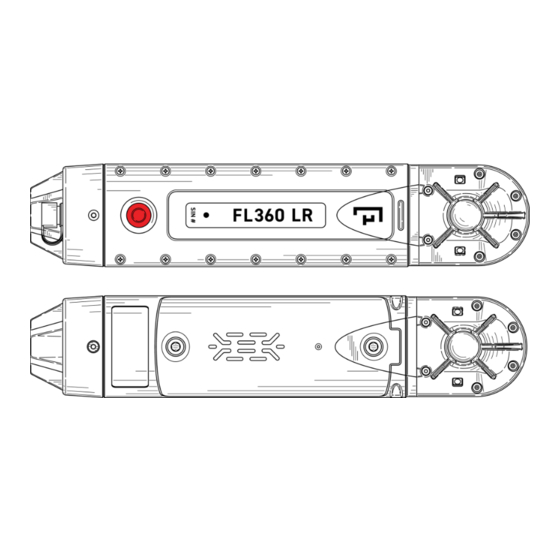
Page 7: Fl360 Camera Overview
FL360 CAMERA OVERVIEW... -
Page 8: Fl360 Multifunction Led
Battery level between 10% and 25 % Every second Battery level 10% or less - replace batteries White Continuous/Solid Using CR123A Batteries / Battery malfunction when using FL360 Rechargeable Li-ion Batteries - shut down camera and test batteries Blue-Green Alternating Camera firmware update in progress... -
Page 9: Battery Lids
Environmental Battery Lid (0607-59-003) The FL360 Environmental Battery Lid is the go-to lid for the FL360 Camera. This lid is designed to allow the camera to be used for short periods under water at depths of up to 3 meters. - Page 10 The Speaker Microphone Battery Lid is water resistant for rain, water spray, and accidental dunking (IP67). If you wish to use the FL360 Camera under water, exchange the Speaker Microphone Battery Lid with the Environmental Battery Lid. ● Ensure that the gasket on the interior side of the Speaker Microphone Battery Lid is in good condition, free from debris, and contains no nicks or cuts that could negatively affect the seal (Figure ●...
-
Page 11: Charging Procedures
Both the tablet and the power bank can be charged with the USB wall charger provided in the kit. Please refer to the kit specific manual for detailed instructions. Charging FL360 Batteries The FL360 Batteries can be charged using the battery charger provided. Please refer to the kit specific manual for detailed instructions. -
Page 12: Preparing The Control Tablet
NOTE: In case of a factory reset / use of a different tablet / uninstall of the app, the Firstlook App will have to be re-installed. Download and install the Firstlook App as follows: 1. -
Page 13: Connecting The Camera
NOTE: It is good practice to store the camera with batteries removed. Please be aware the FL360 Camera (not LR), while turned off, will slowly drain batteries left in the camera whereas the FL360 LR Camera will not drain batteries while turned off. - Page 14 Step 5 Press and hold the FL360 Camera power button for 4 seconds until the multifunction LED turns blue, indicating the camera is powering up. The camera can take 30-40 seconds to complete the initial boot sequence. After finishing booting up, the multifunction LED will indicate the charge level of the battery (refer to FL360 MULTIFUNCTION LED on page 7 for details).
- Page 15 Step 8 Open the Firstlook App, click on the Dashboard icon in the left navigation menu if the dashboard is not visible, and tap the green “CONNECT” button (Figure 15) to connect to the FL360 Camera (the initial connection can take a few seconds).
- Page 16 Wired Connection Operation Use wired mode if the wireless signal between the FL360 Camera and Control Tablet is unavailable or unstable. Repeat steps 1-6 from the wireless mode operation described above on page 12 Step 7 Refer to the kit specific manual for cable connection options in conjunction with a pole or to hang the camera from a cord.
-
Page 17: Firstlook App Overview
FIRSTLOOK APP OVERVIEW Dashboard The Dashboard provides information and access to the diagnostics and multiple control functions, settings, mapping, gallery as well as device firmware version and App version when the camera is connected. Figure 18 - Dashboard Diagnostics Once the Camera has been connected the App will run full system diagnostics. Either a green checkmark will appear or a caution circle (Figure 19). - Page 18 Live Screen Live screen with Operator Controls (Figure 20). NOTE: When connected as “Observer” some functions are not available. Figure 20 - Live screen Zoom The pinch/zoom gesture (Figure 21) allows the operator to digitally zoom (x3) in or out of a live screen or recorded video or image.
- Page 19 Tap the mute button (Figure 24), on the left side of the live screen, to avoid hearing any banging or scraping noises while the operator moves the camera in position or to prevent feedback when the FL360 Camera and Control Tablet are in proximity.
- Page 20 360° image. Each image is date, time, and GPS stamped. Images are stored in the tablet’s internal storage. They can be easily accessed and viewed in the Gallery or Map of the Firstlook app. Figure 28 - Record image...
- Page 21 Meridian Line with Front & Rear Indicators The Meridian Line (Figure 29) indicates the merging field of view of both FL360 Camera lenses. The Meridian Line has a bull’s eye (Figure 30) in the center when looking straight forward as seen from the rear of the camera past the front of the camera bumper.
- Page 22 Control Tablet. Lighting Boost Press and hold the lightbulb icon to enable intense lighting boost (FL360 LR only). Boost mode will automatically disable after 10 seconds, and the illumination will return to the previous set level. When Boost is enabled, an indicator will appear in the top right (Figure 32 far right).
- Page 23 Gallery Access the Gallery via the navigation pane on the left side of the screen to access previously recorded images and videos. Tap thumbnail to see the recorded image or video full screen. Images and videos are stored in full 360° spherical format and will allow the operator to review the entire space the camera was in at the time or recording.
- Page 24 Tap the cluster and you will be taken to the gallery and able to view videos or images recorded at a specific location. The FL360 App allows multiple Maps to be downloaded and these can cover different areas and multiple map resolutions.
- Page 25 Settings In the “Settings” section of the Dashboard in the Firstlook app there are default settings for the “Meridian Line,” “Auto Rotate,” and “Joystick” that can be toggled On or Off. Selections of these settings will persist on app restarts. Tap “More Settings” (Figure 35) or “Settings” in the navigation pane on the left side of the screen for additional options.
- Page 26 Figure 37 - Additional Settings Language – Available languages for the Firstlook app (default language is the language of the Control Tablet’s Operating System). Firmware Version – Current firmware version of the camera. App Version – Current version of the Firstlook application.
-
Page 27: Changing Camera Id And Password
CHANGING CAMERA ID AND PASSWORD To change the name (Camera ID) and password of the FL360 Camera, first connect to the Camera using the wired method as described on page 15, then tap “More Settings” to go the Camera Settings section (Figure 38). -
Page 28: Search Operation
Tip: It is possible to record an image or video for review later. This can be useful in scenarios where the time to have the Firstlook camera in a space is limited (e.g. time is limited due to safety concerns (e.g. -
Page 29: Battery Handling
FL360 Smart Battery Holder. To minimize discharging when not in use, it is recommended to always store FL360 Rechargeable Li-ion Batteries in the FL360 Smart Battery Holder. -
Page 30: Alternate Power
Each Adapter Tube will hold two CR123A sized batteries (Figure 42). NOTE: the placement of the CR123A Initiator does not matter as long as the FL360 CR123A Initiator is combined with one CR123A lithium battery in the same Adapter Tube and an additional two CR123A lithium batteries in the other Adapter Tube (Figure 42). -
Page 31: Care & Storage
FL360. Storage - FL360 Camera, Tablet, and Batteries ● Please avoid using or storing your FL360 Camera and tablet in the following conditions, as this may damage the camera: ●... -
Page 32: Fl360 Specifications
Protected from immersion in water at depths of up to 3 meters Anchor Points Dual Anchor Points: Rear 3/18-16 UNC – Front 10-32UNF * FL360LR requires the use of FL360 CR123A Initiator ** Boost Mode is supported on FL360LR only... -
Page 33: Warranty
Agility Technologies Corporation. Agility Technologies follows the Canadian competition bureau enforcement guidelines. SERVICE If you have questions about the operation of FL360, or if your FL360 system requires service, please contact FIRSTLOOK at +1 604 259-1579 or by email at support@firstlook.net.
Need help?
Do you have a question about the FL360 and is the answer not in the manual?
Questions and answers