Table of Contents
Advertisement
Quick Links
Advertisement
Table of Contents

Summary of Contents for Reno EVC10
- Page 1 Electric Vehicle AC Charger Installation Instructions...
-
Page 2: Table Of Contents
USER MANUAL USER MANUAL WARNING & CAUTION WARNING & CAUTION 1. Important Safety Instructions 1.1 Overall Warnings & Cautions TABLE OF CONTENTS WARNING: To avoid fire, injury or death, carefully read and follow the instructions during installation, operation and maintenance. 1. - Page 3 USER MANUAL USER MANUAL WARNING & CAUTION WARNING & CAUTION Consignes De Sécurité Importantes 1.2 Installation Requirements WARNING: Disconnect electrical power prior to installing the charging station. 1.1 Avertissement & Mise En Garde Généraux WARNING: Be sure to preview the user manual and ensure local building and electrical codes are AVERTISSEMENT : Pour éviter les risques d’incendie, de blessure ou de mort, il faut lire et suivre reviewed before installing the AC charger.
-
Page 4: Product Introductions
USER MANUAL USER MANUAL WARNING & CAUTION WARNING & CAUTION 2. Product Introductions 1.2 Exigence Avant L’installation AVERTISSEMENT : Assurez-vous de consulter le manuel d'utilisation et assurez-vousque les CAUTION: Avoid placing the charger near hot objects and at high temperature locations codes locaux du bâtiment et de l'électricité... -
Page 5: Verify Contents
USER MANUAL USER MANUAL 3. Verify Contents 2.3 Specifications Check the box to ensure you have this installation guide and these parts: Model Number EVC10 Version Rated Input Voltage 208/240VAC Rated Output Current 16/32/40/48/70/80A AC Power Frequency 50-60 Hz Electric Vehicle AC Charger... -
Page 6: Gather Tools
USER MANUAL USER MANUAL 4. Gather Tools Product Name Quantity Description Tools required before installing the Wall-Mounted charger, gather the following tools: With attached input power cable and AC Charger output charging cable 1. Wire stripper 2. Adjustable Wrench User Manual Please read carefully before use 3. -
Page 7: Plan The Mounting
USER MANUAL USER MANUAL 5. Plan The Mounting STEP 3 (Only for 4G Version) WARNING: In areas with frequent thunderstorms, add surge protection at the service Tighten 13 screws on the front cover after the front panel for all circuits. Ensure all power and ground connections, especially those at the cover is put back, the recommended screw torque is breaker and bus bar, are clean and tight. -
Page 8: Mount The Charging Station
USER MANUAL USER MANUAL 6. Mount the Charging Station STEP 4 STEP 1 Overall outlook picture after installation. Use 4 sets Hexagonal Expansion Screws to secure the wall -mounted bracket on the wall. Then level the brackets. STEP 2 STEP 3 Wall-mounted cable winding Optional cable hanging (optional accessory) Align the rear notch of charger with the... -
Page 9: Wire The Circuit
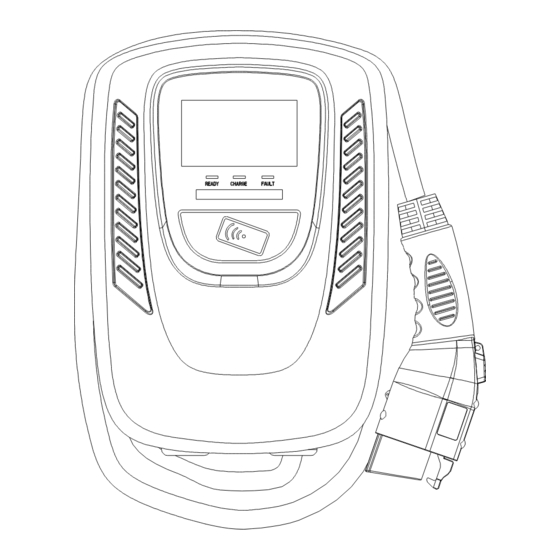
USER MANUAL USER MANUAL 7. Wire The Circuit 8. Operate Your Device WARNING: This device must be grounded. Disconnect electrical power prior to installing WARNING: This device should be supervised when used around children. the charging station. CAUTION: Please use the charger properly. Do not hit or press hard on the enclosure. If WARNING: Improper connection of the equipment-grounding conductor would result in a the case is damaged, please contact a professional technician. - Page 10 USER MANUAL USER MANUAL 8.2 Operating Steps with RFID (Optional) STEP 2 Plug the Charging Connector: CAUTION: Please keep your RFID card properly to avoid unnecessary loss. Please plug the charging connector into the vehicle charging inlet. STEP 1 Standby Mode: STEP 3 After power-on, blue light (READY), green light (CHARGE) and red light (FAULT) all on.
-
Page 11: Light Codes
USER MANUAL USER MANUAL 9. Light Codes STEP 3 9.1 After Start UP Swipe the RFID Card: Waiting to Swipe the RFID card first and plug in the charging Standby, charge, Charging in Finished waiting to plug Fault communicating progress charging connector within 120 seconds, otherwise you need with vehicle... -
Page 12: Warranty And Maintenance
USER MANUAL USER MANUAL 10. Warranty and Maintenance • The warranty period for this charger is three years. • During the warranty period for any malfunction under normal use according to the User Manual (to be determined by certified maintenance technicians of sellers), the product shall be repaired free of charge.
Need help?
Do you have a question about the EVC10 and is the answer not in the manual?
Questions and answers