Table of Contents
Advertisement
Quick Links
Advertisement
Table of Contents

Summary of Contents for UCOCARE P1
- Page 1 Video Doorbell and Wireless Chime Quick Start Guide...
-
Page 2: Table Of Contents
Table of Content Surprise! What’s Included Product Overview 1.Meet Our Video Doorbell 2.Meet Our Wireless Chime APP Download and Device Setup 1.APP Installation 2.Account Registration 3.Device Setup Wireless Chime Connection Install the Video Doorbell Recharge the Video Doorbell Troubleshooting... -
Page 3: What's Included
What’s Included Screw Hole Chime with 3 of Video Doorbell Positioning-Card AAA Batteries Screw & Tools 2 x Stickers Micro USB Charging Cable User Manual User Manual... -
Page 4: Product Overview
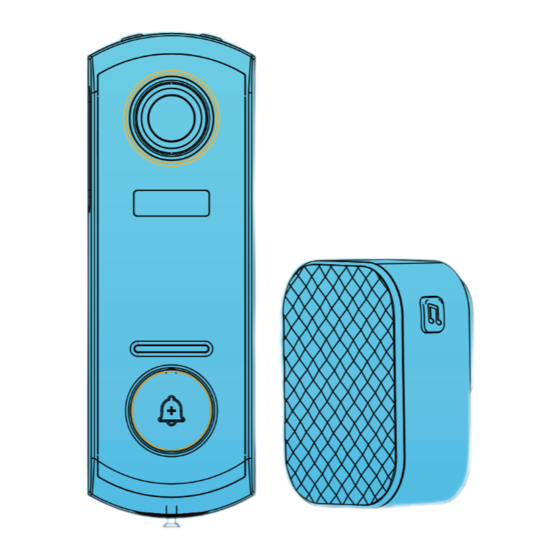
Product Overview 1.Meet Our Video Doorbell (Front Side) (Back Side) (Left Side) (Bottom Side) Anti-theft Alarm Button FHD Optical Lens Reset key PIR Motion sensor USB charge port Microphone Micro SD card slot LED Indicator Charging indicator Doorbell Button Speaker Safety Screw... - Page 5 Product Overview Short press for more than 1 second to power on the device; Doorbell Button Long press for more than 5 seconds to power off the device. Press and hold RESET for 5 seconds to reset Reset Key the device. You will hear 'Bugu' sound from the device if reset successfully Support local micro SD card storage (maximum Micro SD Card...
-
Page 6: Meet Our Wireless Chime
Product Overview 2.Meet Our Wireless Chime (Left Side) (Front Side) (Right Side) (Back Side) (Bottom Side) Ringtone button Battery Slots Horn Indicator light Connection/volume button: long press to link the doorbell, and short press to change the volume(3 levels of volume adjustments) -
Page 7: App Download And Device Setup
APP Download and Device Setup 1.APP Installation Method 1: Download the ‘CloudEdge’ APP from the APP Store (iOS devices) or Google Play (Android devices). Method 2: Scan the QR code below to download the app. Notes: Please ALLOW the below two permissions when using the APP at the first time. -
Page 8: Account Registration
APP Download and Device Setup 2. Account Registration Step 1: Open the App, tap ‘‘Sign up now’’ to register. If you do already have an account, tap “Log In” to log in. Step 2: Enter your email address or phone number (email address is recommended), and check the privacy agreement.Then enter the nick name and password. -
Page 9: Device Setup
APP Download and Device Setup 3.Device Setup 1. Tap ‘Add Device’ 2. Select ‘Smart Doorbell’ and tap ‘Smart Video Doorbell’ 3. Short press the Doorbell Button for about 1 second to power on the device 4. Tap ‘Next’ 5. Please long press and hold the Reset Key to reset the device, and wait till the LED indicator to flash RED, tap ‘Next’. - Page 10 APP Download and Device Setup 6. Select your 2. 4 Ghz wifi network, and enter the wifi passwords correctly. (If your wifi network is the combined network of the 2. 4 Ghz and 5GHz network, please refer to Tips (4) in the end of this part) 7.
- Page 12 APP Download and Device Setup 3) Please use a card pin or the pen point to press and hold the Reset Key to reset the device, you should hear a sound ‘Bugu’ from the device, which means the device is reset successfully, and please wait till the LED indicator to flash RED.
-
Page 13: Wireless Chime Connection
Wireless Chime Connection 1. Power on the wireless chime Please remove the AAA battery protective film first and mount the batteries in the correct direction per the positive and negative marks on the slot of the wireless chime.(The model of the battery in the wireless chime is the AAA battery, you can easily get the replacement from the market if the provided one is dead.The AAA battery is not rechargeable.) - Page 14 Wireless Chime Connection 3. Within 5 seconds after you completed step 2, please short press the button of the video doorbell to link. The chime will sing, which means that the connection is successful. (please place the video doorbell close to the wireless chime before setting up their connec- tion) 4.
-
Page 15: Install The Video Doorbell
Install the Video Doorbell 1. Take off the mounting bracket from the video doorbell 2. Mount the bracket on the wall: Option1:Mark the screw holes and mount the bracket on your wall using the provided screws. Option 2: Using the adhesive stickers, which are very sturdy. Please be noted that the adhesive stickers take approximately 1 hour to reach half of the maximum bond strength and 72 hours to reach the final bond strength. -
Page 16: Recharge The Video Doorbell
Recharge the Video Doorbell Please use a 5V/2A micro USB cable (included) or a 5V/2A USB charger (not included) to charge the video doorbell. (A full charge takes about 8-12 hours.) When the batteries are being charged, the red light that next to the USB port is on;... -
Page 17: Troubleshooting
Troubleshooting 1. APP can't be registered successfully Please check if the network of the mobile phone is normal; Please tick the software service agreement and privacy policy; Please check if the verification code is in the spam mail; Please use WIFI to register if mobile network cannot be registered. If the mobile network and WIFI prompts cannot obtain the server address, please check if other software can be used normally;... - Page 18 Troubleshooting WiFi password reason Check the WiFi password connected of the camera same as the WiFi password of the connected router. Check if the entered WiFi password has space or special characters (@,#,%,&). Disconnected 5Ghz WiFi, unable to connect to WiFi Turn off the 5Ghz network and keep the 2.
- Page 19 Use your phone’s camera to scan the QR code of the new account that you want to share with. Product Name: Video Doorbell Brand:UCOCARE Model Number/Type: P1 Batch Number: SJ98371573 Manufacturer: Xinyi Shangyiyuan Dianzi Shangwu Youxian Gongsi Customers Contact Email: svipcustomers@163.com...
Need help?
Do you have a question about the P1 and is the answer not in the manual?
Questions and answers