Table of Contents
Advertisement
Advertisement
Table of Contents

Related Manuals for BECSY UC200

Summary of Contents for BECSY UC200
- Page 1 Universal Remote Control User Manual UC200/UC500...
-
Page 2: Table Of Contents
ᆞContents 1. Product Composition and Name of Each Part for UC200/UC500-- --- 1~2 2. T erminologies---------------------------------------------------------------3 3. Getting Started with Multi Remote- ------------------------------4~5 4. Setting Mode------------------------------------------------------------6~7 5. Adding Database Devices----------------------------------------------8~10 6. Adding and Using OTT/Bluetooth Devices--------------------------11~19 7. Deleting Devices-----------------------------------------------------------20 8. Deleting Devices(Bluetooth)------------------------------------------21~23 9. -
Page 3: Product Composition And Name Of Each Part For Uc200/Uc500
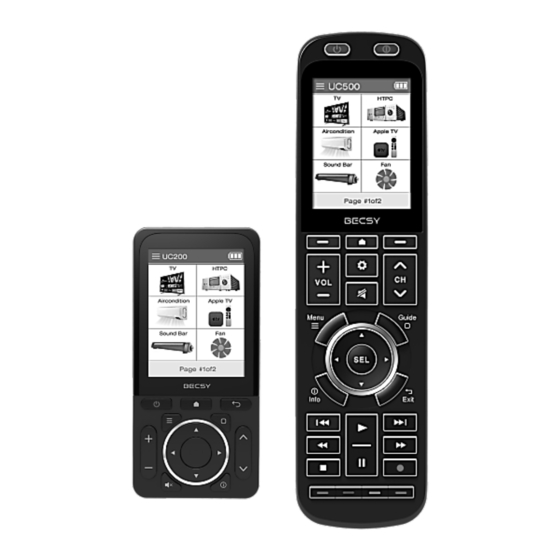
1. Product Composition and Name of Each Part for <UC200> Menu Power ON/OFF Home/Guide Display home Mute EXIT Information LCD Screen IR Transceiver Volume UP/DOWN USB Type-C Connector Channel UP/DOWN USB C Cable Navigator Selection... - Page 4 1. Product Composition and Name of Each Part for <UC500> Volume UP/DOWN Power ON IR Transceiver Channel UP/DOWN Power OFF USB Type-C Connector Mute LCD Screen USB C Cable Navigator Return to previous page Selection Go to next page Multi-media Control Display home Optional Function position...
-
Page 5: Terminologies
2. Terminologies Devices ▣ Marked the products (TV, Audio, AC, etc.) to be registered on the multi-remote controller (UC200/UC500) as devices. Devices Keys/Buttons ▣ Keys created in registered home appliances/devices (volume, channel, and other function keys) INPUT TV INPU T... -
Page 6: Getting Started With Multi Remote
3. Getting Started with Multi Remote ▪ UC200 REMOTE POWER ON Press power button for second minutes. (device goes into power saving mode if no action is made) ▪ UC200 REMOTE POWER OFF If you press and hold ON and the home screen button at the same time for 3 seconds, the power of the remote <3 seconds >... - Page 7 3. Getting Started with Multi Remote ▪ Page Change <UC500 Key > You can change the page by scrolling left and right on the screen or by pressing the previous/next page key on the UC500 product. ▪ Moving Device You can quickly move registered devices by scrolling the screen up and down.
-
Page 8: Setting Mode
4. Setting Mode ▪ BECSY multi remote control consists of two modes, Basic Setup and Expert Setup, and the basic setting of the remote control is set to Basic Setup mode. ▪ Run setting mode < UC200 Home Screen Key 3 seconds >... - Page 9 < Expert Setup Mode Basic Setup Mode Setting > ▪ Press and hold the UC500 setting key or home screen key of UC200 for 3 seconds, and move to setup mode by pressing and then change to OFF in Preference Setup Mode.
-
Page 10: Adding Database Devices
1) Press and hold the UC500 setting key or the home screen key of UC200 for 3 seconds, then the screen goes to basic setup mode. 2) Select Add Device. 3) Select the type of device you want to add. - Page 11 5. Adding Database Devices 4) Select the manufacturer of your device. (※ You can change the page by scrolling left/right or using the previous/next page key to view more search by device and manufacturer.) Codeset (1/28) 5) Select an IR Codeset suitable for the [TV]: Brand device.
- Page 12 5. Adding Database Devices 6) Set the device name. (※ You can change capital and small letters by scrolling up/down the screen, and the keyboard layout of letters by scrolling/right. After setting the name, press the key to save.) 7) When the device addition is complete, the added devices appear in the order they were created on the main screen.
-
Page 13: Adding And Using Ott/Bluetooth Devices
1) Press and hold the UC500 setting key or the home screen key of UC200 for 3 seconds, then the screen goes to basic setup mode. 2) Select Add Device. 3) Select OTT 4) Select device type. - Page 14 6. Adding and Using OTT/Bluetooth Devices OTT/Bluetooth 5) Enter the device name. 6) Go to the home screen After completion, press the and check the added key to confirm. devices. ※ How to pair Chromecast class (Other Bluetooth class pairing methods are similar.) Bluetooth There is no paired key.
- Page 15 6. Adding and Using OTT/Bluetooth Devices OTT/Bluetooth BT State 9) Make sure that the pairing screen appears as shown. Try to pair remote from chromecast_1 The waiting time for pairing is 3 minutes [timeout=178] and 30 seconds, and the pairing must be completed within the timeout period 10) When the progress pairing screen appears, proceed with pairing in Chromecast as well.
- Page 16 6. Adding and Using OTT/Bluetooth Devices OTT/Bluetooth 12) Select “pair a remote control or accessory”. 13) When the UC500 device screen is displayed, selecting the device automatically initiates pairing proceed. (Searching may take more than 30 seconds depending on the situation.) If the device is not searched, proceed from step 7 again.
- Page 17 6. Adding and Using OTT/Bluetooth Devices OTT/Bluetooth 14) When pairing is completed, the “UC500” device is registered to Chromecast. 15) The pairing progress window appears on the LCD screen of UC500 for a while, and the device selection screen appears. (You can check the operation by pressing the key on the Chromecast device.)
- Page 18 6. Adding and Using OTT/Bluetooth Devices OTT/Bluetooth ▪ This is an example of how to use the Chromecast device. You can use basic mode/mouse mode/keyboard mode. ▣ Main UI screen / Media UI screen of Chromecast device (Switching the screen using left/right scroll or previous/next keys) ▣...
- Page 19 6. Adding and Using OTT/Bluetooth Devices OTT/Bluetooth ▣ Left/Right Mouse Click: Use the left/right arrow keys. (When tapping the LCD screen, only the lower right area is the right button.) ▣ To move the keyboard screen, use the left/right scroll or previous /next keys.
- Page 20 6. Adding and Using OTT/Bluetooth Devices OTT/Bluetooth conversion < Upper case > < Low case > ▣ For uppercase and lowercase letters in English, scroll up/down the LCD screen ▣ If the title is displayed in red, it is not connected to the device. Please wait until the connection is complete.
- Page 21 6. Adding and Using OTT/Bluetooth Devices OTT/Bluetooth Moves to the next/previous screen whenever the channel UP/DOWN button is clicked basic UI screen mouse screen keyboard screen < > < > < > ▣ In the OTT/Bluetooth device menu, you can easily move the screen by using the set's channel UP/DOWN keys.
-
Page 22: Deleting Devices
7. Deleting Devices 1) Press and hold the UC500 setup key or the UC200 home screen key for 3 seconds to move to the setup mode. 2) Select Delete Device 3) Select device to delete Delete device Are you sure to delete the device (※... -
Page 23: Deleting Devices(Bluetooth)
8. Deleting Devices (Bluetooth) Bluetooth You must also unpair from 5) In case of deleting Bluetooth devices, chromecast_1 a confirmation window is displayed once more. Cancel ※ Ex) Delete Chromecast device 6-1) Chromecast Settings → Select “Remote Controls & Accessories”. - Page 24 8. Deleting Devices (Bluetooth) After selecting the UC500 device, select “Don’t Save”. 6-2)
- Page 25 8. Deleting Devices (Bluetooth) 6-3) Make sure the “UC500” device is removed from the “Remote Controls & Accessories” menu.
-
Page 26: Keys Adding
9. Keys Adding 1) Press and hold the UC500 setup key or the UC200 home screen key for 3 seconds to move to the setup mode. 2) Select Add Key. 3) Select the device to add the new key. 4) Sets the name of the key 5) You can check the key to be added. -
Page 27: Deleting Keys
10. Deleting Keys 1) Press and hold the UC500 setup key or the UC200 home screen key for 3 seconds to move to the setup mode. 2) Select Delete Key. 3) Select the device that has the key to delete. -
Page 28: Ir Learning
<existing remote to cop> 1) For IR learning, first place the IR transmitter of the existing remote control and the IR receiver of the BECSY remote control facing each other at a distance of 2 to 4 cm, then proceed to the next step. - Page 29 11. IR Learning Learning INPUT TV INPU T TIMER SOUND RATIO SIMPLINK Press any key to learn [2/5] 4) Select Devives. 5) Select the button to apply IR learning. ▪ In addition to the buttons on the LCD screen, the actual buttons (ON/OFF, Volume Up/Down, etc.) can also be selected.
- Page 30 11. IR Learning 7) When you press the key you want to learn from the existing remote control, it automatically receives and stores the signal at the specified key on the UC500. When IR learning is completed normally, the phrase 'SUCCESS' appears at the bottom of the screen. <...
-
Page 31: Copying Keys
1) Press and hold the UC500 setup key or the UC200 home screen key for 3 seconds to move to the setup mode. 2) Select Copy Key. - Page 32 12. Coping Keys 6) Select the button of the position (slot) to be copied. You can select not only the Soft Button but also the actual button on the remote control.
-
Page 33: Devices Moving
13. Devices Moving ▪ The BECSY multi-remote controller can easily change the device screen configuration by moving the location of the registered device. 1) Press and hold the UC500 setup key or the UC200 home screen key for 3 seconds to move to the setup mode. -
Page 34: Changing Devices Names
14. Changing Devices Names 1) Press and hold the UC500 setup key or the UC200 home screen key for 3 seconds to move to the setup mode. 3) Select the device to be renamed. Select Edit Device Name on the second page of Basic Setup. - Page 35 14. Changing Devices Names 6) ) If you select “OK” to change the name and icon together, select the device icon to be changed to switch the name and icon.
-
Page 36: Move Key
15. Move Key 1) Press and hold the UC500 setup key or the UC200 home screen key for 3 seconds to move to the setup mode. 2) Select Move Key on the second Select the device to move page of Basic Setup. - Page 37 15. Move Key Confirm by pressing OK.
-
Page 38: Renaming Keys
2) Select Edit Key Name on the 3) Select device. second page of Basic Setup. 5) After entering the name, confirm 4) Select Soft button to rename. with the SEL button. (UC200 is the center key of the direction keys) -
Page 39: Preference
▪ The Preference menu in Basic Setup mode consists of 7 menus: Macro key setting, Sleep timer, Display, Sound, Other, Unpair device, and Setup Assistance. 1) Press and hold the UC500 setup key or the UC200 home screen key for 3 seconds to move to the setup mode. Preference Sleep Timer... -
Page 40: Setup Mode
▪ Unpair Device Remove paired Bluetooth device information. ▪ Setup Assistance This is a simple guideline built-in the remote control. 18. Setup Mode 1) Enable/disable Expert Setup mode. ※ A detailed manual of Expert Mode can be found at www.becsy.net... -
Page 41: Troubleshooting
19. Troubleshooting Error Screen Display Action BT DEVICE chromecast_1 is already existed.You try to rename it. ▪ The same Bluetooth device name cannot be duplicated. Bluetooth 페어링 ▣ timeout 메시지 Bluetooth ▪ When the pairing standby time Pairing timeout (3 minutes and 30 seconds) has passed. - Page 42 19. Troubleshooting Error Screen Display Action ▣ Error message when connecting to an existing registered device during pairing attempt Bluetooth ▪ After turning off the Turn off Bluetooth of the android_tv_n10 Android_tv_n10 device, device. and try again try pairing. ▣ Message that occurs when a connection request is received ▪...
- Page 43 19. Troubleshooting Error Screen Display Action Add device The max number of BT devices is 8. This message is displayed ▪ when registering more than 8 Bluetooth devices that can be registered. Delete one or more Bluetooth devices and try pairing again. ※...
-
Page 44: Specifications
20. Product Specifications 모 델 명 UC200 UC500 Infrared Rx/Tx Bluetooth BLE 5.x USB Type C 배터리 사양 Li-ion 2000 mAh Li-ion 2600 mAh 사 이 즈 115 x 54 x 17(mm) 204 x 54 x 31(mm) H x W x D 무... -
Page 45: Warranty
1 year from the date of purchase. <Repair fee will be charged for breakdowns caused by customer negligence such as damage due to impact or submersion, etc.> ▪ Customer Center : +82-31-8018-5671 / AS@becsy.net - Contact - 4F. S dong, Gangnam Paragon, 338, Hakdong-ro, Gangnam-gu, Seoul, 06099 Republic of Korea ▪... -
Page 46: Product Safety Guidelines
▪ Product Safety Guidelines Read the safety instructions carefully before using this product. ※ - Keep out of reach of children. - Do not disassemble the product or replace parts yourself. - Replacement of components (if not applicable)and parts may be carried out by an authorized dealer or service provider. -
Page 47: Battery Safety Guidelines
Batteries may explode if damaged. Throwing it away as household waste or throwing it into the fire can explode. Dispose of the product according to the regulations Refer to additional instructions and more information at www.becsy.net...
Need help?
Do you have a question about the UC200 and is the answer not in the manual?
Questions and answers
Can I pair this remote with a Samsung frame tv