La Crosse Technology C86224 - Alarm Clock Dual USB Charging Station Manual
- Instructional manual (8 pages) ,
- Setup manual (4 pages) ,
- Faqs (7 pages)
Advertisement
- 1 Buttons on top
- 2 LCD Features
- 3 Setup
- 4 Settings
- 5 Nap Feature
- 6 Backlight
- 7 USB Charge Ports
- 8 Included USB to Micro USB or Lightning Cable
- 9 Cable Hooks
- 10 Time Alarm
- 11 Alarm Type Indicator
- 12 Activate/Deactivate Alarm
- 13 Snooze
- 14 Low Battery Icon
- 15 Care and Maintenance
- 16 Specifications
- 17 Warranty and Support
- 18 Documents / Resources
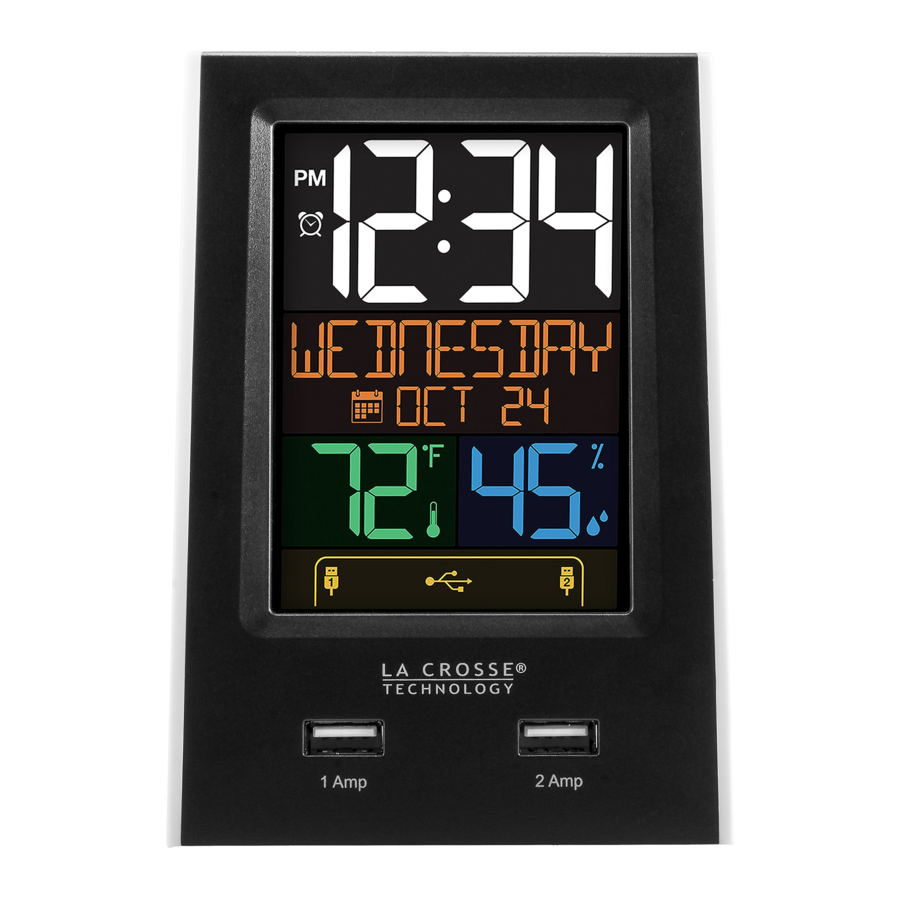
Buttons on top

LCD Features

- Time (manual set)
- Low Battery Icon
- Alarm Icon (M-F)
- Weekday, Nap duration, or Snooze duration
- Month/Date
- Indoor Temperature
- Indoor Humidity
- USB 1 Charge Indicator
- USB 2 Charge Indicator
- USB 1 Charge Port 1 Amp
- USB 2 Charge Port 2 Amp
Setup
- Insert the 5.0 volt power cable into the outlet, then into the clock.
- (Optional), Insert 2 AAA batteries (included) into the clock.

- Set language, time, calendar, temperature unit and snooze duration.

Settings
Language, Time, Date, etc.
- Hold the SET button to enter time set mode.
- Press the+/- buttons to adjust the values.
- Press the SET button to confirm adjustments and move to the next item.
- Press the SNZ/LIGHT button at any time to exit.
Time set order:
- Language (English or Spanish)
When Español is selected, the instructions on screen will be in Spanish.

- Beep ON/OFF

- Hour
![]()
- Minutes
![]()
- Year
![]()
- Month
![]()
- Date
![]()
- Fahrenheit/Celsius

- Snooze duration (5 minutes-120 minutes)
![]()


Begin: Hold the SET button for 3 seconds. ENGLISH will show.
Nap Feature
Sometimes, we just want a quick nap without having to set a new alarm. Set the nap duration one time, then, a simple press of the NAP button starts the nap countdown.
Set Nap Duration:
- Hold the NAP button for 3 seconds. NAP and the duration will show (default is 10 minutes).
![]()
- Use the+/- buttons to select a nap duration (up to 120 minutes).
- Press the NAP button to confirm and start nap count down to zero.
- Press the SNZ/LIGHT button at any time to exit.

Ready for a Nap? Press the NAP button once, and the clock will wake you at the preselected time.
- From normal time display, press the NAP button once to start the nap feature for the preset time. NAP will show with the preset duration.
![]()
- Minutes and seconds will countdown.
- When the alarm sounds NAP and 0m will flash. The alarm will sound for two minutes and then stop if no buttons are pressed.
- Press any button except SNZ/LIGHT, at any time to exit nap mode.
![]()


Backlight
HI-LOW-OFF
- When operating with the power cable, the backlight is adjustable: HI-LOW-OFF.
- Press and release the SNZ/LIGHT button to adjust the backlight.
- When operating on batteries only, the backlight will come on briefly when the SNZ/LIGHT button is pressed.
USB Charge Ports
USB Output:
- Charge devices that self-regulate.
- Do not charge multiple devices from the same USB port.
- For Tablets and other high power devices, use the USB port on the right (2 Amp).
- Must operate clock with power cable to charge other devices.
- Plug your device into one of the USB ports on the front of the clock.
- The clock will show HELLO for 3 seconds.
![]()
- The lightning bolt will flash while charging.

- When no device is connected, no battery will show.
- As your device becomes full and less current is drawn, solid battery icon may show, before the charge is complete.


Note: The FULL icon will show when full. After charging, the clock will provide a trickle charge and show the charging icon. Your device may not show fully charged.
Included USB to Micro USB or Lightning Cable
- The included USB cord offers a Micro USB connection or a Lightning connection on the same cord.
![]()
- Use your own charge cord or the included cord to charge your device.
- Place your cord in the handy hook on the back of the clock.

Cable Hooks
- On the back of the clock there are two cable hooks to secure your charging cables.
- Simply slide your cable into the hook and the end of your cable will be easy to find every time.


Time Alarm
- Press and release the ALARM button to view alarm time.
- With alarm time showing, hold the ALARM button for 3 seconds to enter alarm settings.
- Set the time then select alarm type:
(Single alarm, Mon-Fri alarm, or Weekend alarm) - Setting and activating the alarm are separate functions.
Alarm Type (choose the type for each alarm):
- Daily/Single-Will alarm at the same time every day when active.
- Mon-Fri-Will only alarm Monday through Friday when active.
- Weekend- Will only alarm Saturday and Sunday when active.
Set Alarm:
- Press and release the ALARM button to view alarm time.
- With alarm time showing, hold the ALARM button for 3 seconds to enter alarm time set mode.
- Press the +/- buttons to adjust the alarm hour.
![]()
- Press the ALARM button to confirm and move to the minutes.
- Press the +/- buttons to adjust the alarm minutes.
![]()
- Press the ALARM button to confirm and move to alarm type.
![]()
- Use the +/– to select SINGLE, MON-FRI or WEEKEND alarm.
![]()
![]()
![]()
- Press the ALARM button to confirm and exit.


Note: This is a crescendo alarm. It will sound for two minutes then shut off completely if no buttons are pressed.
Alarm Type Indicator
Alarm Type:
- Daily/Single: Clock icon only
![]()
- Mon-Fri: Clock icon with 5 lines below
![]()
- Weekend: Clock icon with 2 lines below
![]()


Activate/Deactivate Alarm
- When you finish settings, the alarm is active.
- From the normal time display, press and release the ALARM button to view alarm.
- Press and release the ALARM button to deactivate or to activate the alarm.
- When active the alarm clock icon will show.
![]()
- The clock icon will not show if the alarm is not active.

Snooze
- When the alarm sounds, press the SNZ/LIGHT button. The alarm will be silent for the preselected snooze duration.
- SNOOZE - duration will show, and the snooze time will count down.
![]()
- When alarm sounds again, the SNOOZE - 0 will flash.
![]()


Low Battery Icon
- The low battery icon
![]() will appear between the hour and minutes.
will appear between the hour and minutes. - This icon indicates it is time to replace the batteries.
 will appear between the hour and minutes.
Care and Maintenance
- Do not mix old and new batteries.
- Do not mix Alkaline, Standard, Lithium, or Rechargeable Batteries.
- Always purchase the correct size and grade of battery most suitable for intended use.
- Replace all batteries of a set at the same time.
- Clean the battery contacts and also those of the device prior to battery installation.
- Ensure the batteries are installed with correct polarity (+ and -).
- Remove batteries from equipment when it is not used for extended period.
- Promptly remove expired batteries.
Specifications
Temperature Range: 32°F to 122°F (0°C to 50°C)
Humidity Range: 10%RH to 99%RH
Power: 5.0V AC6: HX36-0503500AU
Optional-2-AAA, IEC, LR3 batteries (included)
USB Output: 1 Amp and 2 Amp
Battery Life: Battery life is over 24 months with reputable batteries
Dimensions: 3.74" W x 2.40" D x 5.24" H (95 x 61 x 133 mm)
Warranty and Support
Before returning a product, please contact our friendly customer support with questions or visit our online help:
Phone: 1-877-408-2678
Online Product Support:
www.lacrossetechnology.com/support
Product Registration:
www.lacrossetechnology.com/support/register

Warranty Address:
La Crosse Technology, Ltd
2830 S. 26th St.
La Crosse, WI 54601
lacrossetechnology.com/support

Documents / ResourcesDownload manual
Here you can download full pdf version of manual, it may contain additional safety instructions, warranty information, FCC rules, etc.
Download La Crosse Technology C86224 - Alarm Clock Dual USB Charging Station Manual
Advertisement


Need help?
Do you have a question about the C86224 and is the answer not in the manual?
Questions and answers