Table of Contents
Advertisement
Quick Links
USE AND CARE GUIDE
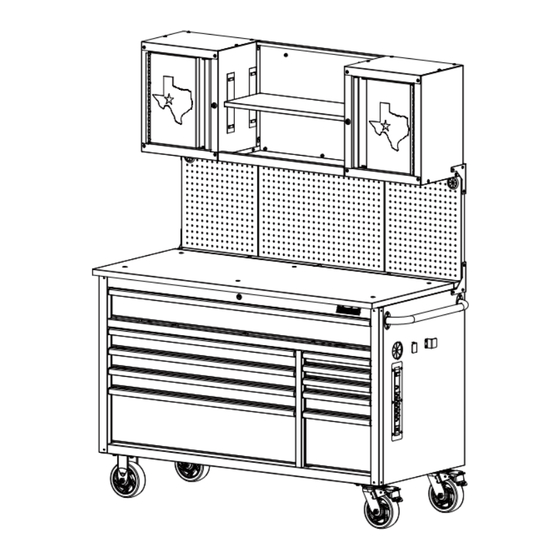
56 in. 10-Drawer Mobile Workbench
with Pegboard and Top Storage Cabinets
Questions, problems, missing parts?
Before returning to the store, call
Husky Customer Service
8 a.m – 7 p.m., EST, Monday-Friday
9 a.m – 6 p.m., EST, Saturday
1-866-441-5080
We appreciate the trust and con dence you have placed in International through the purchase of this cabinet. We strive to continually
create quality products designed to enhance your home. Visit us online to see our full line of products available for your home
THANK YOU
improvement needs. Thank you for choosing International!
Store SKU # 1000000000
Internet SKU # 1000000000
Model # INT56ULTWSTEX
Advertisement
Table of Contents

Related Manuals for International INT56ULTWSTEX


Summary of Contents for International INT56ULTWSTEX
- Page 1 THANK YOU We appreciate the trust and con dence you have placed in International through the purchase of this cabinet. We strive to continually create quality products designed to enhance your home. Visit us online to see our full line of products available for your home...
-
Page 2: Table Of Contents
Table of Contents Table of Contents ..........2 Assembly ............... 6 ....... - Page 3 7. Extension cord WARNING: Changes or modifications to this unit not □ Follow all manufacturers' Warnings and Operating expressly approved by the party responsible for Instructions for your extension cord. compliance could void the user’s authority to operate the equipment. □...
-
Page 4: Warranty
Warranty The manufacturer warrants the product to be free from defects in materials and workmanship for a period of three (3) years from date of purchase. This warranty applies only to the original consumer and only to products used in normal use and service. If this product is found to be defective, the manufacturer’s only obligation, and your exclusive remedy, is the repair or replacement of the product at the manufacturer’s mishandling. - Page 5 Package Contents (continued) NOTE: The keys are inside top drawer. Quantity Quantity Part Description Part Description Cabinet handle Door for wall cabinet Pegboard Shelf inside wall cabinet Storage hook Back panel for wall cabinet Hanger Left side panel for wall cabinet(Left) Horizontal support Right side panel for wall cabinet(Left) Vertical support...
-
Page 6: Assembly
Assembly The holes in the top cabinet are tapped and do NOTE: not require nuts. Two people are recommended for assembly. CAUTION: Side panels and back panel tabs (flanges) must NOTE: be positioned on inside of cabinet facing up. Top Cabinet Assembly □... - Page 7 Top Cabinet Shelf Assembly □ Insert Back Panel (L) between the two wall cabinets and secure the pins in the key holes. Ensure the top of the Back Panel (L) is ush with the top of the cabinets. See Figure 2.1 □...
- Page 8 Attaching the Cord Storage Hooks Attaching the Cabinet Handle □ Position the Storage Hook (C) over the holes on the NOTE: There are holes to mount handle on either side Cabinet (X). of cabinet, but only one handle comes with this cabinet. □...
- Page 9 Figure 5.1 Figure 5.2 CAUTION: Two people are recommended Attaching Top Cabinet System to the Workstation for this step. □ Peel off the paper back from the EVA stickers (I), then attach in appropriate position toward bottom of Wall Cabinets‘ back. See Figure 6.1 □...
- Page 10 Figure 6.2 Figure 6.3 Attaching the Storage Tray □ Loosen bolts (AA) from Wood Top (Y) with hex key (FF). □ Gently pull the Wood Top (Y) forward until 2 in. of overhang on the front of the Workstation (X) □...
- Page 11 Attaching the LED Magnetic Light □ Attach LED light (K) under the Top Cabinet System. □ Attach the LED power cord to the light and run through the rubber grommet in the Pegboard (B). □ Plug in the LED power cord to the USB connection in the power strip located in the Workstation (X). Ensure the cord is free from the workspace area.
-
Page 12: Operation
Operation Removing the drawers Re-inserting the drawers □ □ Fully extend the empty drawer. Extend the drawer slides. □ □ e l i pulling down on Insert the brackets on each side of the drawer into the other release lever. the slots in the slides, being careful that they are properly positioned. -
Page 13: Cordless Power Tool Battery Chargers
Cordless Power Tool Battery Chargers □ See Charger’s Owner’s Manual for proper use and care of charger and batteries. Follow all Warnings and Instructions provided with your battery charger. □ Place chargers and electrical connections inside cabinet. □ Chargers are for use in dry locations only. Do NOT expose to liquid, vapor, or rain. Should your charger become wet, Do NOT attempt to use. -
Page 14: Replacement Parts
Replacement Parts For assistance with replacement parts please call 1-866-441-5080 Quantity Part Description Cabinet Handle Fixed Caster Swivel Caster Cabinet Lock Badge Drawer Liner Drawer Slide Caster Bolt Caster Washer Handle Bolt Outlet Outlet Panel Cover Rubber Grommet Storage Hook Storage Hook Bolt Pegboard Bolt Pegboard (Left, Center, Right) - Page 15 Questions, problems, missing parts? Before returning to the store call Customer Service 9 a.m. - 6 p.m., EST, Monday-Friday 1-866-441-5080 Retain this manual for future use.
Need help?
Do you have a question about the INT56ULTWSTEX and is the answer not in the manual?
Questions and answers