HealthSmart 04-174-021, 04-174-026 - SELF-TAKING HOME BLOOD PRESSURE KIT Manual
- Instruction manual (2 pages)
Advertisement
Please read this guidebook completely before operating the unit.
PRODUCT IDENTIFICATION
With proper care and use, your HealthSmart Self-Taking Blood Pressure Kit will provide you with many years of reliable readings.
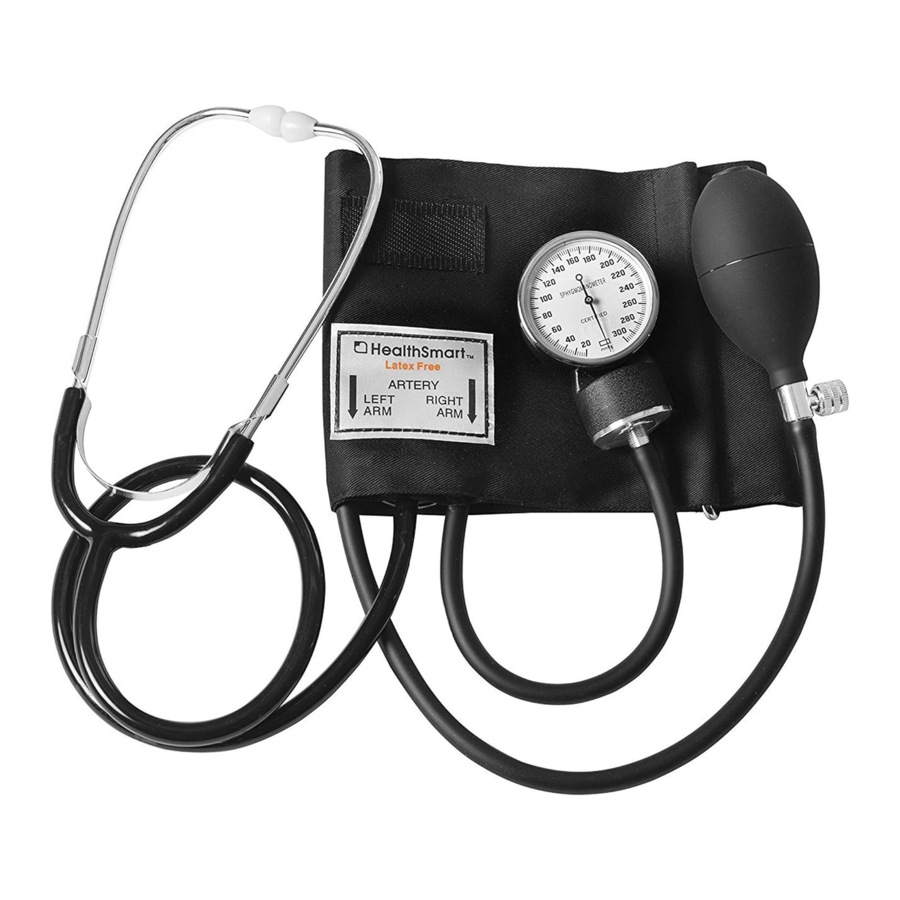
Lay cuff on a flat surface with the metal D-ring to the left. The unit can be assembled as outlined below:
Step 1: Fold the right end of the cuff in half and insert the end of the cuff through the metal D-ring.
Step 2: Insert the single end of the Y-tubing into the stem of the chestpiece to form a stethoscope.
Step 3: Remove the metal binaurals from the plastic bag and insert the ends into the Y-tubing.
Step 4: Attach the gauge to the tubing on the left of the stethoscope.
Step 5: Attach the inflation bulb to the tubing on the right of the stethoscope.
NOTE: THE WHITE ARTERY PATCH WILL BE ON THE OUTSIDE AND THE CHESTPIECE IS ON THE INSIDE OF THE CUFF. Also, if folded correctly, the hook and loop material will be on the outside of the cuff.
The adult cuff (item # 04-174-021) fits an arm circumference of 10" – 14" (25.4 cm – 35.6 cm). The large adult cuff (item # 04-174-026) fits an arm circumference of 13" – 17" (33 cm – 43.2 cm).
PRODUCT ASSEMBLY

GENERAL BLOOD PRESSURE INFORMATION
What is Blood Pressure?
Blood pressure is the pressure that is exerted by blood flowing against the walls of the blood vessels throughout your body.
Your heart, which is the center of the circulatory system, provides the force for the blood to flow or circulate. When your heart contracts or beats, the blood is forced through the blood vessels increasing the pressure. This is the highest pressure in the cycle or what is referred to as SYSTOLIC PRESSURE. In-between beats your heart relaxes and your blood pressure decreases. This is referred to as DIASTOLIC PRESSURE.
How is Blood Pressure Measured?

Blood pressure is measured in millimeters (mm) of Mercury (Hg) and is generally recorded with the systolic pressure (120) listed first and the diastolic pressure (80) listed second. The numbers are typically separated by a slash mark ( / ) as shown above.
Please contact your physician to discuss your "normal" blood pressure reading.
What Influences Blood Pressure?
Many factors such as genetics, age, sex, altitude, physical activity, anxiety, muscular development, certain medications or even the time of day can influence blood pressure. Influences such as sleep or relaxation decrease blood pressure, while anxiety or exercise increase blood pressure.
Why Monitor Your Blood Pressure at Home?
Home monitoring allows you to supplement measurements taken at your physician's office. These home readings, when taken over a period of time, can show an accurate indication of change. Furthermore, your records can assist your physician in evaluating your health and in making important decisions in the diagnosis and treatment of your condition. Because of this, it is important to take consistent, daily measurements.

Prior to use, your physician or trained healthcare provider should be consulted to determine your "normal" blood pressure, evaluate your technique using this unit and to interpret your blood pressure measurements.
HELPFUL HINTS FOR ACCURATE READINGS
- Relax at least 15 minutes before taking a reading.
- Always place the cuff directly on the skin. Remove any clothing or jewelry that may interfere with the cuff placement.
- Make sure the cuff is snug, but not too snug. One or two fingers should fit between the cuff and the arm.
- Make sure the stethoscope head is directly over the brachial artery.
- Try to use the same arm for all readings unless instructed otherwise by your physician.
- Deflate the cuff at 2 or 3 mmHg per second.
- Remain still with your palm up and arm extended keeping the cuff at the same level as your heart.
- Relax during the reading as anxiety can produce incorrect results.
APPLYING YOUR BLOOD PRESSURE CUFF
Make sure that the unit is assembled correctly. Check eartips to make sure they are securely fastened.
- Sit upright but relaxed in a chair with a back. Keep your feet flat on the floor. Remove any constrictive clothing from your left arm.
- Extend your left arm. *Find your brachial artery, which is at the inner aspect of your elbow. You may or may not feel your pulse.
![]()
- Open the cuff so that you can slide your arm into it. Do not extend the cuff beyond the metal bar.
- Insert your left arm into the cuff. Position the bottom edge of the cuff approximately one-half inch ABOVE your elbow. The chestpiece must directly touch the inside of your arm, over your brachial artery (see step 2).

- With your arm extended, palm facing upward and tubes positioned down the center of your arm, use your right hand to pull the end of the cuff and secure the hook and loop material. MAKE SURE THE CHESTPIECE REMAINS OVER THE BRACHIAL ARTERY.
- The cuff should fit comfortably, yet snugly around your arm. Check for any gaps between the arm and the cuff.


*The left arm should be used unless you are unable to or should not use your left arm. Consult with your physician to assess which arm is best for you to use.
TAKING YOUR BLOOD PRESSURE READING
- Insert the eartips into your ears. You can adjust the metal binaural for comfort.
- Rest your elbow on a table with your arm facing upward. Elevate your hand so that the cuff is at the same level as your heart. Relax your left hand.
- Position the gauge so it can be read without being moved. It can be clipped to something such as a kitchen towel for stability.

- Hold the inflation bulb with your right hand and turn the air release valve clockwise to close.
![]()
- Begin inflating the cuff SLOWLY AND STEADILY by pumping the inflation bulb until the gauge reads 30 mmHG ABOVE your last known SYSTOLIC measurement.
If you do not know your last known SYSTOLIC measurement, inflate to approximately 180-200 mmHg.
![]()
To prevent injury to yourself and/or the unit, never inflate the cuff above 280 mmHg. - Upon reaching the proper inflation level, SLOWLY AND STEADILY turn the air valve counterclockwise at a rate of 2-3 mmHg per second.
![]()
- As the pressure begins to drop, carefully listen for your pulse beat. Note and record the first thumping sound you hear. This is your SYSTOLIC pressure.
![]()
- Allow the cuff to continue to deflate. You will hear changes in the sounds and then no sound at all. When you hear the last sound, note the reading and record. This is your DIASTOLIC pressure.
![]()
- Rapidly turn the valve counterclockwise to deflate the remaining air. Remove the cuff and record your measurement on your recording chart.


NOTE: If you need to take another measurement, wait a minimum of 15 minutes between readings to allow for the blood vessels to return to normal. The wait time may vary depending on your health.
CARE AND MAINTENANCE
- Do not wash or moisten the cuff.
- A void dropping or hitting the surface of the gauge or stethoscope chestpiece.
NOTE: As with any sensitive instrument, the quality and reliability of the manometer gauge should be checked annually. When the cuff is fully deflated, make sure the gauge needle is at zero (within the zero square). A needle outside the square means the gauge needs to be recalibrated or replaced by a qualified technician.
QUICK START GUIDE
- Assemble the contents of your kit.
- A 15-minute resting period is recommended to stabilize the body prior to taking a reading.
- Find your brachial artery, which is at the inner aspect of your elbow.
- Remove any constrictive clothing or jewelry that may interfere with the cuff placement. Wrap the cuff snugly around your left arm with the cuff's bottom edge approximately 0.5" (1.3 cm) above your elbow joint with the chestpiece positioned over the brachial artery.
- Rest your elbow on a table making sure the cuff is at the same level as your heart.
- Position the gauge in a stable, readable location.
- Slowly and steadily inflate the cuff 30 mmHg above your last known SYSTOLIC reading. If not known, inflate between 180-200 mmHg.
- At a rate of 2-3 mmHg per second, begin to deflate the cuff.
- The first "thumping" sound heard is your SYSTOLIC rate.
- The last sound heard is your DIASTOLIC rate.
- Record your measurements.
- A 15-minute rest period is needed between readings to allow the blood vessels to return to normal.

Never inflate the cuff above 280 mmHg.
Specifications are subject to change without notice.
Manufactured for:
HealthSmart® International
1931 Norman Drive
Waukegan, IL 60085
Register this product at LiveHealthSmart.com

Documents / Resources
References
Download manual
Here you can download full pdf version of manual, it may contain additional safety instructions, warranty information, FCC rules, etc.
Download HealthSmart 04-174-021, 04-174-026 - SELF-TAKING HOME BLOOD PRESSURE KIT Manual
Advertisement


Need help?
Do you have a question about the 04-174-021 and is the answer not in the manual?
Questions and answers