
Summary of Contents for Reborn Endo R-Smart Plus+
- Page 1 Multifunctional Endo Motor Instruction Manual R-Smart Plus + https://stomshop.pro/...
- Page 2 Thank you for purchasing Multifunctional Endo Motor. If you encounter any questions or problems while reading this manual, please contact the device manufacturer immediately. Please read this manual before operating, and keep this manual for future reference. As the manufacturer of this device, we’re reserves the rights to modify the information and data contained in this instruction manual at any time without advance notice.
-
Page 3: Table Of Contents
Contents 1 Product Description .................... 5 1.1 Product Introduction ................5 1.2 Model and Specification ................5 1.3 Performance and composition ..............5 1.4 Scope Of Application ................5 1.5 Contraindications ..................5 1.6 Warning ....................6 1.7 Instrument Safety Classification ..............6 1.8 The Main Technical Parameters .............. - Page 4 5.2.2 Preset file-parameter mode ............28 5.2.3 Advanced mode setting ............28 5.3 After Use ....................29 5.3.1 Regular Inspection ..............29 5.3.2 Maintenance ................30 6 Troubleshooting ....................33 7 Safety precautions .....................34 https://stomshop.pro/...
-
Page 5: Product Description
1 Product Description 1.1 Product Introduction Multifunctional Endo Motor is a medical device for dentists to perform endodontic treatment. It can be used as a Endo Motor for preparation and enlargement of root canals, or device for measuring canal length. It can be used to enlarge the canals while monitoring the position of the file tip inside the canal. -
Page 6: Warning
1.5.4 Use with caution in patients with heart disease, pregnant women and young children. 1.6 Warning This section contains descriptions of serious side effects and potential safety risks for the product itself and users/patients. The following warning clauses must be read before use : 1.6.1 The instrument can only be used by professional dentists in accordance with national regulations. -
Page 7: The Main Technical Parameters
1.7.2 Type of protection against electric shock: Class II equipment with internal power supply. 1.7.3 Degree of protection against electric shock: B type applied part. 1.7.4 Degree of protection against harmful ingress of water: Ordinary equipment (IPX0). 1.7.5 Degree of safety application in the presence of a flammable anesthetic mixture with air, oxygen, or nitrous oxide: Equipment cannot be used in the presence of a flammable anesthetic mixture with air, oxygen, or nitrous oxide. -
Page 8: Operation Mode And Memory Mode
2.1 Operation Mode And Memory Mode The device provides 5 operation modes, which can be operated and used according to the user’s expected needs. The 5 operation modes and application scenarios are : 2.1.1 Optimum Glide Path Function(OGP) Optimum Glide Path Function(OGP): A Motion: 180°clockwise, and then 180°anti-clockwise reverse rotation. -
Page 9: Optimum Torque Reverse Function(Otr
B Motion: 180°clockwise, and then 270°anti-clockwise reverse rotation. Repeat the watch-winding (A) motion and balanced force (B) motion. OGP can be set the status (ON/OFF) in REC mode. If the OGP function is the ‘ON’ status,the instrument operates according to the motion mode of OGP mentioned above. -
Page 10: Memory Mode
and reverse rotation angles. Adjustment range of forward / reverse rotation angle:30°- 370°. It can increase or decrease the angle by pressing ‘<’ / ‘>’. The angle adjustment step value is 10 °. It is recommended that the sum of forward rotation angle and reverse rotation angle should be greater than or equal to 120 °. -
Page 11: Sgp(T-Mode
Remove the broken file in Remove Broken File mode the root canal Store file parameters of Preset File-parameter Mode RebornEndo Store file parameters of main Preset File-parameter Mode brands and RebornEndo Store file parameters of main Preset File-parameter Mode brands and RebornEndo Store file parameters of main Preset File-parameter Mode brands and RebornEndo... -
Page 12: The Way To Call Preset Parameters Of File
2.2.4 The way to call preset parameters of file Press the File key,call the parameters of main brands endo file (include RebornEndo R3 file and other main brands file) for choose. After selecting the file parameters, the system will store the selected file parameters in M12. M11 :... - Page 13 https://stomshop.pro/...
-
Page 14: Symbol Instruction
3 Symbol instruction Volume Switching button Modulation Refer To The Instruction Indoor Use Only Manual Before Use Cautions! Refer to Direct Current attached documents B type applied Class II Equipment part Retrieve Keep Dry Humidity limit for Fragile products storage: 0% ~ Temperature limit Atmospheric pressure for for storage: 10°C... -
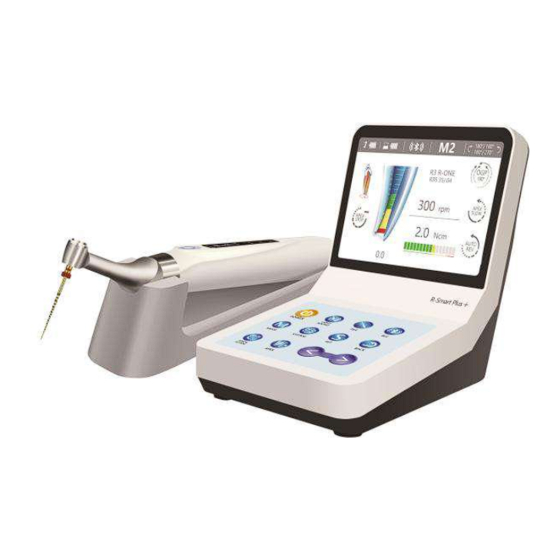
Page 15: Parts Identification And Display Screens
4 Parts Identification and Display Screens 4.1 Parts Identification 4.2 Components and Accessories Contra Angle Silicone sleeve Battery Power adapter lip hook Probe File Clip Measuring wire Oil filling nozzle 4.3 Operation Fig. 4.3.1 LCD screen Fig. 4.3.2 Operation panel https://stomshop.pro/... -
Page 16: Operation
5 Operation 5.1 Before Use 5.1.1 Product Installation a)Installation of Contra Angle Align any locating pin of the contra-angle with the positioning slot on the motor handpiece and push the contra-angle horizontally. The locating pins on the contra-angle are inserted into those positioning holes on the motor handpiece. -
Page 17: Calibration
wire. Connect the lip hook to the socket (white) on the measuring wire. d ) Battery Charging The device can be charged in two ways: Host charging: Connect the power adapter to the Type-C charging port of the main unit to charge. During the charging process, the screen of the main unit will display the charging status, as shown in Figure 1. -
Page 18: In Use
5. After the calibration is completed, the LCD display of the main unit will prompt completion, as shown in Figure 2, and return to the initial working interface. Note: Calibrate the instrument at the following times: •Right after purchase. •Whenever the contra angle has been replaced. •When using a contra angle other than the one that has been calibrated. - Page 19 It can switch the parameter setting by pressing Mode key.Parameter categories are as follows: Parameter category Parameter setting Five operation modes used for Endo Motor for preparation and apex locating: Operation Mode EAL、CW、CCW、REC、ATC CW、CCW:100~1000 rpm Speed REC、 ATC:100~500 rpm CW:0.4~5.0 N.cm CCW:0.4~5.0 N.cm Torque REC:2.0~5.0 N.cm...
- Page 20 torque value, the rotation mode of the file will automatically change to the reverse mode. When the load is lower than the preset torque value again, the file rotation mode returns to the forward rotation mode. Note: 1. The automatic reverse rotation protection function is only applicable to the forward rotation mode.
- Page 21 pressing the Bluetooth key to confirm, you can select different devices to connect. Once the main unit is successfully connected to the MAC address of a certain handpiece, the corresponding MAC address will turn into a green state of successful connection. At the same time, the Bluetooth indicator on the handpiece will be solid blue.
- Page 22 The canal length indicator bar will show on the screen.Setting parameters of automatic functions as needed, such as Apical Action, Auto Start, etc. When the user selects M0-M17, if the operation mode is set to the operation mode of the root canal preparation stage (CW/CCW/REC (including OGP)/ATC (including OTR)), then connecting the root measuring wire and the lip hook with the corner of the patient's mouth and mouth, and set the reference point position of the root apex.
- Page 23 D) Set the important parameters of the preparation function while measuring Important parameters for preparation while measuring include: apical movement, auto-start, auto-stop, apical reference point flash bar position, and apical deceleration. The above settings allow the device to optimally perform both root canal preparation and root apex positioning.
- Page 24 Automatic stop This function is only effective in the mode of endo preparation accompany with apex locating. After the automatic stop function is turned on, the root canal file is pulled out of the root canal, and the motor rotation stops automatically. Root apex positioning reference point selection: Click the root measurement button on the main unit, and the doctor reference...
- Page 25 steps, the operator manually presses the power button on the handpiece, and the second-stage operation of the equipment will switch back to the preset working mode under normal conditions. Pressing the power button on the handpiece again will stop the handpiece from working. The first-stage process: the file reciprocates over the steps with equal forward and reverse rotation angles, and the default angle of the system is 90°.
- Page 26 rotation of the file at low speed of CW and CCW. This mode is only valid in the case of expanding while measuring. When switching to M9 mode, the interface will remind the operator to confirm that the measuring wire and the lip hook are connected to ensure that the equipment is working under the condition of measuring and expanding.
- Page 27 Root Canals not suitable for Electric Measurement https://stomshop.pro/...
-
Page 28: Preset File-Parameter Mode
Stop Working Status When the root canal motor is rotating, in order to stop the motor rotation, the root canal motor can be stopped by pressing the main switch of handpiece. You can also find the automatic stop function setting interface by switching the function selection key,when the device run at the status of endo preparation accompany with apex locating. -
Page 29: After Use
Press the System key in sequence to alternately display different advanced setting function interfaces: Advanced setting Function description function The software version number is displayed on the advanced settings page: Software Version R-Smart Plus+-X0.Y0.Z0.A01 Please contact the manufacturer for a version upgrade. Set left and right habitual hands, When switching to the left-handed habit, the display interface Dominant Hand... -
Page 30: Maintenance
for both the motor handpiece end and the battery charger. •Put the motor handpiece into the battery charger and check that the Charge LED lights up. Check that the battery does not seem to be losing its charge too quickly. •Check that the connection end of the motor handpiece is not damaged of dirty. - Page 31 Cleaning The cleaning should be performed no later than 24 hours after the operation. The cleaning can be divided into automated cleaning and manual cleaning. Automated cleaning is preferred if conditions permit. Disconnect the contra angle from the motor hand piece.Clean off the cutting, Debris with running water and a soft brush and then wipe off the water.
- Page 32 Stand the contra angle Screw the nozzle onto the Cover the contra angle up on a piece of gauze to spray can.Then insert it into with a piece of gauze or allow excess the connection end of the other suitable cloth. spray to drain out.
-
Page 33: Troubleshooting
Ⅱ Disinfection Wipe the components of motor handpiece, battery charger base, AC adapter, measuring wire with a piece of gauze that has been dampened with Ethanol for disinfection(Ethanol 70 to 80 vol%)and wrung out thoroughly. The method of disinfection Ⅱ is only available for motor handpiece, battery charger base, AC adapter, measuring wire, etc. -
Page 34: Safety Precautions
Failure Possible cause Solutions The load of the file in the root 1 Increase the setting torque. canal is too large. 2 Enlarge the root canal The motor 2 The root canal is too narrow. appropriately. handpiece reverses 3 The size of file is too thick. 3 Replace with the small size frequently. - Page 35 7.7 Any modification will render the guarantee void and may cause harm to the patient. 7.8 The guarantee is valid for normal usage conditions. Any disassembly will render the guarantee void, the professionals of RebornEndo company will offer the repair service during guarantee period. 7.9 Only the original adapter and lithium battery could be used to this machine.
Need help?
Do you have a question about the R-Smart Plus+ and is the answer not in the manual?
Questions and answers