
Summary of Contents for Velivi KMYL100-2
- Page 1 INSTRUCTION MANUAL MODEL: KMYL 100-2 / KMYL150-2 Support Phone: (213)432-5433 Suppo rt Email : Velivi@163.com...
-
Page 2: Table Of Contents
TABLE OF CONTENTS IMPORTANT SAFETY INSTRUCTIONS PRODUCT DIAGRAM INSTALLATION INSTRUCTIONS Before Using Your Beverage cooler To Install Stainless Steel Handle To Install Your Beverage cooler OPERATION INSTRUCTIONS Controls Storage Door Lock Beech Shelves CARE & MAINTENANCE Cleaning Your Beverage cooler Power Failure Vacation Time Moving Your Beverage cooler... -
Page 3: Important Safety Instructions
IMPORTANT SAFETY INSTRUCTIONS Your safety and the safety of others are very important. This Beverage cooler complies with the applicable safety requirements and is safe for daily use. However, basic safety precautions should always be followed when using an electrical appliance, to reduce the risk of fire, electric shock, and personal injury. - Page 4 Do not use this wine cooler for other than its intended purpose. For indoor, household use only. Move this wine cooler by 2 people. Failure to do so can result in injury. Place this wine cooler in a well-ventilated area with temperatures above 15°C (60°F) and below 32°C (90°F).
-
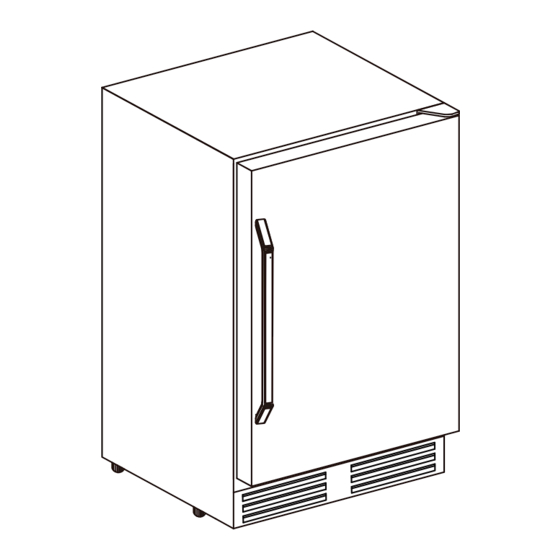
Page 5: Product Diagram
PRODUCT DIAGRAM Control Panel Top Hinge Beverage Shelves Glass Door with Handle Exhaust Window Safety Child Lock Leveling Legs... -
Page 6: Installation Instructions
INSTALLATION INSTRUCTIONS Before Using Your Beverage cooler Remove the exterior and interior packaging. Check to be sure you have all of the following parts: 3 wired Shelves 2 Keys Stainless Steel Handle Instruction Manual 2 Extra Screws for Installing Handle ... -
Page 7: To Install Your Beverage Cooler
Illustration #1 Illustration #2 1 Gasket 2 Screw 3 Screw Driver 4 Handle To Install Your Beverage cooler This Beverage cooler is designed for free standing or built-in (fully recessed) installation. Place your Beverage cooler on a solid and level floor that is strong enough to support it when it is fully loaded. - Page 8 fluctuate, and the temperature range of 3ºC-18ºC (37ºF-64ºF) may not be reached. Connect the Beverage cooler to an exclusive, properly grounded, standard electrical supply (115 V AC only, 60 Hz), in accordance with the National Electrical Code and local codes and ordinances.
-
Page 9: Operation Instructions
OPERATION INSTRUCTIONS Controls After plugging the Beverage cooler into a wall outlet, the cooler would turn on automatically and the LCD screen would show the temperature inside of the cooler. After setting your desired serving temperature, allow the cooler to cool down for 3 to 4 hours before placing wine bottles in the Beverage cooler. -
Page 10: Storage
Storage Many cans and bottles may differ in size and dimensions. As such the actual number of bottles you may be able to store may vary.. Door Lock This cooler can be secured with a lock and key. The keys are located inside the plastic bag that contains the Instruction Manual. -
Page 11: Care & Maintenance
CARE & MAINTENANCE Cleaning Your Beverage cooler IMPORTANT: Always unplug the cooler before cleaning or performing maintenance. Never use harsh cleansers or scouring pads to clean any part of the cooler. Turn off the power, unplug the Beverage cooler, and remove all items including shelves. ... -
Page 12: Moving Your Beverage Cooler
Moving Your Beverage cooler Remove all items (bottles) from the cooler; Securely tape down any loose items, such as shelves, inside the cooler. Turn the adjustable leg up to the base to avoid damage. Tape the door shut. ... -
Page 13: Troubleshooting Guide
TROUBLESHOOTING GUIDE PROBLEM POSSIBLE CAUSE SOLUTION The Beverage cooler may not be Ensure the Beverage cooler has been plugged in, or plug may be loose. plugged in properly. The Beverage cooler does not The Beverage cooler is turned off. Press to turn on the cooler. - Page 14 PROBLEM POSSIBLE CAUSE SOLUTION Not plugged in. Plug the cooler in. The circuit breaker tripped The light does not Check the breaker and/or fuses. or a blown fuse. work. The light button is “OFF”. Press to turn the light ON. The cooler is not leveled.
- Page 15 4. Products damaged due to force majeure, such as fire, flood, lightening, etc. Warranty Claim Procedure can always contact Velieta’s customer service through email at Velivi@163.com. 2. Velieta’s customer service will guide you through the whole service procedure regarding any product issue or problem you have encountered.
Need help?
Do you have a question about the KMYL100-2 and is the answer not in the manual?
Questions and answers