Table of Contents
Advertisement
Quick Links
Advertisement
Table of Contents

Summary of Contents for Werner PROPLUS Base Pack 1
- Page 1 Mobile Aluminium Tower Instruction Manual www.wernerco.co.uk EN 1004-2 en...
- Page 2 TOWER www.wernerco.co.uk...
-
Page 3: Table Of Contents
TOWER Contents 1 Safety First Introduction Tower Designation 2 Building the Tower Pre-Assembly Checks Component Diagram Quantity Schedule Stabilisers Assembly 2.5.1 Assembly General: Steps 2.5.2 Assembly for 0.65m Platform Height: Steps 2.5.3 Assembly for 1.65m Platform Height: Steps 2.5.4 Assembly for 3.4m Platform Height: Steps Dismantling 3 Using the Tower Safety Checklist... -
Page 4: Safety First
Ideal for maintenance and installation work or short-term access, the highly versatile towers provide a strong working platform for a variety of heights. Verification and assessment documentation is held by Werner UK Sales & Distribution Ltd. Compliances... -
Page 5: Tower Designation
Clear Height Class (H1 = 1.85m, H2 = 1.90m) *UDL = Uniformly distributed load 1.2 Maintenance - Storage – Transport • The Werner mobile tower system is robust and requires little maintenance. • All components and their parts should be regularly inspected to identify damage, particularly to joints. -
Page 6: Building The Tower
• Check the surface is level to within 0.6°. If it is larger than 0.6°, the tower must not be used. • Only components specified in this manual shall be used with Werner towers. Check all required components are onsite and in a suitable working condition. - Page 7 TOWER 2. Building The Tower • Check this manual is available and its contents familiar to all those involved. • If assembling outdoors; check the forecast windspeed. • The assembled tower is certified to wind forces equating to 27mph, but handling components under those conditions would be hazardous.
-
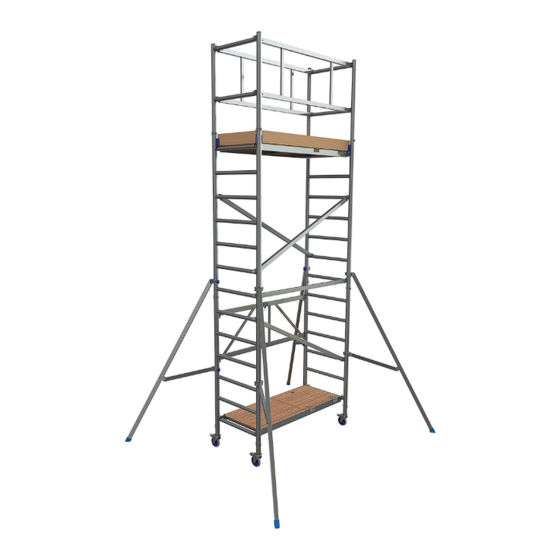
Page 8: Component Diagram
TOWER 2. Building The Tower 2.2 Component Diagram Guardrail 2 Rung Guardrail Frame End Toe board Side Toe board Diagonal Brace 7 Rung Frame Horizontal Brace 6 Rung Frame Folding Unit Trapdoor Platform Stabiliser Castor www.wernerco.co.uk... -
Page 9: Quantity Schedule
TOWER 2. Building The Tower 2.3 Quantity Schedule Internal or External Use Working Height (m) 2.65 3.65 Pack Description Platform Height (m) 0.65 1.65 Base Pack 1 Extension Pack 2 Extension Pack 3 Pack Contents Pack Pack Pack description Base Pack 1 Extension 2 Extension 3 Pack Code... -
Page 10: Assembly
TOWER 2. Building The Tower 2.5 Assembly This tower structure must be assembled, and components oriented, in accordance with this instruction manual. Deviation from this instruction manual is not permitted. THIS TOWER MUST NOT BE USED AS AN ANCHOR POINT FOR PERSONAL FALL PROTECTION EQUIPMENT. - Page 11 TOWER 2. Building The Tower 2.5.1 Assembly General Remove the end caps from the bottom of two 6 rung end frames. Insert the castor into one of the end frames and insert the locking pin to secure the castor in place as shown.
- Page 12 TOWER 2. Building The Tower 2.5.1 Assembly General Use a 17mm spanner to remove the nuts from the end frames in upright position. Fit the folding unit onto the bolts and re-tighten the nuts. Unfold the folding frame assembly so that it’s self-supporting.
- Page 13 TOWER 2. Building The Tower 2.5.2 Assembly for 0.65m Platform Height Fit the platform on the 2 rung of the folding frame. Ensure the wind-locks are engaged. Do not climb onto the platform until all stabilisers and guardrails are in place. Fit four stabilisers as shown (see notes on page 9).
- Page 14 TOWER 2. Building The Tower 2.5.2 Assembly for 0.65m Platform Height Fit a guardrail on the 6 rung of the folding frame. Ensure guardrail is fitted correctly. Fit two end toe board with holders between the frame above the platform as shown. www.wernerco.co.uk...
- Page 15 TOWER 2. Building The Tower 2.5.2 Assembly for 0.65m Platform Height Fit two side toe boards into holders as shown. The 0.65m tower is now complete. www.wernerco.co.uk...
- Page 16 TOWER 2. Building The Tower 2.5.3 Assembly for 1.65m Platform Height Remove the end caps from the top of the folding frame and from two 2 rung guardrail frames. Fit four frame connection tubes on top of the folding frame using the fixings as shown with the spanner supplied.
- Page 17 TOWER 2. Building The Tower 2.5.3 Assembly for 1.65m Platform Height Fit the two guardrail frames. Ensure locking pins on frame members are in locked position before use. Fit four stabilisers as shown (see notes on page 9). Fit the platform on the 6 rung of the folding frame.
- Page 18 TOWER 2. Building The Tower 2.5.3 Assembly for 1.65m Platform Height Climb up the inside of the tower and from the trapdoor position, fit both guardrails on the 8th rung (on both sides). Ensure guardrails are fitted correctly. Fit two end toe board with holders between the frame above the platform as shown.
-
Page 19: Remove The End Caps From The Top Of The Folding
TOWER 2. Building The Tower 2.5.4 Assembly for 3.4m Platform Height Remove the end caps from the top of the folding frame and from two 2 rung guardrail frames. Fit four frame connection tubes on top of the folding frame using the fixings as shown with the spanner supplied. - Page 20 TOWER 2. Building The Tower 2.5.4 Assembly for 3.4m Platform Height Fit two 9 rung frame assemblies onto the top of the folding frame. Fit a horizontal brace on the 7 rung. Ensure brace is fitted correctly. Fit the platform on the 6 rung of the folding frame.
- Page 21 TOWER 2. Building The Tower 2.5.4 Assembly for 3.4m Platform Height Fit four stabilisers as shown (see notes on page 9). Climb up the inside of the tower and from the trapdoor position, fit two diagonal braces on the on the 8 and 11 rungs.
- Page 22 TOWER 2. Building The Tower 2.5.4 Assembly for 3.4m Platform Height Fit the 2 platform on the 13 rung. From the trapdoor position, disassemble both guardrails from its original position to the ground. Reposition the 1 platform from its original position to the 1 rung of the folding frame.
- Page 23 TOWER 2. Building The Tower 2.5.4 Assembly for 3.4m Platform Height Fit a diagonal brace on the 3 and 6 rung. From the trapdoor position, fit two guardrails on the 15 rung (on both sides). www.wernerco.co.uk...
- Page 24 TOWER 2. Building The Tower 2. Building The Tower 2.5.4 Assembly for 3.4m Platform Height 2.5.4 Assembly for 3.4m Platform Height Fit two end toe board with holders between the frame above the platform as shown. Fit two side toe boards into holders as shown. The 3.4m tower is now complete.
-
Page 25: Dismantling
TOWER 2. Building The Tower 2.6 Dismantling To dismantle the tower, reverse the assembly procedure. www.wernerco.co.uk... -
Page 26: Using The Tower
TOWER 3. Using The Tower 3.1 Safety Checklist This inspection must be carried out before initial use, after moving the tower, if any environmental condition change that may affect the tower and at regular intervals determined by local regulations. Local regulations may also specify other information to be supplied to the user or attached to the structure. -
Page 27: Pre-Use Checklist
TOWER 3. Using The Tower 3.2 Pre-Use Checklist Tower upright and level to within 0.6° Castor brakes locked and all wheels in ground contact All interlock clips engaged Braces/Guardrails correctly positioned All claws latched All platform wind-locks engaged Correct stabiliser size fitted and positioned Toe boards fitted to working platform Instruction manual available to user No environment changes affecting safe use have occurred or... -
Page 28: Use
TOWER 3. Using The Tower 3.3 Use • This tower must not be used as an anchor point for personal fall arrest equipment. • The tower must only be climbed on the inside, using the access method specified. • This tower provides a work platform. It must not be used to access other structures. - Page 29 TOWER 3. Using The Tower • Beware of high winds. This tower has been assessed as a freestanding structure for wind loads equating to 27mph (43kph, 12m/s). If greater windspeeds are forecast the tower must be moved to a sheltered location or dismantled while it is still safe to do so.
-
Page 30: Movement Of The Assembled Prefabricated Tower Scaffold
TOWER 3. Using The Tower 3.4 Movement Of The Assembled Prefabricated Tower Scaffold MOVING A FULLY ASSEMBLED TOWER CAN BE EXTREMELY HAZARDOUS. If there is any doubt about the safety of the move, the tower must be dismantled and reassembled in the new location. This tower is not designed to be lifted or suspended. - Page 31 TOWER 3. Using The Tower During • The tower must be moved only by manual effort, pushing at the base of the tower. • Constant attention must be given to the position of the castors, stabiliser feet and the top of the tower. •...
- Page 32 For further information and support for the Werner product please contact: Werner UK Sales & Distribution Ltd. Blackwater Trading Estate, The Causeway, Maldon, Essex, CM9 4LJ, United Kingdom WernerCo Hungary Kft. 6000 Kecskemét, Szt. Istvan Krt. 19. +44 (0)1621 745900 uk.customercare@wernerco.com...
Need help?
Do you have a question about the PROPLUS Base Pack 1 and is the answer not in the manual?
Questions and answers