Table of Contents
Advertisement
Advertisement
Table of Contents

Related Manuals for VistaQuest HS-500X

Summary of Contents for VistaQuest HS-500X
- Page 1 Portable Scanner HS-500X User’s Manual...
-
Page 2: Table Of Contents
Table of Contents 1. Precaution…………………………………………….…2 2. Preparation……………………………………………..5 Standard Accessories……………………………5 Part Names & Functions………………………..6 3. key features…………………….….………..…….……7 4. Status Icons Explanations……….…….………….…..8 5. Use the scanner……………..……….………………..9 Install battery……………………….…..…………9 Insert microSD memory card…….……………10 Set system Date & Time……………….….…...11 Format microSD memory card…..……….……12 Set resolution……………………………………12 Set scan mode…………………..…..………….12 How to scan……………….……..….…..………13 White Balance Calibration…………….…..…...13... -
Page 3: Precaution
Welcome Thank you for the purchase of VistaQuest HS500 Portable Scanner. Please take a moment to read through this manual. Its contents will help you to get the best use of this smart scanner. 1. Precaution Before using Portable Scanner, please ensure that you read and understand the safety precautions described below. - Page 4 If you notice smoke or a strange odor coming from Portable Scanner, turn the power off immediately. Take Portable Scanner to the nearest authorized service center for repair. Never attempt to repair Portable Scanner on your own. • Portable Scanner may become slightly warm during use.
- Page 5 FCC Notice This equipment has been tested and found to comply with the limits for a Class B digital device, pursuant to Part 15 of the FCC Rules. These limits are designed to provide reasonable protection against harmful interference in a residential installation.
-
Page 6: Preparation
2. Preparation ■ Standard accessories Portable scanner Quick Guide Carry bag USB cable Battery Calibration card Cleaning cloth... -
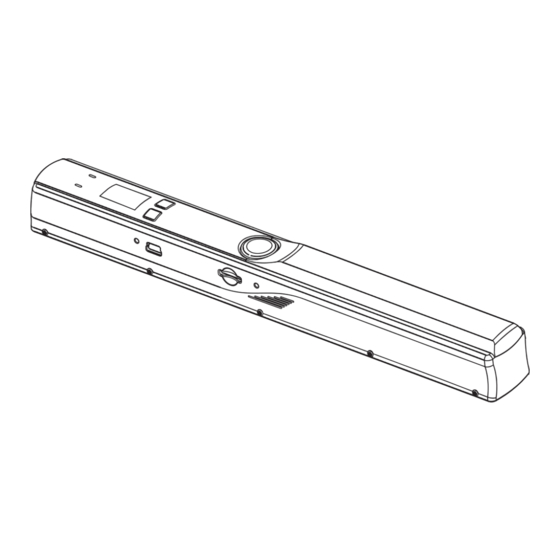
Page 7: Part Names & Functions
■ Parts Names & Functions Parts Functions Battery door For 2xAA alkaline batteries Power/Scan Power on/off: Press and hold this key for 2 seconds to turn power on or off. In power on mode, press this button start scan, press this button again to stop C/BW Select Color/Mono scan. -
Page 8: Key Features
3. Key Features Color/Monochrome (Mono) scan selection 600/300 dpi scan selection Direct save JPG file to microSD card Support microSD card up to 32GB Driver free to download for Windows XP SP2/Vista/7 and Mac OS 10.4 or above (direct plug-in, driver installation not required) -
Page 9: Status Icons Explanations
4. Status Icons Explanations Item Function Description SD card Photos will be stored in microSD card indicator Battery indicator Battery is full Empty battery Effect indicator Color or Mono Counting indicator Show qty of scanned files in microSD card Selected resolution High: 600dpi/Low: 300dpi... -
Page 10: Use The Scanner
5. Use the scanner 5.1 Install battery 1). Open the battery door by sliding it outward. 2). Insert 2x AA batteries into the battery compartment according to the polarities shown in the compartment. 3). Turn on the scanner by pressing the [POWER]/Scan button for 2 seconds. -
Page 11: Insert Microsd Memory Card
5.2 Insert a microSD memory card (not included) You must insert a microSD card (not supplied) to record and store your pictures. Inserting the microSD memory card: 1) Turn off the scanner 2) Insert the microSD card into the microSD card slot;... -
Page 12: Set System Date & Time
5.3 Set system Date & Time Press Time Set button with the tip of a ball pen, then the Date & Time setting interface shows. Sequence How to set Meaning Press C/BW or DPI to select a target year Year Then press to enter into Month setting. -
Page 13: Format Microsd Memory Card
5.4 Format microSD memory card 1). Insert a new microSD card into the scanner, and then turn on the scanner. 2). Press the format button with the tip of a ball pen into format mode. “F” shows on the LCD. 3). -
Page 14: How To Scan
5.7 How to scan 1). Hold the document firmly by one hand. 2). Place the scanner on the start scanning position. 3). Hold the scanner tightly and press the scan button once. 4). Slide the scanner downward slowly and keep your hand stable to get the best quality picture. -
Page 15: Led Light Indications
6. LED light indications “GREEN” SCAN LED ON Scan in process “GREEN” SCAN LED OFF Standby/Scan is complete “RED” ERROR LED ON Scanning too fast. May cause scanning distortion Restart and scan again. “RED” ERROR LED OFF No error in scanning Continue scanning process. -
Page 16: Connect To Computer
7. Connect to Computer You may also connect your scanner to your computer and view pictures on the computer monitor. -
Page 17: Specifications
8. Specifications Image sensor A4 Color Contact Image Sensor Number of sensor 5138 dots ( 1 -5104 dots available) Resolution Low resolution: 300x300 dpi (default) High resolution: 600x600 dpi Maximum scanning Color High resolution 13 seconds speed for A4 size Mono High resolution 6 seconds document... -
Page 18: Troubleshooting
10. Troubleshooting Problems Cause Solution Low battery power Replace or install the Cannot turn on the Battery not battery correctly scanner inserted properly MicroSD card has Install microSD card not been Installed Download the 2. Memory is full The pictures from the Pictures cannot microSD card has not scanner to the... -
Page 19: Nimodoc Lite
11. NimoDoc Lite 11.1 Install NimoDoc Lite Click NimoDoc Lite.exe and then the installation wizard will walk you through the whole installation process. 11.2 Start NimoDoc Lite Start → Programes → NimoDoc Lite → NimoDoc Lite 11.3 Main Interface Search input box Shortcut icon Menu bar Preview area... -
Page 20: Introductions On Software Functions
11.4 Introductions on Software Functions 11.4.1 Set Work Space Right click on a directory from work space, and enter into folder management. Press Add, choose a directory, then the directory will be set as a work space: Then, files inputted will be stored at the work space. - Page 21 11.4.2 Create New NSD File NSD file is a folder into which you can put source files. Click New NSD File icon, and then a new folder is created in the preview area. You can rename the new folder by right clicking its icon.
- Page 22 11.4.3 Input Pictures at Main Interface Click Input icon: You can choose to input either a whole folder that contains pictures or a single picture. A new folder will then be generated to contain the pictures inputted.
- Page 23 11.4.4 Output files from Main Interface Choose a folder you want to output by clicking it, and then click Output icon: Then you can choose the target type you want to output the pictures.
- Page 24 11.4.5 Editing Interface Double click a folder at the main interface, and then you can enter into editing interface, where you can do input and output pictures, recognition and picture edit. Picture list area Recognized words area Picture edit tools Picture preview area...
- Page 25 11.4.6 Input Pictures at Editing Interface Click Input icon: You can choose to input either a whole folder that contains pictures or a single picture. Inputted pictures will then list on the Picture list area on that left.
- Page 26 11.4.7 Recognition Click recognition icon: Choose the target pictures you need to do recognition. Then you must choose the language compatible to that on picture. Click ok, and then the recognized txt will display in the Recognized words area.
- Page 27 11.4.8 Output Files from Editing Interface Click Output icon: Choose the target format you need to output the pictures. Target formats can be either of the following: 1) Output pictures to PDF 2) Output pictures to word document 3) Output pictures to excel document 4) Output pictures to BMP format 5) Output pictures to JPG format 6) Output pictures to TIF format...
- Page 28 11.4.9 View Mode Click View Mode icon: You can choose any of the five View modes: 1) Normal mode 2) Photo mode 3) List mode 4) Image mode 5) Text edit mode...
- Page 29 11.4.10 Picture Edit Tools Select Color Negative Mirror Rotate Threshold Gray Erase Black edge Erase red eye Quick notes Font...
- Page 30 Eraser Pencil Filler Line Ellipse Rectangle...
-
Page 31: System Requirements On Nimodoc Lite
11.4.11 Email Email function enables you to send files by email. 11.4.12 Search By inputting key words, search function enables you to locate history files easily and efficiently. 11.5 System Requirements on NimoDoc Lite Operating system Windows XP SP2/Vista/7 Pentium 11 or above 64MB Interface USB port... - Page 32 © 2011 VistaQuest Corporation . www.vistaquestcorp.com The VistaQuest Corporation is proud that you have chosen its product and hopes you will enjoy sharing “a clearer vision“ of your memories and special moments captured with your new product with friends and family for many years.
Need help?
Do you have a question about the HS-500X and is the answer not in the manual?
Questions and answers