Table of Contents
Advertisement
Advertisement
Chapters
Table of Contents

Related Manuals for Huananzhi X79 DELUXE


Summary of Contents for Huananzhi X79 DELUXE
- Page 1 X79 DELUXE SZ HUANAN SANXIAN TECHNOLOGY CO.,LTD. WWW.HUANANZHI.COM User Manual...
-
Page 2: Table Of Contents
安全信息 目录 此包装中包含的组件有可能静电放电 (ESD) 损坏。 请遵守 以下注意事项, 以确保成功组装计算机 安全信息 ..............确保所有组件连接牢固。 若连接不紧可能会导致计算机 无法识别组件或无法开启 包装说明 ..............拿取主板时为防止静电损坏其配置, 请在拿取主板前通 过接触其它金属物体释放自身的静电 简介 ................ 拿起主板时请手持主板边缘, 避免触及主板的敏感组件 主板图解 在不安装主板时,请将主板放在静电屏蔽容器或防静电垫上 ..............在打开计算机前,确保计算机机箱内的主板或任何位置上 后置I/O面板 ............没有松动的螺丝或金属组件 在安装完成之前不要启动计算机。 否则可能会导致组件 安装与设置 ............永久性损坏以及伤害使用者 在任何安装步骤中,如果您需要帮助,请咨询专业的售后客 驱动程序的安装 ..........服人员 BIOS设置 安装或拆卸计算机任何组件之前,请先关闭电源,并将电源 ............ -
Page 3: 包装说明
简介 在电源供应器连接到电源插座之前,请确保您的插座提供 了电源供应器上额定相同的指示电压 特点介绍 将电源线摆放在不会被人踩到的地方, 不要在电源线上放 置任何物品 CPU: 英特尔® LGA2011处理器 英特尔® 志强™ 英特尔® LGA2011处理器 I7系列3/4代英特尔® 酷睿™ 发生下列任一状况时,请将本主板交由维修人员检查: RAM: 4*DIMM 最大支持128GB DDR3 有液体渗透至计算机内 1600/1333/1066MHZ 非ECC.ECC内存 主板暴露于水气当中 四通道存储器体系结构 主板不工作,或您依照使用指南后仍无法让本主板工作 实际内存数据速率取决于CPU类型和DRAM模块 主板曾掉落且损坏 I/O特效: 2 x SATA3.0(最大传输速度高达6GB/s) 4 x SATA2.0(最大传输速度高达3GB/s) 主板有明显的破损痕迹 6 x USB2.0接口 2 x USB3.0接口... -
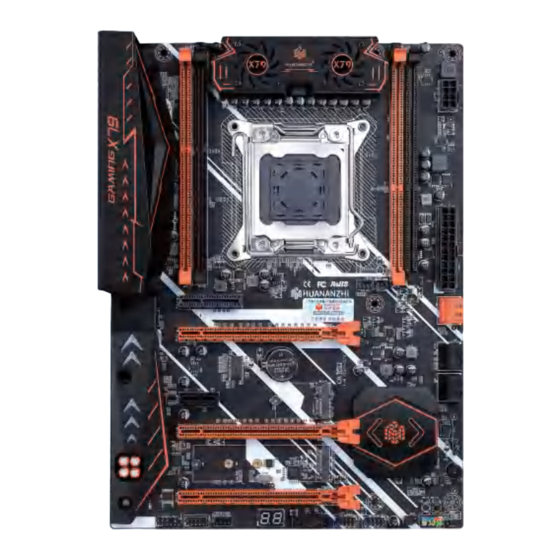
Page 4: 主板图解
主板图解 后置I/O面板 USB 2.0 音频接口 DDR3*2插槽 DDR3*2插槽 PS/2 PS/2鼠标 USB 2.0 USB 2.0 USB 3.0 8PIN CPU供电接口 USB2.0 光纤音频 图1-2 整体后置I/O面板展示 USB3.0 千兆网卡 (上) USB2.0 ( 下) 24PIN主板供电接口 连线/工作灯号 速度灯号 音频接口 3针风扇接口 状态 描述 状态 描述 PCI-E X4 4针风扇接口 关 网络未连接... -
Page 5: 安装与设置
安装与设置 PCI-E x4 PCI-E x16 注意 ! M.2 WIFI PCI-E x1 请仔细查看主板, 凡有表明 “1” 或是白色粗线标记的接 PCIE x16 脚均为1脚位置。 M.2 NVME PCI-E x4 8.8. 图2-4 PCI扩展插槽 图2-1 清除CMOS 跳线 8.8. 硬盘指示灯-电源正极 电源指示灯-电源正极 硬盘指示灯-电源负极 电源指示灯-电源负极 重新启动接口-重启开关 ATX电源开关-电源开关 重新启动接口-重启开关 ATX电源开关-电源开关 MIC+ 麦克风插口 Ground 接地 空... - Page 6 1. 将内存插槽两端的卡扣往外扳开, 内存条与插槽的凸出位置做对应, 确 定安装的方向 2. 将内存条对准插槽, 按下去 3. 让插槽两端的卡扣自动弹起来 8.8. 为了正确的将 CPU 放置在主板 图2-9 内存安装 中, LGA2011CPU 的表面有两个 对起点和一个金色三角指示。 金 色三角指示为 Pin1 图2-7 CPU安装 1.用螺丝刀拆除主机箱上的挡板和螺丝 从螺丝底座上移除螺丝 2.安装显卡时需掰一下卡槽的卡头 拧紧旋入长度M.2模块到M.2 3.把显卡插到显卡的卡槽中 接口距离孔的螺丝底座 30 ° 将您的M.2模块以30度角插 入到M.2接口 4.安装到位以后,卡头会自动归位 将螺丝放在您M.2模块的 5.用螺丝把显卡固定在机箱上 后缘缺口上并拧紧到螺丝 6.装好电源线即可 底座...
-
Page 7: 驱动程序的安装
选择:属性-更新驱动程序-不连接到Internet-手动安装 —找到对应的目录 选择 “下一步” 3.声卡驱动程序安装 SATA3.0 在进行此部分驱动程序安装之前, 请您先找到您主板上 的声卡芯片 (可参考本手册主位标有声卡芯片位置) 看看 是何种型号, 然后根据芯片型号选择对应的驱动程序进 8.8. SATA2.0 行安装 3.1 安装声卡驱动程序 (以 HD Audio系列安装为列) 图2 -11 SATA接口 运行 《驱动程序》 : /X79zhiAudio DRIVER/VISTA-WIN7-R267,XP 驱动程序的安装 选择WDW-267 选择 “下一步” 继续 1.驱动程序目录一览: 选择 “完成” , 系统将自动重启并完成安装 3.2 卸载声卡驱动程序 (以HD Audio为例) 驱动程序目录... -
Page 8: Bios设置
点击 “下一步” , 继续 菜单说明: 请注意设置菜单中各项内容, 如果菜单项左 边有一个三角形的指示符号, 表示选择了该项子菜单, 将会 点击 “下一步” , 继续 有一个子菜单弹出来。 点击 “完成” , 系统将会自动查找设备完成安装 1.主菜单功能 5.网卡驱动程序的安装 Main Advanced Chipset Boot Security Save Exit 运行 《驱动程序》 : X79zhiLAN DRIVER /setup.exe Main 点击 “下一步” , 继续 System Overview(系统信息) 选择... - Page 9 If you need any assistance in the process of installation, please contact our after-sales customer service or reach us on ..............BIOS Settings HUANANZHI official E-mail:bussiness@huananzhi.com for professional technical support. Prior to installation or disassembly, please switch off the power and pull the power cable from the socket.
-
Page 10: Packing
Ethernet: 1 x Realtek PCle Gigabit LAN possible. Expansion slot: 2 x PCIe 3.0 x16 1 x PCIe 2.0x4 1.1*HUANANZHI X79 Deluxe V7.1Motherboard 1 x PCIe 3.0x4 2.2*SATA Data Cable 1 x PCIe x1 1 x M.2 NVME PCIe 3.0X4 (key M)2242/2260/2280 3.1*I/O Shield Back Plat... -
Page 11: Motherboard Diagram
HDD LED Front speaker output JUSB2.0 JAUDI 4Pin Fan Interface Rear speaker output Center/Subwoofer output POWER SW POWER LED Microphone input 1-1 X79 Deluxe V7.1 Motherboard Illustration Optical Audio interface 1-4 Audio Port Configuration 05 Motherboard Diagram Rear I/O Panel 06... -
Page 12: Installation And Settings
Installation And Settings PCI-E x4 NOTICE ! PCI-E x16 please check the motherboard where all pins marked with M.2 WIFI PCI-E x1 number “1” or white bold line are position “1” . PCIE x16 M.2 NVME PCI-E x4 8.8. 2-4 PCI-E Slot 2-1 Clear CMOS Jumper CLR-CMOS 8.8. - Page 13 1.Pull the clips on both ends of the memory slot outward, and the memory strip corresponds to the protruding posi- tion of the slot to determine the direction of installation. 2.Align the memory module into the slot and press 3.Let the snaps on both ends of the slot automatically bounce 8.8.
-
Page 14: Drivers Installation
device and proceed with the installation below: Option: Propertyl - Update driverl - Not connect to Internet - Manually installation Find the corresponding directory Select "Next step" SATA3.0 3.Audio driver installation 8.8. Before this installation, please check the model of the audio SATA2.0 chip on the motherboard first(you may refer to this manual), Select the proper driver accordingly for installation. -
Page 15: Bios Settings
5.Driver installation of external video card Menu: please pay attention to every option in the settings Run"driver installer", take Setup.exe, menu. When there is a triangle shaped symbol on the left side of click on "next"- "yes” menu, it means that you choose this sub-menu,so a pop-up -"next"...
Need help?
Do you have a question about the X79 DELUXE and is the answer not in the manual?
Questions and answers