
Related Manuals for Aussie Traveller 51000100002000

Summary of Contents for Aussie Traveller 51000100002000
- Page 1 FRONT-LOADER WASHING MACHINE USER MANUAL READ CAREFULLY BEFORE USING RETAIN MANUAL FOR FUTURE REFERENCE More information https://www.caravansplus.com.au...
-
Page 2: Table Of Contents
CONTENTS PRODUCT INTRODUCTION ___________________________________________________ 2 Packing List ______________________________________________________________________________________ 2 Parts of the Washing Machine ______________________________________________________________________ 3 SAFETY PRECAUTIONS _____________________________________________________ 3 INSTALLING THE WASHING MACHINE __________________________________________ 5 Removing the Shipping Bolts _______________________________________________________________________ 5 Adjusting the Levelling Leg _________________________________________________________________________ 6 Fixing the bottom cover and guide-leg ______________________________________________________________ 7 Connecting the Water-In Hose______________________________________________________________________ 8 Connecting the hose drain _________________________________________________________________________ 9 INSTALLATION REQUIREMENTS ______________________________________________10... -
Page 3: Product Introduction
PRODUCT INTRODUCTION A compact but powerful and convenient washing machine that makes laundry easy, right in the comfort of your caravan. Aussie Traveller can cover your full washing machine requirements with the stylish 3kg front-loader washing machine. The floor-mounted washing machine features a large 3kg wash load capacity all while being able to fit under a bench. -
Page 4: Parts Of The Washing Machine
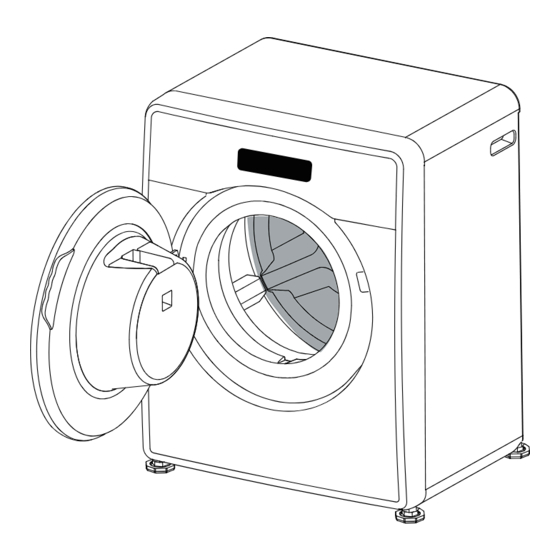
PRODUCT INTRODUCTION (cont.) PARTS OF THE WASHING MACHINE: ASSY COVER TOP CONTROL PANEL FRAME HANDLE HOUSING DRAWER POWER PLUG DOOR ASSEMBLY LEG ASSEMBLY SAFETY PRECAUTIONS Important Safety Symbols and Precautions. Please read this manual carefully before using this product. Please read the instructions carefully and preform all installations, maintenance and operation of this machine with caution and care. - Page 5 SAFETY PRECAUTIONS (cont.) RISK OF FIRE: • Do not wash or soak any clothing stained with gasoline or other flammable, and toxic solvent, for the clothing will release flammable substance that may cause fire or explosion. Wash the clothing manually first, and ensure that all potentially flammable liquid, solid and particle traces are removed before putting it into the washing machine.
-
Page 6: Installing The Washing Machine
SAFETY PRECAUTIONS (cont.) RISK OF ELECTROCUTION: • Please unplug the washing machine before performing maintenance, cleaning or repair. Repairs MUST only be carried out by qualified and experienced service personnel. Repairs made by unqualified and inexperienced personnel may lead to further damage to the washing machine and may result in personal injury. -
Page 7: Adjusting The Levelling Leg
INSTALLING THE WASHING MACHINE (cont.) NOTE: Packing materials can be dangerous to children; keep all packing materials well out of reach of children. This appliance can be used by children from 8 years and above and persons with reduced physical, sensory or mental capabilities or lack of experience and knowledge if they have been given supervision or instruction concerning use of the appliance in a safe way and understand the hazards involved. -
Page 8: Fixing The Bottom Cover And Guide-Leg
INSTALLING THE WASHING MACHINE (cont.) FIXING THE BOTTOM COVER AND GUIDE-LEG: 1. Lay the machine body on its side, place the bottom cover on the bottom. 2. Align one side of the cover bottom and insert it into the groove. 3. -
Page 9: Connecting The Water-In Hose
INSTALLING THE WASHING MACHINE (cont.) CONNECTING THE WATER-IN HOSE: • Tighten the nut firmly. • Do not twist, squash, modify or cut the hose. Water inlet Min. 10mm 3/4” • The new hose-sets supplied with the appliance are to be used and that old hose-sets should not be reused. -
Page 10: Connecting The Hose Drain
INSTALLING THE WASHING MACHINE (cont.) CONNECTING THE HOSE DRAIN: The end of the hose drain may be positioned in three ways: 1. In a floor drain directly: We recommend that you should use the hose drain attached to the appliance; it can be directly inserted into the floor drain with the width of the trough entry not less than 4cm. -
Page 11: Installation Requirements
INSTALLATION REQUIREMENTS POWER SUPPLY: • To avoid the unnecessary risk of fire, electric shock or personal injury, all electrical circuit and grounding must be set as per the relevant AS/NZS standards. It is the owner’s responsibility to provide proper maintenance on the electrical appliance. •... - Page 12 INSTALLATION REQUIREMENTS (cont.) GROUNDING: • The instructions for appliances incorporating a functional earth, states that the appliance incorporates an earth connection for functional purposes only. • The washing machine must be grounded. If the washing machine has a fault or cannot run normally, the current can be conducted to the ground, minimising the risk of electric shock.
-
Page 13: Control Panel And Program Description
CONTROL PANEL AND PROGRAM DESCRIPTION CONTROL PANEL: Control panel and program description to facilitate easy operation of the washing machine Power button Start/Pause Program button Turn on/off the washing Press this button to start/ Press this button to select the machine using this button. - Page 14 CONTROL PANEL AND PROGRAM DESCRIPTION (cont.) PROGRAMS: Cotton Quick Wash Soft Suitable for cotton washing or linen Suitable for washing slightly soiled Suitable for washing slightly soiled cloth, such as bed sheets, table cloths, laundry that is worn only once or needs cotton textiles, linen bed sheets, underwear, towels, shirts.
-
Page 15: Using Detergents And Additives
USING DETERGENTS & ADDITIVES Please ensure the cap-drawer is place at the correct position, and it cannot be taken down during wash. Cap-drawer Addition level of laundry liquid should not exceed MAX base line marked on the cap-drawer. Laundry powder should be added to the drum directly. -
Page 16: Maintenance
MAINTENANCE CLEANING THE WASHER DRUM: The drum auto clean program can remove the possibility of mould that may be present in the drum. PRECAUTIONS FOR USING DRUM CLEANING FUNCTION: 1. Turn on the water tap. 2. Press the Power button to start the washing machine. 3. -
Page 17: Cleaning The Water Supply Valve Filter
MAINTENANCE (cont.) CLEANING THE WATER SUPPLY VALVE FILTER You should clean the supply valve filter at least 3 to 4 times per year, or when you see ‘SF’ error message on the display. 1. Pull out the power plug and 2. -
Page 18: Cleaning The Washing Enclosure
MAINTENANCE (cont.) CLEANING THE ENCLOSURE: Clean the housing of washing machine regularly to keep it clean and sanitised. Unplug the washing Never spill water on Use a damp cloth to Never use synthetic machine before cleaning, the washing machine, clean the washing detergent, benzene otherwise electric shock otherwise short circuit... -
Page 19: Troubleshooting
TROUBLE SHOOTING PROBLEMS AND SOLUTIONS: PROBLEM SOLUTION Detergent remains in the • Check if the water pressure is sufficient when washing. detergent drawer after the • Check if the washing powder is damp and caking. washing machine is complete • Check if the washing machine is set on an uneven surface. -
Page 20: Error Messages Description
ERROR MESSAGE DESCRIPTIONS: ERROR CODE DESCRIPTION SOLUTION CODE • Check if the door is opened and make sure the door is closed firmly. • Check if the wiring harness of the computer board was Abnormal door lock accidentally disconnected. • Check if the plug wire of door switch is loose or has a poor contact. -
Page 21: Product Specifications
PRODUCT SPECIFICATIONS FRONT-LOADER WASHING MACHINE TYPE Full automatic washing machine RATED VOLTAGE & FREQUENCY 220V - 240V / 50Hz WASH MODE Drum-type SPIN MODE Centrifugal type WASH - 3kg RATED WASH & SPIN CAPACITY SPIN - 3kg RATED CONSUMED POWER 1300W TAP WATER PRESSURE (MPa) 0.05MPa - 0.8MPa... -
Page 22: Wiring Diagram
WIRING DIAGRAM 1300 663 868 | enquiries@aussietraveller.com.au | aussietraveller.com.au BRISBANE SHOWROOM: 11-15 Oasis Court, Clontarf QLD 4019 | MELBOURNE SHOWROOM: 235 Barry Road, Campbellfield VIC 3061 More information https://www.caravansplus.com.au... -
Page 23: Warranty Statement
final retail customer makes payment for the Product to the wholesale purchaser. 3. If the Product is purchased directly from Aussie Traveller for use by final retail customer and not to be on sold in any way, the Warranty will commence at the time of the original purchase. - Page 24 If such inspection and testing find no defect in the Product, the final retail customer must pay Aussie Traveller’s usual costs of service work and testing. The final retail customer must bear the cost of the transport of the Product to and from Aussie Traveller or the authorised repair agent, and all insurance of the Product.
Need help?
Do you have a question about the 51000100002000 and is the answer not in the manual?
Questions and answers